FaceTime calls are one method to quickly collaborate with your team members, colleagues, and even clients compared to video conferencing platforms.
I’ve worked remotely for over ten years and have utilized numerous audio, video, and screen recording tools to team up with team members and customers during that time.
Many people still prefer FaceTime over Zoom, Microsoft Teams, Google Meet, and Webex when recording or conducting a video. FaceTime remains the top choice for many users.
It’s the easiest method to connect with your colleagues or customers since every iPhone, iPad, Mac, or PC comes pre-installed with FaceTime.
Here are the steps you need to take in order to record a FaceTime session with sound effects on your iPhone/iPad, Mac, and even Android devices.
Tips to Record FaceTime with Sound on iOS Devices
If you own an iOS device, you are likely aware of Apple’s strong commitment to protecting users’ privacy.
Your iPhone and iPad come with the built-in video calling app – FaceTime, which you may use for audio and video calls – but I did neglect to mention the fact that there is no recording option.
So, how to record FaceTime with audio on an iPhone or iPad? The simple answer is – using the built-in iOS screen recorder. You’d be surprised to know that recording audio and video calls on iPhone or iPad is simpler.
To enable the Screen Recorder, simply tap the Screen Record button and then start recording.
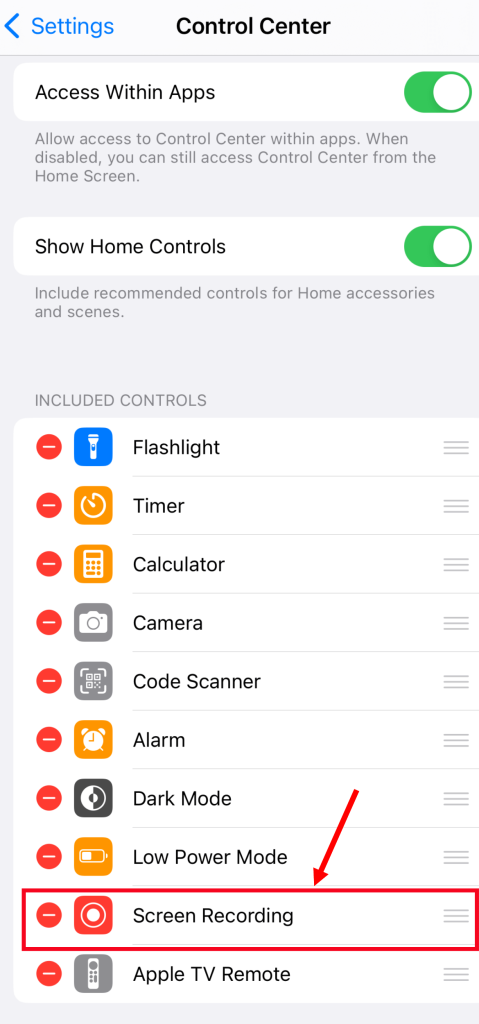
Step 1: To begin, open the ‘Settings‘ app on your iPhone. Next, find the option named ‘Control Center‘. Once inside the Control Center, choose the icon in the shape of a plus sign ‘+‘ that is adjacent to ‘Screen Recording‘.
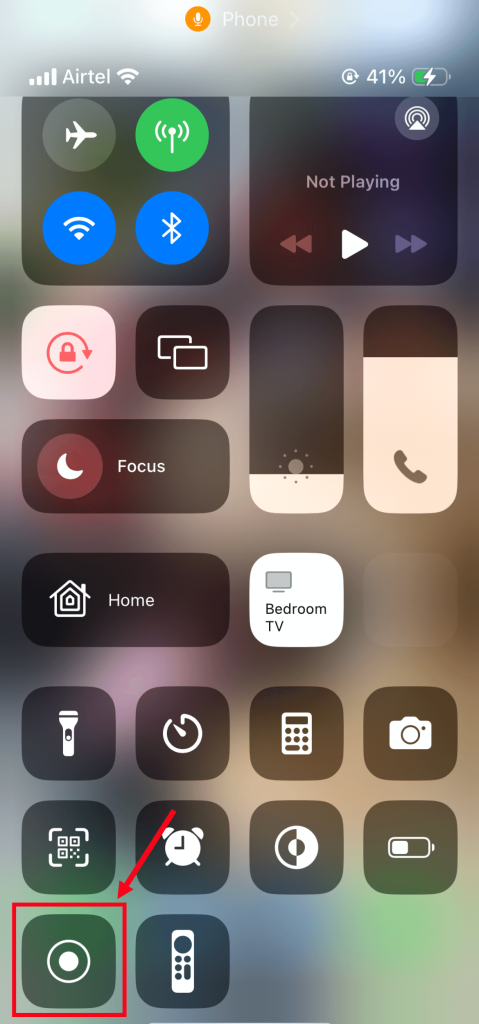
Step 2: To initiate recording on your iPhone, proceed to the second step, where you will need to swipe down from the top-right corner of the screen. Locate the screen-recording button, identifiable as a circle containing a white dot, and tap on it.
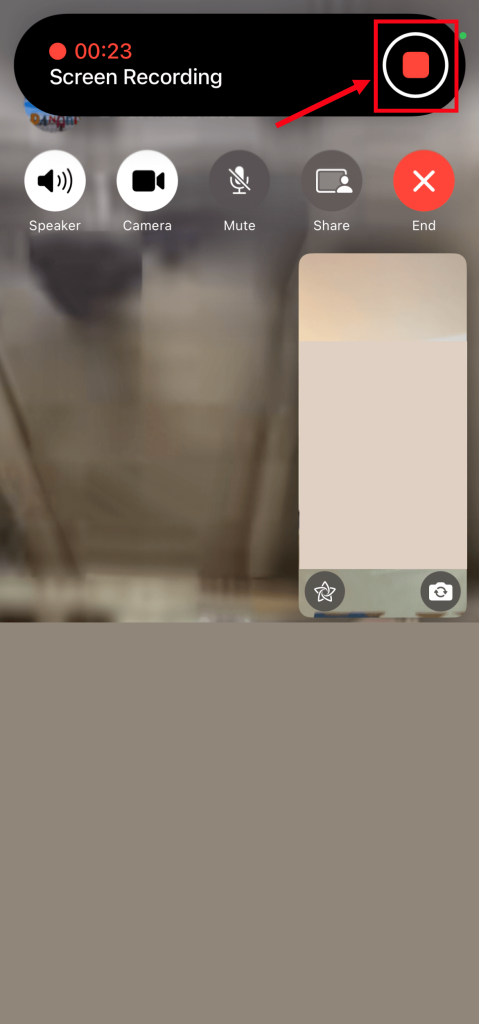
Step 3: To ensure sound recording on FaceTime, start by pressing and holding the screen-recording button, then enable the microphone before initiating the FaceTime call.
Step 4: Open the FaceTime app and begin recording with audio. Once finished, press the red ‘Stop‘ button at the top of the screen.
Steps to Record FaceTime with Audio on Macbook
FaceTime calls may be recorded and played on macOS with Mac pre-installed FaceTime. However, the question now is: Can you record a FaceTime call with audio? Yes, FaceTime calls may be recorded and saved for later reference on Mac.
Have a face-to-face conversation with anybody – that’s the whole idea behind it – but there are a few additional steps you’ll have to take in order to record FaceTime interactions on your Mac.
Here, we’ll walk you through the two finest techniques to swiftly record FaceTime and conserve the audio recording.
Method 1: Use the hotkey Command :- CMD + Shift + 5
The initial technique is rather straightforward — just a few keyboard shortcuts and you’re all set to commence recording on FaceTime.
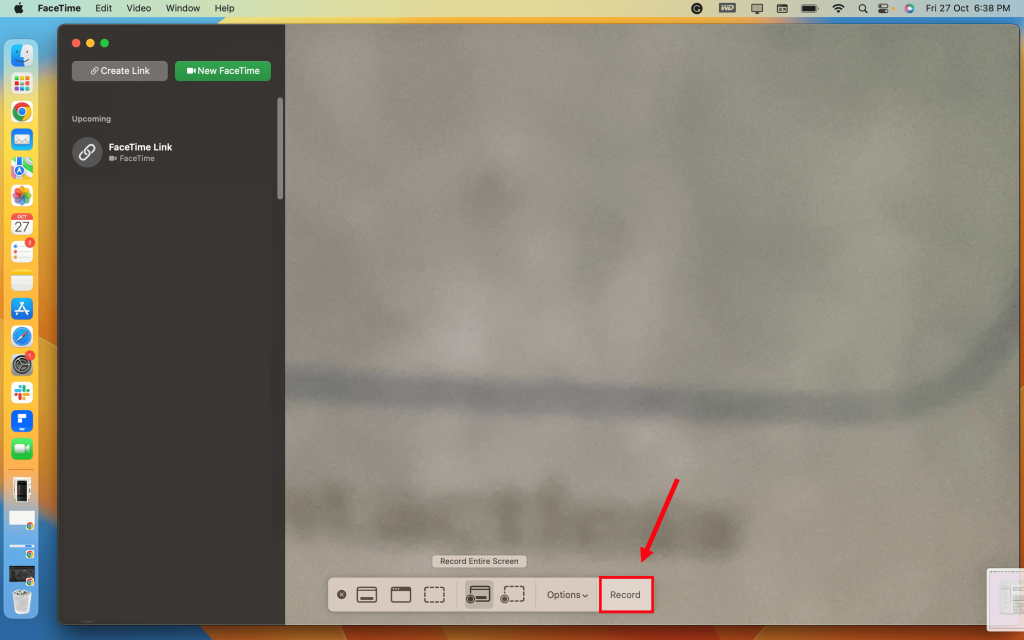
To initiate a FaceTime call on macOS, simply press Command + Shift + 5 on your computer’s keyboard. Doing so will launch the window for the screen recording utility.
You can locate a list of options in the top menu bar. Choose “Record Entire Screen” first and then select “FaceTime” from the drop-down menu.
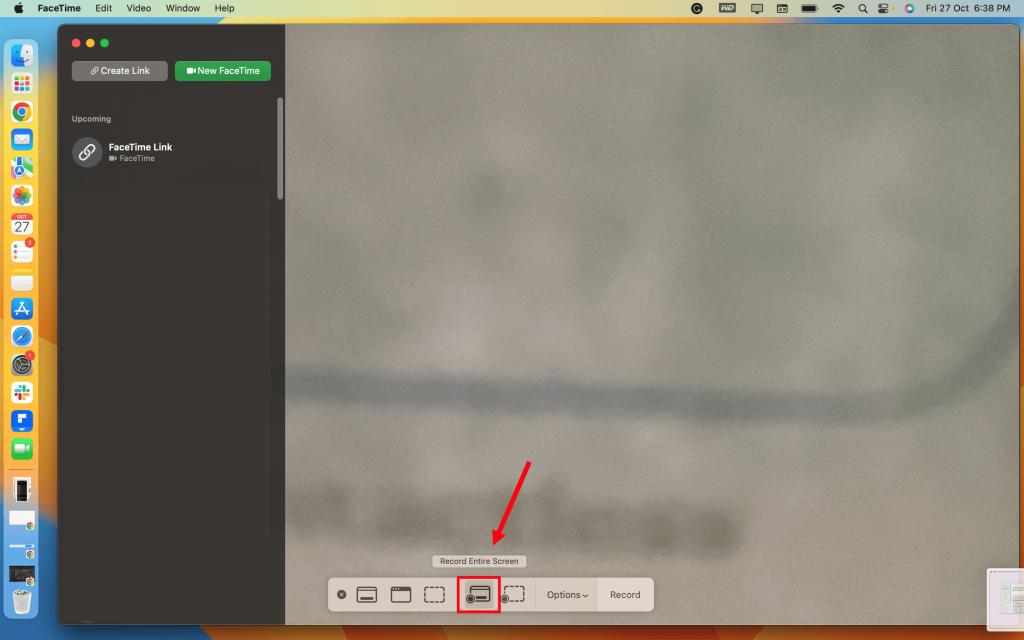
For the second step, click ‘Record’ to start the recording process and the built-in screen recorder will start recording your FaceTime call.
After finishing the call, use CMD + Control + Esc to reopen the screen recording utility window. Finally, click on the ‘Stop’ button.
FaceTime recordings are saved to your Mac’s Movies folder with a timestamp.
Method 2: Use Notta Screen Recording App for FREE
A screen recording app is primarily developed to record and share desktop material; However, it is also capable of recording FaceTime calls (it’s one of the best tools for doing so), and it is available in the free plan, which is considerably beneficial to many people.
While the majority of the programs allow you to record screens, Notta can do much more, making it a fantastic tool for recording and transcribing media items. It’s a complete tool for creating transcriptions and summaries from the conversation.
Here’s how to record FaceTime with audio using Notta.
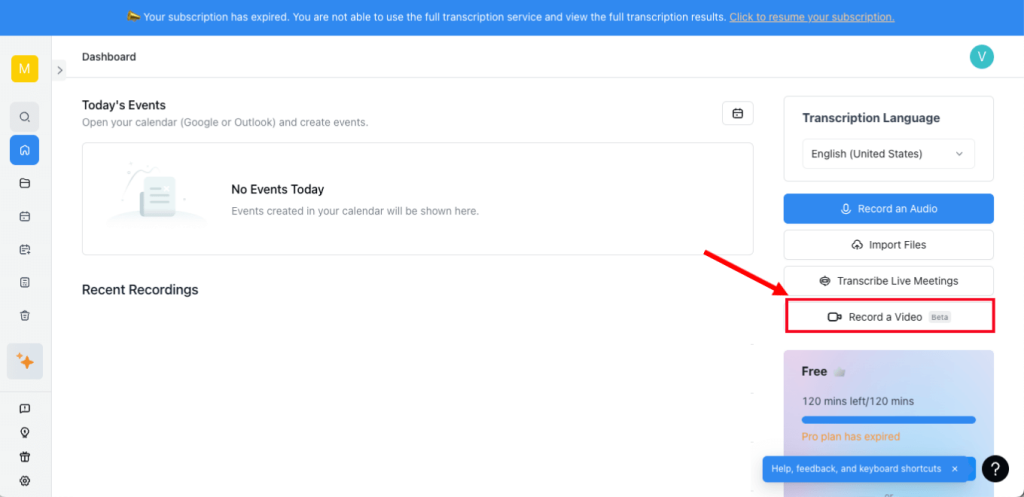
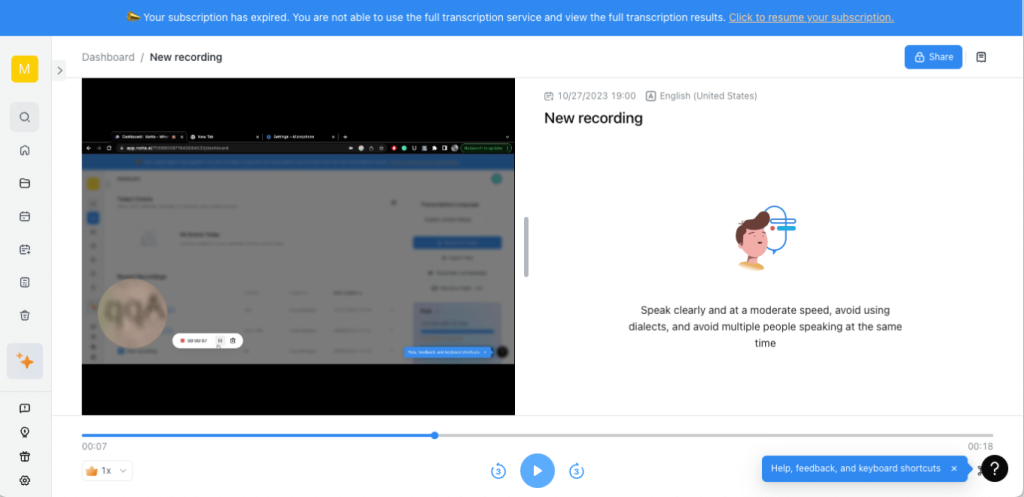
Step 1: Begin with FaceTime, sign up for a free trial of Notta. Upon entering the dashboard, select the “Record a Video” option from the right sidebar.
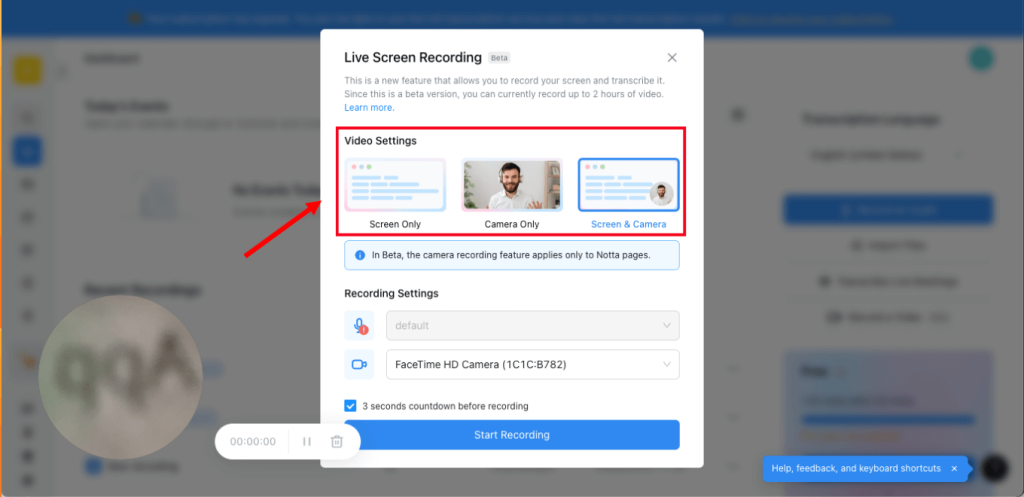
Step 2: You will find three “Live Screen Recording” choices in the pop-up window menu: Screen Only, Camera Only, and Screen & Camera.
I have chosen the ‘Camera & Screen‘ option (as you can see in the photo below), but you may select any of the other alternatives as well.
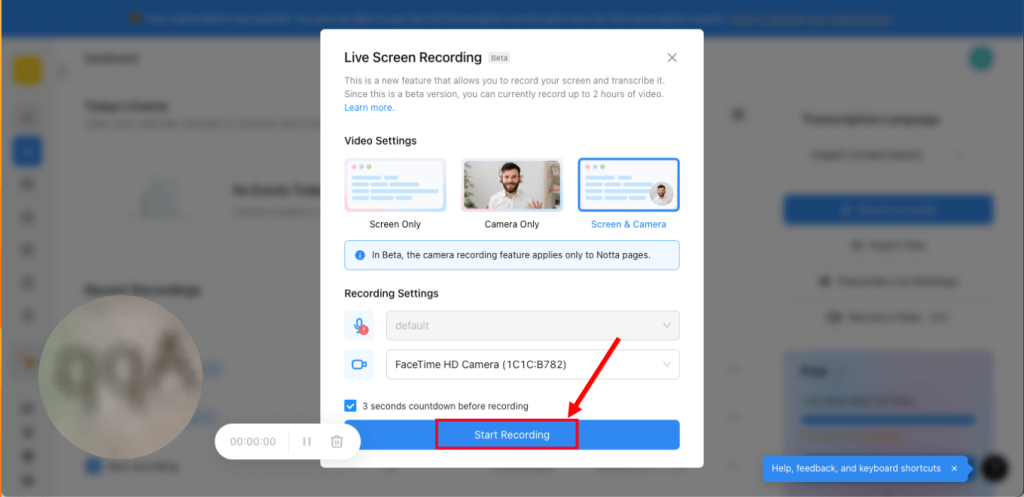
Step 3: Select ‘Start Recording’ and choose ‘FaceTime‘ to begin recording audio and video. After your conference call is finished, click on the red button to halt recording.
Step 4: Your recorded and transcribed FaceTime call will be saved in the Nota dashboard. To view the complete transcript, click the file.
Experience Notta – The Ultimate Online Tool for Transcription and Summarization. With Notta, effortlessly transcribe and condense your conversations and conferences.
Tips to Record FaceTime on Android Devices
FaceTime, like Apple’s iMessage, is no longer a service exclusive to iOS users. FaceTime on Android has now hit the internet, allowing Android users to participate and record FaceTime sessions. However, this is not the same as initiating a FaceTime call on Android – you may only join and observe FaceTime sessions.
Any iOS user may send an invitation link via desktop or mobile, and Android users can join FaceTime calls via Google Chrome.
Here are the steps you’ll have to go through to record FaceTime calls with audio once you receive the link.
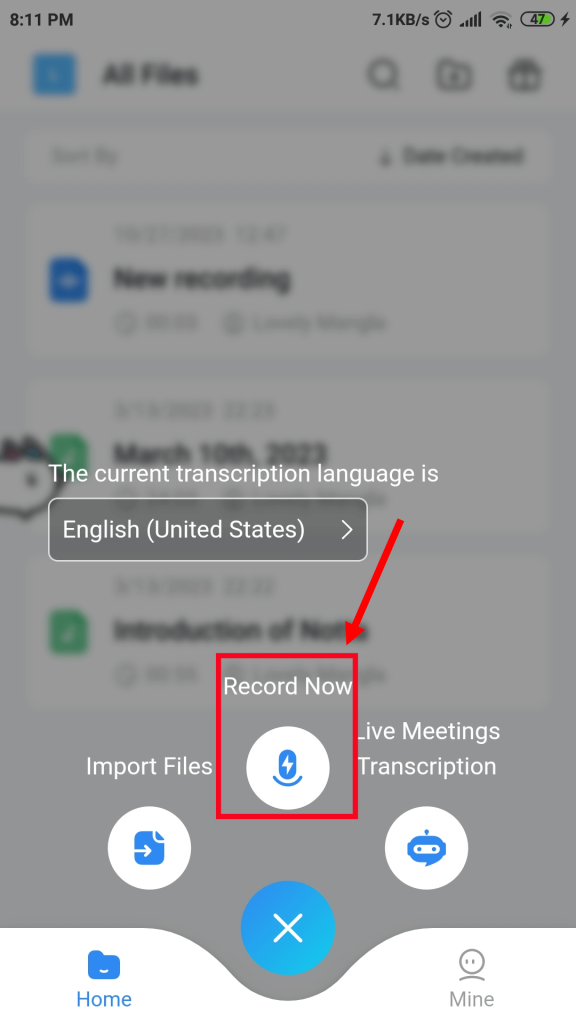
Step 1: To get started, download and install the Notta mobile app on your Android phone. Once installed, open the app and locate the ‘+’ (Plus) icon. Tap on it and select the option ‘Record Now‘ to begin.
Step 2: Join the video call on another device and set it on the speakerphone. Now, place both devices close to each other, and the Notta app will start recording and transcribing what you say in real-time.

The audio should be saved on your phone after you click the red ‘Stop‘ option on Notta when you are finished with your phone call. Press the blue ‘Done’ option to save the file.
Is it Illegal to Record FaceTime Calls?
In the United States, there are distinct audio and video recording rules. Each state has its own set of rules and regulations on how many audio recordings are permitted.
Generally speaking, phone recording regulations may be classified into two legal categories – one party and all-party consent.
People will be talking about this term. It is easy to understand – the one-party doctrine requires informing only one organization about the recording. However, in an all-party agreement, all organizations must give their approval before the recording can begin.
It is not always illegal to record FaceTime calls, but it’s a good idea to inform all involved before recording any audio or video call.
FAQs
Is it possible to record a FaceTime call using screen recording?
Certainly! You have the ability to record FaceTime calls on your iPhone, iPad, and Mac devices. As a longtime user of iOS devices, I greatly appreciate the simplicity of making FaceTime calls.
One feature that I absolutely love is the option to capture FaceTime calls using the built-in screen recording function of FaceTime.
Is it possible to secretly screen record FaceTime without the other person being aware?
When utilizing the device’s integrated recorder to capture calls, FaceTime does not provide a notification indicating that the call is being recorded. This feature enables you to record calls without notifying the other participants.
Nevertheless, this behavior is considered illegal in multiple states and is indeed impolite when dealing with such situations. Therefore, I strongly recommend informing the other party that you have initiated the recording.
Key Takeaways
Recording FaceTime calls on the iPhone, Mac, and Android is achievable for anyone, but it requires additional steps. While iOS offers a useful built-in screen recorder, its functionality is somewhat restricted.
P.S. This post isn’t a sponsored post.
Content Reference & Image Source – https://www.notta.ai/en/blog/how-to-record-facetime-call