Category: How To

  • Facebook Pictures not Loading (Fixed – 7 Ways)

    Facebook Pictures not Loading (Fixed – 7 Ways)

    Facebook pictures not loading is a common complaint among its users. Users all throughout the world have reported that Facebook photos are refusing to load.

    It may be used on Android smartphones as well as online browsers. Facebook hasn’t issued an official statement about the issue, but we’ve narrowed it down to a few possible causes.

    So, 

    Why is Facebook not Loading Pictures?

    A slow internet connection is the most common cause of Facebook not showing pictures or images not loading for any website. Other causes include VPN, bad DNS servers, network cache issues, and more.

    In this article, we’ll go over all of the reasons why images aren’t loading on Facebook, as well as various solutions to the problem.

    Read Also: How to Ban Someone from Facebook Page to Stop Spam?

    How to Fix Facebook Pictures not Loading: Step by Step

    Below are several possible causes and solutions to fix Facebook not loading images issue.

    1. Bad Internet Connection

    Bad internet is the most prevalent cause of photos and websites not loading. When you are unable to view Facebook photographs, the first thing you should check is your internet connection.

    To do so, open a new tab and begin loading other websites, such as YouTube.

    If they’re all working properly, you can rule out the internet as the source of your problem. You may also use Google to find out how fast your internet is. To do so, follow these procedures.Type Internet Speed Test into a new tab and press Enter.

    • Now, on the first result, click the Run Speed Test button.
    • After the test is done, you will receive a thorough report on your internet.

    If your internet connection is terrible, you can simply move to a different network until it improves. If the internet is working properly, move on to the next option and use it.

    2. Check the Facebook Server’s Status

    While the Facebook server is one of the greatest for any website, it does go down from time to time. When the server goes down, the entire website or sections of it may malfunction.

    You may check the status of Facebook’s server here. The message on this page will say “Facebook Platform is Healthy” if the server is up. Otherwise, it would state the reason for the outage and then explain the problem.

    3. Clear the Cache of the Facebook App (ANDROID)

    On Android, Facebook collects cache so that it can swiftly load photographs and frequently viewed pages for you.

    On Android, an excessive volume of cache data might lead to an absurdly large app size. The instructions below will help you clear the Facebook cache.

    1. Go to the Android home screen or app drawer to find Facebook.
    2. Go to the app info menu by long-tapping the app icon.
    3. Select the Storage & Cache option from the menu.
    4. Select Clear Cache from the drop-down menu.

    When you open Facebook on your Android device, you’ll notice that the photographs are loading normally again.

    4. Clear the DNS Cache

    DNS cache flushing aids in the resolution of DNS-related issues on your computer. If you’re having trouble accessing websites and web content because your network configurations are corrupt, flushing the DNS resolver cache can assist.

    As an administrator, open the command prompt and type the commands below, pressing the enter key after each one.

    • ipconfig /release
    • ipconfig /renew
    • ipconfig /flushdns

    Last but not least, type escape to quit the command prompt and reboot your computer. Check to see whether the issue has been resolved.

    5. Change Your Browser

    An outdated or ancient browser is another major source of this problem. So, whatever browser you’re using to access Facebook, simply upgrade it. If you’re using Chrome, these instructions will help you update it.

    1. Open Google Chrome and go to the top right corner of the screen and click the three dots.
    2. Select Settings from the drop-down menu.
    3. Then, on the left side panel, scroll down and click on About Chrome.
    4. If an update is available, Chrome will update itself automatically. Wait till the procedure is finished.

    6. Make Use of Facebook Lite (Android)

    Facebook might feel bloated at times, what with its Stories, Groups, Pages, and hundreds of other features. If the Facebook app for Android isn’t loading photographs, try the Facebook Lite app.

    As the name implies, Facebook Lite is a stripped-down version of the main Facebook application.

    7. Updates for the Facebook App

    Are you using an old Facebook app on your iPhone or Android device? That could be the main reason why Facebook photographs aren’t loading.

    Open the App Store or Google Play Store and download the most recent version of the Facebook app.

    Final Words

    So, this was all about different ways to fix Facebook pictures not loading issue. Pictures are an essential part of Facebook.  The experience becomes harsh and sour without them. As a result, you must be able to solve any problem that arises from them.

  • Can I Change Birthday on Facebook After Limit?

    Can I Change Birthday on Facebook After Limit?

    Here, you will learn how to change birthday on Facebook and will also discuss either you can update your date of birth on Facebook after limit or not.

    So, let’s get into details….

    Because of security concerns, Facebook does not enable users to update their information frequently.

    As a result, it’s always a good idea to add your correct information. This lowers the likelihood of encountering a problem with this social media platform.

    Facebook may even request that you use your ID or official document to verify your identity.

    This reduces the possibility of impersonation or identity theft, keeping you and the Facebook community secure.

    So,

    Can I Change Birthday on Facebook After Limit?

    Facebook allows users to change Birthday every two weeks for three times only. Once your limit is over, you cannot change your date of birth on Facebook. In special case, you can contact Facebook via mail or messenger to update your birthday information.

    Why Would You Want to Modify Your Facebook Birthday?

    A lot of people might desire to update their birthdays on Facebook for a variety of reasons. Here are a few examples:

    • To obtain a job for which they are either too old or too young.
    • They didn’t realise they wouldn’t be able to readily edit their Facebook account later when they created it, so they added a random DOB.
    • To keep their original birthday a secret from others.
    • Someone may be embarrassed by the fact that they are older or younger than their friends or the person with whom they would be in a relationship.

    How to Change Your Birthday on Facebook: Step by Step

    To update or change your DOB on Facebook, follow the instructions below –

    How to Change Birthday on Facebook
    How to Change Birthday on Facebook
    1. Login to your Facebook account.
    2. Click your profile photo in the top right corner of Facebook from your main profile.
    3. Select the About option.
    4. Then, under the left menu, select Contact and basic information.
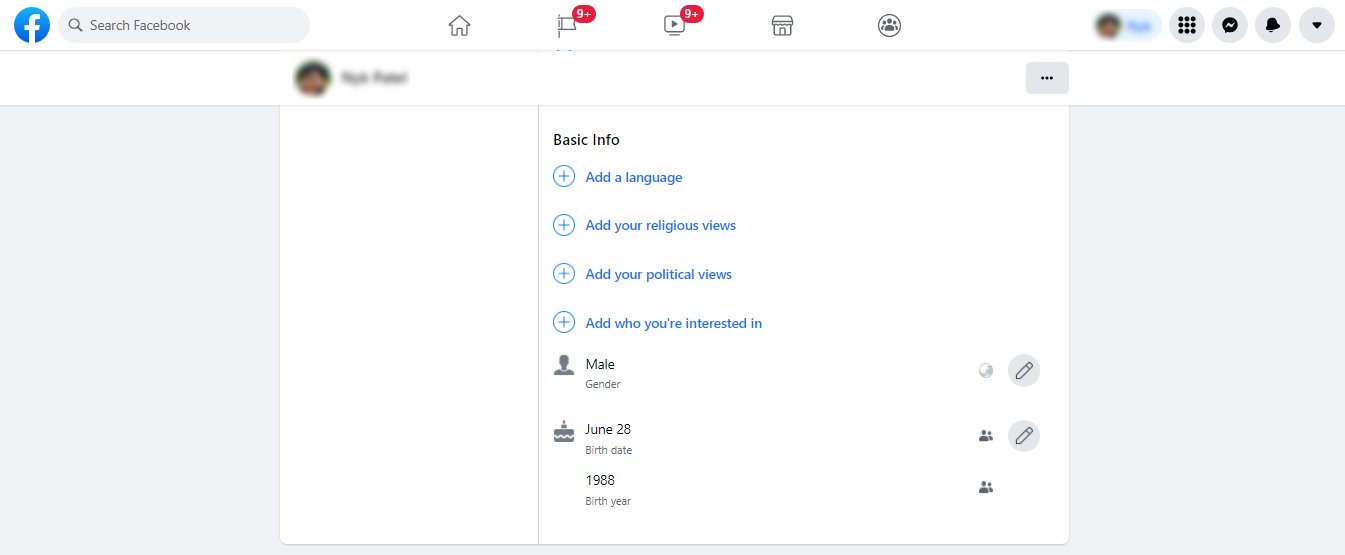
    5. Scroll to the bottom to your birth date and select the Edit icon to your right.
    6. Change your birthday using the drop-down boxes, and pick who may see it using the audience selector.
    7. Select Save.

    By changing the audience, you can control who can see your DOB. There are two options next to your birthday: one for the day and month, and one for the year. If you don’t disclose the day and month with your friends, they won’t be notified of your forthcoming birthday.

    Read Also: How to Delete Watched Videos on Facebook at Once?

    Steps to Change Birthday on Facebook After Limit

    After you’ve reached the maximum of revisions, follow the procedures below to modify your birthday –

    1. Login to your Facebook account.
    2. Go to the Facebook help page now.
    3. Once you’ve arrived at the page, simply enter the year, month, and date of your birth, as well as the reason for which you’re updating your Facebook profile’s date of birth.

    Note: This time, make sure you include your correct date of birth because Facebook may ask you to give verification, such as a copy of your government ID.

    The Birthday Rules on Facebook

    Though you may modify your birthday information on Facebook, you cannot do so freely. When it comes to Fb birthdays, there are few limits. These are the following:

    #Rule 1 – You can only modify your birthday three times in total.

    #Rule 2 – You can only update your birthday every two weeks.

    #Rule 3 – Once you’ve gone over the three-time restriction, you won’t be able to change your birthday.

    #Rule 4 – You may be banned from Facebook if you change your birthday to a date that makes your current age less than 13.

    For further information, you’ll need to contact Facebook’s customer service staff.

    Frequently Asked Questions (FAQs)

    How Many Times Can You Edit Birthday on Facebook?

    Once every two weeks, you can change your birthday on Facebook. You can only update your DOB three times in total.

    Can I Remove My Birthday from Facebook?

    Yes, you have the option of not sharing your birthday with your Facebook friends.

    Why I Can’t Change My Birthday Date on Facebook?

    When you go over the Facebook limit, you’ll get this message. If you’ve altered your DOB more than three times, you’ll need to contact the Facebook help link for further information.

    Final Words

    So, this was all about how to change birthday on Facebook and how many times you can update it. It is always recommended to provide correct information while creating a new account on Facebook.

  • How to Ban Someone from Facebook Page to Stop Spam?

    How to Ban Someone from Facebook Page to Stop Spam?

    Does a spammer regularly bombards your Facebook page with unwanted advertisements? If yes, then you should know how to ban someone from Facebook page to stop spam.

    If you’ve never done it before, blocking somebody from your Facebook Page could feel a little harsh.

    However, making this decision can be wise or necessary course of action to protect your page.

    How to Ban Someone From Facebook Page?

    With a private Fb account, you can use the privacy options to block another user. These options aren’t present on Facebook Business pages, but you can still ban individuals in other ways. Banning someone is possible from your Page’s admin side, a post they made on your Page’s Timeline, or a comment they left on a status you put on your Page.

    If you block someone from your Facebook page, they won’t be able to –

    • Post on your Page.
    • React to your postings by liking or commenting on them.
    • Send you a message
    • Share your Page on social media

    Steps to Ban Someone from a Facebook Page

    Follow the below steps to ban someone from Facebook page.

    Ban Someone From Facebook Page
    Ban Someone From Facebook Page
    1. Go to your Facebook account and log in.
    2. Open your Facebook page.
    3. Go to Page Settings option.
    4. In the left column, select People and Other Pages option.
    5. Type the person’s name into the search bar or click the box next to their name.
    6. Choose Ban from Page from the gear icon showing on the top right side.
    7. Click the Confirm button.

    How do you Ban a Post on your Page or a Post that Mentions your Page?

    To ban a post on your Facebook business page or a post in which you have been mentioned, follow the procedures below.

    1. Go to your Facebook account and log in.
    2. In the left side of your Page, select Posts.
    3. On the right side of your Page, click Visitor posts.
    4. In the upper right corner of the post by the person or Page you wish to prohibit, click more.
    5. Click Confirm after selecting Ban from Page.

    How to Ban Someone From your FB Page’s Inbox?

    To block someone from your Page’s inbox, follow the procedures below –

    Ban Someone from Facebook Page Inbox
    Ban Someone from Facebook Page Inbox
    1. Go to your Facebook account and log in.
    2. Go to the top of your Page and click Inbox.
    3. On the left, click the message from the person you wish to block.
    4. Select Ban from Page from the three dots in the top right corner.
    5. Click the Confirm button.

    When Should You Block Someone on Facebook?

    It is advised not to ban someone simply because he or she posted a bad comment on your Facebook page.

    For starters, comments are engagement indications for a Facebook page, so if the remark isn’t completely false or spam, you should respond to it and try to explain or clarify the user’s negative comments.

    This is beneficial for several reasons:

    • It can result in a conversion on the Facebook post, allowing you to increase your organic reach.
    • Responding to comments is preferable to hiding them.

    Read Also: Why Can’t I Post on Facebook?

    Frequently Asked Questions (FAQs)

    Can You Block Someone from Facebook Page?

    Users cannot be “blocked” from your company page, but they can be “banned.” This enables them to share your material without having to interact with your Page.

    Will someone know if I ban them from my Facebook page?

    No, the user will not be notified that they have been banned. If they try to visit your Page in the same way as previously, they will discover the limitations.

    What Does Banning Someone from a Facebook Page Do?

    Someone can’t publish to your Page if they’ve been banned. They can’t message or like your Page, and they can’t like or comment on your postings.

    Final Words

    So, this was all about how to ban someone from Facebook business page. If you think someone is spamming or harassing you on this popular social media platform, then banning them is the best option.

    Don’t hesitate to ban them if they are using inappropriate words or posting things on your Page which is unnecessary. Keep your Page safe and spam-free with the help of “Banning” feature from Facebook.

  • How to Delete Watched Videos on Facebook at Once?

    How to Delete Watched Videos on Facebook at Once?

    Don’t know how to delete watched videos on Facebook? No worries, here I will explain the exact same thing step by step and also discuss the right way to clear the watch history on Facebook.

    So, let’s jump right in…

    Facebook has evolved into much more than a platform for exchanging messages and sharing memes.

    It has also made strides in the entertainment industry. The popular social networking site now provides a variety of options for finding videos you enjoy watching.

    In addition, Facebook Watch has become the go-to location for discovering videos on Facebook, ranging from big shows, sports/news, and music videos.

    However, were you aware that Facebook maintains a record of all the videos you have watched till date?

    Yes, you heard that right, Facebook keeps track of every video you watch and search you conduct on the site.

    Your Facebook viewed activities appear to be limited to your account; no one else can see what videos you’re watching.

    However, if you’re still wondering how to delete watched videos on Facebook, then this is the place for you.

    How to Delete all Videos Watched on Facebook at Once?

    To erase watched videos on Facebook, follow the instructions below –

    Delete Watched Videos and Clear Watch History on Facebook
    Delete Watched Videos and Clear Watch History on Facebook
    1. To begin, go to your Facebook account and log in.
    2. Next, go to the menu option.
    3. From the Settings & Privacy from the drop-down menu, select Settings option.
    4. Scroll down and tap on Activity log option.
    5. Scroll down and click on Logged actions.
    6. Next choose Videos You’ve Watched from the drop-down menu.
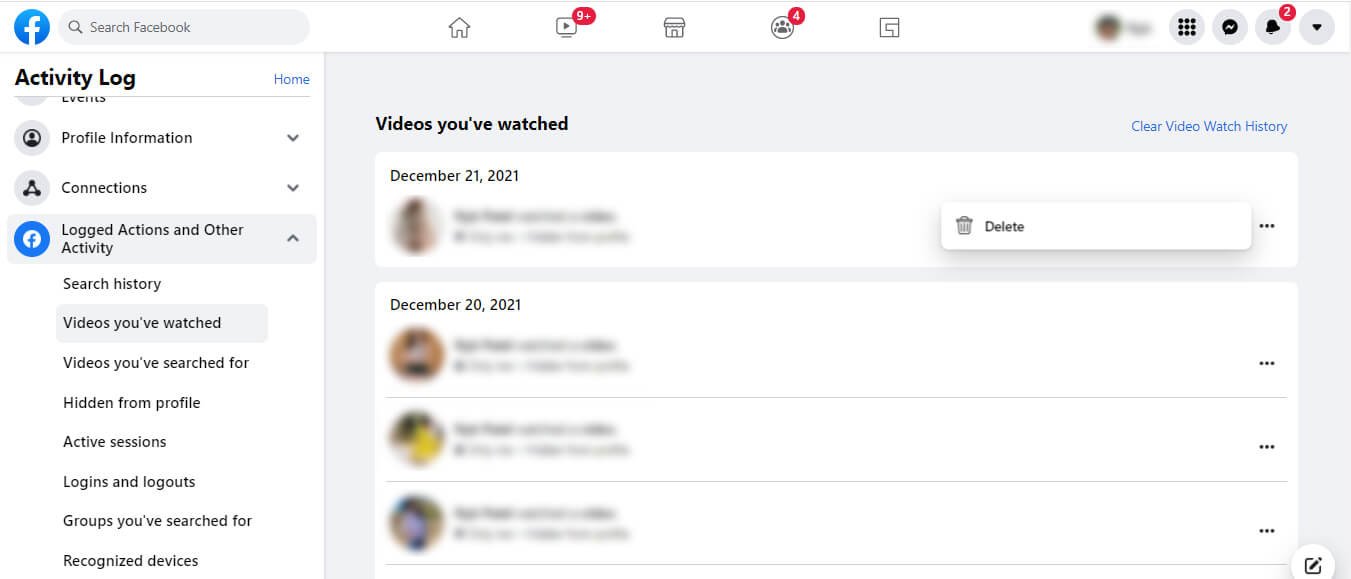
    7. You should now see a list of all the videos you’ve watched previously. To delete a specific viewed video, select the three-dots icon next to it, then choose Delete.
    8. Click the Clear Video Watch History option to erase all of your watched videos at once.
    9. Click Clear Videos Watch History in the popup window.

    Following the instructions above, you may now effortlessly erase any video. You can also select to delete all of the videos you’ve watched at once.

    Frequently Asked Questions (FAQs)

    Does Facebook tell you who viewed your video?

    No, you won’t be able to see who watched your Facebook videos. If you’re doing a Facebook Live, you can see who’s watching and engaging with your video.

    Will someone know if I watched their live video on Facebook after it has ended?

    There is no way to know if you viewed a live video after it has ended unless you comment, like, share, or post it on your timeline. However, if you and the video publisher are Facebook friends, they will be notified when you join the video in the comment section.

    Final Words

    So that was all there was to it when it came to deleting watched videos on Facebook.

    If you’re concerned that someone may judge you or intrude on your Facebook page, deleting all of your watched videos may be the best option.

  • How to Change Group Name on Facebook (Mobile and PC)

    How to Change Group Name on Facebook (Mobile and PC)

    Facebook groups are an amazing way to communicate with particular individuals around the globe about common interests.

    You can create a Facebook group for almost anything, such as family reunions, co-workers, corporation, school pals, business, athletic teams, club members, and so on.

    In this article, we will discuss how to change group name on Facebook.

    You can change a Facebook group name if you started it and somebody else appointed you the page admin. Though Facebook has some restrictions, you can call your group whatever you like if it doesn’t compromise Facebook’s community guidelines. A computer, laptop, or smartphone can be used to rename a Facebook group.

    How to Change Group Name on Facebook Using Desktop PC?

    To modify the name of a Facebook group on computer, follow the procedures below –

    Step 1 – Open your Facebook account on your computer and log in.

    Step 2 – Select Groups from the menu icon. (If you’re having difficulties finding the group, look for it on the left side of your screen under “Shortcuts.”)

    Step 3 – Change the name of the group by clicking on it.

    Step 4 – Select “More” from the drop-down menu beneath the group’s banner image, then “Edit Group Settings.”

    Step 5 – Next to “Group Name,” select the field with the group’s name in it and type your new group’s name.

    Step 6 – Scroll to the bottom of the screen and click “Save” once you’ve written the name you want.

    The name of your Facebook group should now be the one you entered in. Other members of the group may receive an automatic notification from Facebook about the name change.

    How to Change the FB Group Name Using your Mobile (iPhone or Android)?

    You must be one of the group administrators to alter the group name on a mobile device, and the method is the same.

    Step 1 – Open the Facebook app on your Android or iOS and tap the menu symbol in the bottom-right corner, which is indicated by three horizontal lines.

    Step 2 – Next, pick the Groups option and then your group’s name.

    Step 3 – Tap the shield-like icon in the top right corner of the screen. Then, from the popup menu, select “Group Settings.”

    Step 4 – Select “Name and Description” from the drop-down menu.

    Step 5 – Tap the “Group Name” field and type in a new name for your group. Tap “Save” in the upper right corner when you’re finished.

    Note: When you alter the name of your group, all members will receive an email notifying them of the change. You can only modify the name of the group once per 28 days.

    Read Also: How to Remove a Like on Facebook: Step-by-Step Guide

    Frequently Asked Questions (FAQs)

    Why Can’t I Change the Name of My Facebook Group?

    If you don’t have an admin account, you won’t be able to make any changes. It’s also worth noting that all members of the group will be notified that the group’s name has been changed.

    Can I Change My Facebook Group Name After 5000 Members Limit?

    In a nutshell, the answer is no. After you’ve reached the 5000-member restriction, you can’t change the name of your group.

    Final Words

    So, this was all about how to change group name on Facebook. If you are an admin of a group, follow the above article and easily change the group name on Facebook.

  • How to Find Someone’s Name by Phone Number for Free?

    How to Find Someone’s Name by Phone Number for Free?

    This article will show how to find someone’s name by phone number for free using the most effective and simple phone lookup tool available.

    So, without further ado let’s get started…

    Are you receiving missed calls from an unknown number?

    Every day, you may receive unknown calls. However, if someone continues to spam you for no apparent reason, it may be not very pleasant.

    As a result, a free reverse phone lookup tool is the best way to find someone’s name by phone number.

    Is it possible to put in phone number and get name?

    Yes, a phone number can be used to look up a person’s name. You can find someone without spending a dollar using Google’s Reverse Number Lookup, the Truecaller application, and a few other commercial apps.

    Read Also: Birthday Lookup: How to Find Someone’s Birthday

    How to Find the Name of Person by Mobile Number?

    Here are a few tried and true methods you can try to learn how to find someone’s name by phone number for free.

    1. Truecaller

    Truecaller to Find Name of the Person Using Phone Number
    Truecaller to Find Name of the Person Using Phone Number

    Truecaller is by far the best tool for finding out who is calling you from an unknown number. It is also very user-friendly.

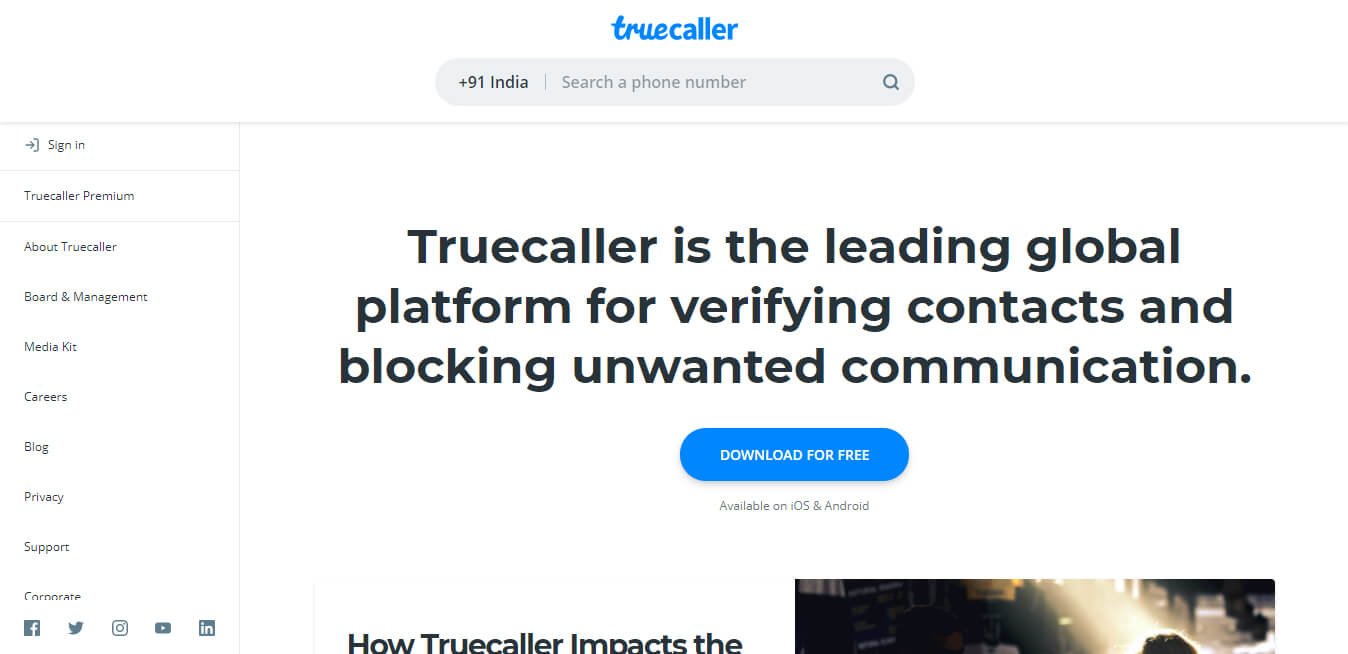
    Browse the Truecaller main website and make an account to get started. The website will recognise your region and automatically fill in the country code.

    Enter the individual’s mobile number whose identity and contact details you require into the lookup space given. The person’s name who is using that mobile number will be displayed. 

    You may get all of the person’s details merely by knowing their contact information. 

    The person’s name, state, and city of residence, as well as the phone number’s associated email address.

    If you know who that person is, you can also assist Truecaller by providing additional information about them. One of these details is the proposal of a name. If the photo of the person associated with the target phone number is recognised but the name is different, provide the person’s real name. Truecaller will even show you the person’s picture, and it’s all for free. 

    Provide tags to identify whether the phone number is a personal, office, or school phone number, and so on. 

    Mark the phone number as spam to warn others that it is spam and to advise them to avoid it.

    Only a limited number of numbers can be searched on the Truecaller website. 

    Install Truecaller for Android or iOS if your profession requires you to look for limitless numbers on a daily basis. 

    All incoming unknown calls will have an identification label attached to them after installing the app on your device. 

    Truecaller may also be set up to recognise spam numbers and reject incoming spam calls continuously.

    2. Whitepages

    Whitepages for Free Reverse Phone Number Look Up
    Whitepages for Free Reverse Phone Number Look Up

    Whitepages.com is the most established and trustworthy of the bunch. You may do a quick background check on an individual by typing their name, in addition to a reverse phone check.

    Whitepages is the greatest database of contact information available on the internet right now.

    This website, which was founded in 1997, allows you to look up someone by their phone number anywhere in North America or the United States.

    This platform gives customers basic information about a suspect, such as location, their phone number, spam risk, and fraud risk.

    The application and website of Whitepages may accomplish a variety of activities, including:

    • You can find a person’s name from a phone number or an address.
    • Checking your background
    • Tenant screening is a thorough examination of the potential tenant.
    • locating a company

    Whitepages’ Tenant Check for Landlord tool provides information on credit, criminal background, and eviction. 

    If all you want to know is how to find someone’s name by phone number for free, Whitepages is the app for you, as it is ideal for swiftly searching for smaller bits of information.

    3. CocoFinder

    Cocofinder Free Reverse Phone Lookup
    Cocofinder Free Reverse Phone Lookup

    CocoFinder is a web service that may provide a person’s name, address, and other information based solely on their phone number. It offers a basic search engine interface that can quickly retrieve information about anyone.

    It’s linked to a slew of public records from throughout the world. 

    As a result, when you search for someone’s phone number, CocoFinder begins searching through its billions of data entries for the search keyword. Because of its powerful supercomputers, the process is incredibly rapid.

    The phone number owner’s information appears on your screen once the findings have been processed. 

    You can also conduct a thorough background check on them if necessary.

    Here’s how to use CocoFinder to determine their name based on their phone number –

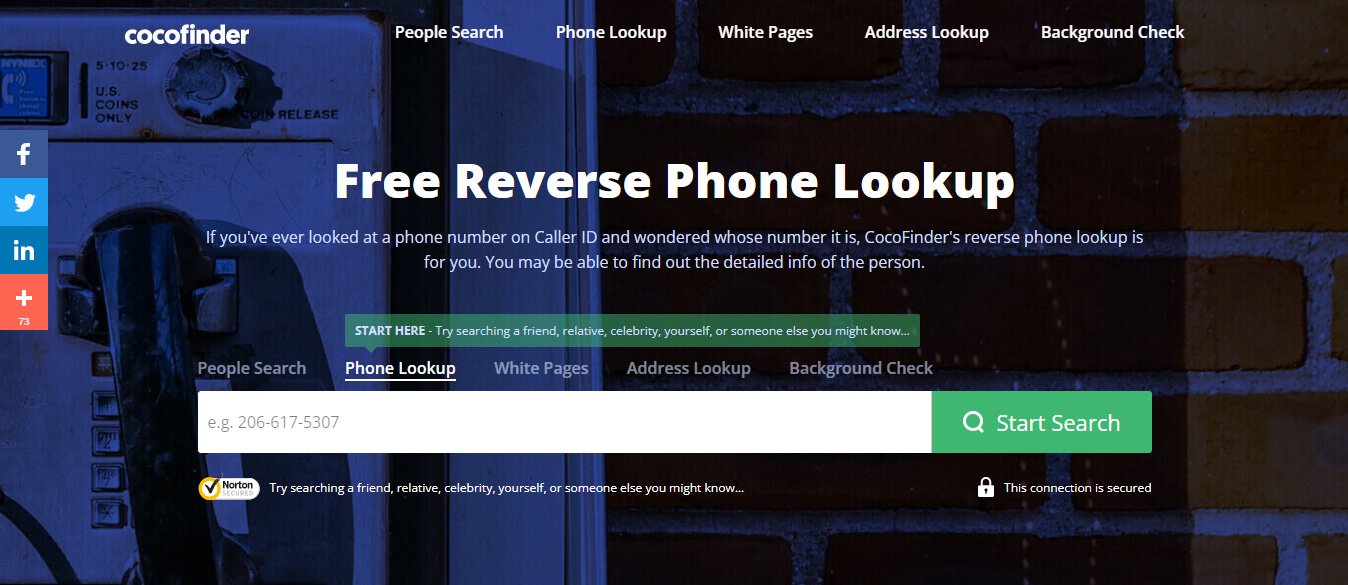
    Step 1: First, go to CocoFinder’s home page. This is where you’ll find the reverse phone lookup.

    Step 2: Select the Phone Lookup tab from the drop-down menu.

    Step 3: Type the person’s mobile number.

    Step 4: Select Start Search from the drop-down menu.

    CocoFinder will begin searching through its records for a match to the mobile number you gave. You may see all of the personal information that is available on public documents.

    Frequently Asked Questions (FAQs)

    Is there a Free Way to Lookup a Phone Number?

    Yes, you may look up a phone number using free applications such as Truecaller and CocoFinder.

    Can you Google Search a Phone Number?

    You may need to do some digging to get someone’s phone number on Google, for example, by typing their name and the location they live in. To perform a reverse number lookup, simply type the complete phone number (including the area code) into the search field and wait for the results.

    Is TrueCaller Free?

    Truecaller is a free service that allows you to search up a phone number. However, the programme provides subscription tools for deeper searching and professional functionality.

    What is a Ghost Phone Call?

    A ghost call, also known as a phantom call, is a phone call for which there is no one on the other end of the line when the recipient answers. You can use a reverse phone lookup tool to find out who they are in these situations.

    Final Words

    The post explains how to find someone’s name by phone number for free in a highly effective manner. You can try all these methods and lookup for any suspicious mobile number.

  • How to Track Someone on Google Maps Without Them Knowing?

    How to Track Someone on Google Maps Without Them Knowing?

    Do you want to know how to track someone’s location without them knowing?

    Google Maps is a renowned programme that enables you to share location with your contacts. 

    With the help of Location sharing feature, you can track the whereabouts of your boyfriend/girlfriend, relatives, or kids.

    So, how to track someone on google maps without them knowing?

    Before you can track someone on Google Maps, they must first enable location sharing. Furthermore, when you use Google Maps to locate a cell phone, a warning usually appears, alerting the owner that you are attempting to access their location.

    How to Start Google Map Cell Phone Tracking?

    How to Start Google Map Cell Phone Tracking

    To track someone on Google Maps to determine a person’s location, follow the instructions below –

    Note: Make sure the device you’re tracking has location services turned on.

    Step 1 – Launch Google Maps on the recipient phone and select “Share Location” from the menu.

    Step 2Determine the length of time you’ll require access to the specific cell device’s location. If you want to change it, tap the plus or minus symbol to raise or decrease the amount of time you wish to share your location. You can tap until you turn off this option if you don’t want time constraints when tracking the target device.

    Step 3Click “Select People” and pick the contact with whom you want to share the location. You may also use the messaging app to reveal your whereabouts.

    In this manner, you’ll get the target mobile phone’s current position in real-time during the period you specify.

    Location History on Google Maps

    Google Maps also shows a mobile phone’s location history. Follow the directions below to examine the location history of any phone.

    Step 1 – To begin, open Google Maps on the target phone.

    Step 2 – Select Your Timeline from the “Menu.”

    Step 3 – On the right-hand side of the screen, tap the Calendar icon.

    Step 4 – Swipe right and left to choose a date you want to look up your location history.

    Step 5 – Select the desired date by tapping on it.

    Now you will be able to see the location history of the person.

    Use WhatsApp To Track Someone On Google Maps

    Follow the below steps to track someone’s cell phone location on Whatsapp via Google Maps.

    Step 1 – Launch WhatsApp on the target smartphone and initiate a conversation with the person or you in this place with whom you want to share the location.

    Step 2 – Choose the Location option from the attached symbol at the bottom.

    Step 3 – Now, select the option to share your live location. Make sure you don’t choose Send your current location. 

    Step 4 – Now, hit the send icon and choose the period for which you want to track the location.

    Step 5 – You will then receive a WhatsApp message from the target smartphone. You can see the person’s current position by tapping on View live location.

    Step 6 – Next, click on the profile icon on the map to go to their profile page.

    Step 7 – Finally, select the GET DIRECTIONS option.

    Step 8 – Open the Maps app to check the target phone’s location on Google Maps.

    How to Turn Off Location Tracking on Google Maps on Your Phone?

    To remove someone’s location off your map, all you have to do is ask them to do so. However, in Google Maps, you can hide them from visibility.

    Step 1 – To begin, open Google Maps on your device.

    Step 2 Click your image in the top right corner of the screen. Select “Location sharing” in the pop-up menu.

    Step 3 – Select the individual you wish to stop tracking inside the list of associated names at the bottom of the screen.

    Step 4 – You can then “Hide [contact] from map” by selecting the three dots in the upper-right corner of the map.

    Other Methods of Locating Someone

    All modern cell phones, particularly iPhones and Android devices, have an integrated feature called Find My Device or Find My iPhone that allows the user to track their phone’s position.

    Track Someone Using Find My iPhone or Find My Device

    1. For Android users, open Find My Device, and for iOS users, open Find My iPhone.
    2. Log in and choose the gadget whose location you’d like to learn about.
    3. The target mobile phone’s location will be shown on the screen.

    You can utilise these built-in features to simply locate the exact position of the target cell phone this way.

    Applications to Track Someone’s Location

    Here are a few free apps that you may use on your device to track someone’s whereabouts.

    1. Life360

    Life360

    Life 360 is a free Android-based mobile tracking app. Location history, location sharing, and place notifications are just a few of the capabilities included in the free app. 

    You can save your favourite locations, such as home, school, and work. Automatic SOS and accident detection are also included in the basic version. Upgrade to a paying membership if you want more advanced features.

    2. GeoZilla

    GeoZilla

    Another programme to track friends and family is GeoZilla Family GPS Locator.

    Because of the SLC (Significant Location Change) feature, GeoZilla Family GPS Locator uses less battery power than many other location-sharing apps.

    It prevents the app from starting if you walk a short distance within your home. Instead, it will begin recording only after you have moved a significant distance.

    Other capabilities include:

    • Receiving notifications when family members arrive at a location.
    • Viewing a week’s worth of location history on a map.
    • Assigning location-based chores to family members via shared to-do lists.

    3. FamiSafe

    FamiSafe

    FamiSafe is a fantastic location monitoring app for Android and iOS devices that was created with great care.

    There are numerous features in this programme that will assist you in monitoring the target device’s location, and it is accessible for both Android and iOS.

    There’s no need to put everything on your child’s phone. After you’ve installed the app, you’ll be able to customise anything on your device.

    You can also block children from making in-app purchases on iOS devices.

    Frequently Asked Questions (FAQs)

    Can Someone Tell if I Check their Location on Google Maps?

    If you’ve shared your location with someone, Google Maps will update your position on the map at regular intervals. Your location has been changed, and you’ll receive a notice at the top of your screen or in your list of alerts letting you know.

    Can you Track Someone on Google Maps Without Them Knowing?

    You can’t trace someone on Google Maps without their permission. The person must agree to share their location with you.

    Can Someone Read My Text Messages from their Phone?

    Various spy apps are available nowadays, allowing someone to read text messages on a smartphone without the user’s awareness. However, these apps must be installed or injected into the victim’s phone, which is impossible to accomplish remotely.

    Can I Track Someone’s Phone with just their Number?

    You can follow someone’s whereabouts only by knowing their phone number. Many services, such as Geofinder.mobi, allow you to do exactly that.

    Final Words

    So, this was all about how to track someone on Google Maps without them knowing. It is important to note that monitoring someone’s location on the phone without their consent is unethical. So, if you want to do any such activities, it is better to ask them first, tell them the reason, and then proceed with the location tracking.

  • Birthday Lookup: How to Find Someone’s Birthday

    Birthday Lookup: How to Find Someone’s Birthday

    There are various reasons why you might want to know someone’s birthday without having to ask them.

    If you’ve known someone for an extended period of time, unexpectedly asking about their birthday, whether it’s friends, relatives, colleagues, or your roommate, can be a little unpleasant.

    Some people enjoy throwing surprises for others, while others just want to sign up for shady services as an amusing prank. Whatever your motive, finding out someone’s birthday will allow you to do either of these things.

    So, if you are thinking about how to find someone’s birthday, then we will uncover that in this article.

    On social media apps such as Facebook, Instagram, and Linkedin, you may look up someone’s date of birth. Aside from that, you can call a friend and ask if they know the birthday of the person in question, and if nothing else works, you can use premium apps.

    How to Find Someone’s Birthday?

    There are a few clever techniques to find out somebody’s birthday that can provide you with the knowledge you require without them realising you have forgotten their birthday.

    How to Find Out Someone’s Date of Birth on Social Media?

    Facebook

    The most obvious place to start is on Facebook, where most individuals post their birthdays and other personal information out in the open. Look for their birthdate under Overview in their Facebook profile’s About section.

    You might also go to Upcoming Birthdays and then Events. Your search is done if the person has submitted their birthday. Try alternative approach if they didn’t add their birthday to Facebook or if you can’t access that information.

    Instagram and Snapchat

    You can also use Snapchat or Instagram to know someone’s birthday.

    You can discover their previous celebrations by scrolling through their Instagram profile or Snapchat timeline. Photos of a cake and a happy birthday tiara are very solid clues that you’ve chosen the appropriate date.

    LinkedIn

    Another social networking site that provides information on a person’s birth date is LinkedIn.

    Look through their profile and posts for birthday greetings. If the individual whose birthday you’re interested in has uploaded their information, the site notifies every one of their connections of the birthday.

    You will be notified if you visit someone’s LinkedIn profile. If this is your last resort, have a plan in place to explain why you were there.

    Make A Call to A Friend TO Find Out Someone’s Birthday

    Why should you be afraid if you have friends? If you find yourself in a position when you can’t recall someone’s birthday, phone a mutual buddy.

    You only need to ask, “Do you remember when John or David’s birthday is?”

    And, assuming they aren’t as forgetful as you, there’s a high chance they’ll remember the date.

    Just make sure the person you’re calling isn’t a brash young man, or you might have a difficult time.

    Get Help Of Birthday Finder Tools

    The sole reason we provided you with various free options was to save you money on searching for someone’s birthday.

    But, if all of the free hacks fail, I assume there’s nothing else you can do. It’s time to look at some paid ways for determining the birthdays of people you know.

    Golookup

    On the internet, some incredible websites house the data of millions of individuals.

    Golookup is an example of a website with access to information about ordinary people and can give you that information.

    This is how you can quickly find out the birthdays of your loved ones using Golookup –

    GoLookup Public Record Search Tool
    • Visit the official Golookup website and enter the name and state of the individual whose birthday you wish to find out. Once you’ve entered that information, select the Search option.
    • The screen will display all people with the same name. You must utilise the person’s address, age, and associated people’s information to identify the individual you are searching for.
    • Select Access Report if the information matches the person whose birthday you want to know.
    • Once the report is complete, you must acknowledge that you are 18 years old or older and that you are not obtaining the information in order to harm that person. You must also agree to the terms and conditions of Golookup.
    • After that, enter your email address and click CONTINUE.
    • Lastly, enter the card information and select VIEW MY REPORT to see the person’s true date of birth.

    How Do You Get Someone to Tell You Their Birthday?

    If you know the person well enough to hold a conversation with them, you could:

    • Inquire about their astrological sign; if they are unsure, you will need their birthdate to find out;
    • Inquire as to whether or if they are of legal drinking age (for alcohol);
    • Inquire about their family’s birth order and other pertinent issues;
    • Request a comparison of “bad driver’s licence photographs” or Request that stamps in passports be compared, and that the page containing identifying information be flipped to.

    Final Words

    So, this was all about how to find someone’s birthday. If you have a close friend whose birthday is approaching, you can utilise the above tried and true ways to discover the special date.

    It’s worth noting that almost all of the free hacks for discovering someone’s birthday without asking them offer very little personal information.

    However, this is not the case with paid methods. The information held by the government under a person’s identity is revealed in public records.

    As a result, make proper use of the information you obtain about the individual. Don’t give out the information you acquire to anybody else because it can be offensive or even unlawful.

  • How to Listen Others Call on My Phone?

    How to Listen Others Call on My Phone?

    Are you wondering, how to listen others call on my phone?

    If the answer is yes, you are living in a technological age where practically everything is conceivable.

    So, if you suspect your boyfriend is chatting with someone else and want to confirm how frequently they converse on the phone without his or her knowledge, this is the place to go.

    Today, we’ll show you how to listen others call on my phone in this step by step guide.

    Recording or eavesdropping on phone calls is no longer difficult. Current technology now provides a choice of apps and services that can track phone calls and extract data from various devices.

    Read Also: Phone Tapping: How to Check if your Phone is Tapped?

    How To Listen Others Call on My Phone: Step by Step Guide

    To listen to other people’s phone calls on your phone using code, follow the steps below –

    • To begin, you must take the person’s phone when she or he is not present or visible to you.
    • Now call **06* accompanied by your own mobile number# in the person’s phone, e.g. **06*08069999999#.
    • After successfully entering the above code, your mobile will now ring anytime the person receives a call, and when you respond, you will be able to listen in on their discussion.
    • Please ensure that both your mobile and the other person’s phone have sufficient airtime. If that doesn’t work, try adding your country code and trying again.

    Apps To Record and Listen to Someone’s Phone Calls

    1. KidsGuard Pro

    KidsGuard Pro

    To listen on somebody’s phone calls, you must first subscribe on KidsGuard Pro, followed by a successful installation and configuration of the software.

    Once you’ve installed the KidsGuard Pro software on the target device and logged in on your smartphone, hearing the phone conversations remotely becomes a breeze.

    KidsGuard Pro begins recording whenever the target person gets a phone call.

    KidsGuard Pro transmits the whole call recording of your spouse or kid with the other user once a time period of 5-10 minutes has passed since the call ended.

    You can listen to the recordings whenever it is comfortable for you.

    By just clicking on the Audio button in KidsGuard Pro, you can hear to the call recording once it has been posted to the portal.

    You can also Download the call recordings to listen to them after some time has passed and locally on your device.

    KidsGuard Pro does not record WhatsApp calls for Android.

    If you want to listen in on your child’s or spouse’s WhatsApp conversations, you can use KidsGuard for WhatsApp. It’s a WhatsApp surveillance app that exclusively monitors WhatsApp.

    Important: This is a premium app with three different pricing options.

    2. FlexiSPY

    Flexispy

    To effectively record and monitor calls, you must first create an account on FlexiSPY and then complete the installation and configuration process.

    Call Recording is one of the many great capabilities that FlexiSPY offers to its users.

    You will find all of FlexiSPY’s recordings underneath the Call Recording section. By using time stamps and date provided with each call recording, locate the call you wish to listen to.

    Simply touch on the Download option once you’ve decided which call you wish to listen to. FlexiSPY does not allow you to listen to a call without first downloading it.

    FlexiSPY also displays the caller’s name, phone number, call length, and whether the call was inbound or departing.

    If the target device is jailbroken and you have an EXTREME plan, your call recording choices expand even more, and you may now record and listen to VoIP calls from the target phone.

    Important: This is a paid app with three different pricing options: LITE, PREMIUM, and EXTREME. Please keep in mind that FlexiSPY will not be able to restrict any mobile numbers for you. Furthermore, the app requires a jailbroken iOS device to function.

    Can You Record the Phone Call Without Letting the Other Person Know?

    If you’re wondering whether you can secretly record someone’s phone calls, the answer isn’t so straightforward.

    This is entirely dependent on your region and whether or not recording non-consensual phone calls is lawful.

    California, for example, is a two-party consent state, which means that both parties must consent to the recording of a mobile phone conversation.

    Please keep in mind that all of the applications mentioned in this article are exclusively for legal use.

    Frequently Asked Question (FAQs)

    Can you Listen to Previous Phone Calls?

    It’s possible to listen to incoming calls after downloading KidsGuard Pro or FlexiSPY on the target device, but you won’t be able to hear calls that were already made before the app was installed. FlexiSPY, on the other hand, allows you to examine the call information.

    How to Listen to Phone Calls Online for Free?

    There are certain limitations to free online call listening. The majority of “free” applications available are either hoaxes or viruses. FlexiSpy, on the other hand, can be used to listen to phone calls online swiftly and efficiently, and it also comes with a free demo.

    Is it Possible to Record a Phone Call Without Informing the other Party?

    Yes, KidsGuard and FlexiSPY applications allow you to record calls without alerting the other party because they operate in stealth mode. However, doing so without another person’s approval is not only inappropriate, but it is also unlawful in most situations.

    Final Words

    It’s never been easier or more convenient to listen in on someone’s phone calls.

    However, you will certainly need to purchase a subscription plan for both the above-mentioned apps. So, whether you’re concerned about your children or want to ensure that your husband isn’t cheating on you, the question of how to listen others call on my phone will be answered with the help of this post.

  • How to Delete All Unread Emails in Gmail All at Once?

    How to Delete All Unread Emails in Gmail All at Once?

    Are you looking for a way to delete all unread emails in Gmail?

    Receiving email from all of the firms with which you do business (and some with which you do not!) appears to be the norm these days.

    In fact, the typical person receives 121 emails every day, and while each one may be well-intended, you just do not have time to read them all.

    So, what’s the simplest way to delete all unread emails in Gmail at once?

    You may use a filter to see all of your unread Gmail emails at a glance in your inbox. With a few clicks, you can delete all of your unread emails once you’ve filtered them.

    We’ll show you how to remove your unread email correctly, so you don’t accidentally delete something crucial.

    Read Also: Protonmail vs Gmail: Which One is More Secure

    How to Delete All Unread Emails in Gmail?

    You may remove Gmail messages in bulk using one of 2 simple methods. Custom filters or Gmail labels are both options.

    Create Filters to Delete Unread Emails in Gmail

    Before trying out any filter, make sure you don’t delete any important emails that are still unread. Fortunately, such emails are branded “Important,” making them easier to spot.

    After you’ve double-checked that you’ve seen all of your critical emails, follow these steps to delete all of the rest quickly –

    Create Filters to Delete Unread Emails in Gmail
    1. Open your computer and go to the Inbox page of your Gmail.
    2. Now, select See all Settings option from the gear icon in the upper right corner.
    3. Next, navigate to Filters and Blocked Addresses option and select Create a New Filter.
    4. Type label:unread beside “Has the words” option to check all of your unread emails. 
    5. Next, when the pop-up menu appears, tap on Create filter and approve the changes by selecting OK.
    6. After that, you’ll be given a few choices. To delete all unread emails, click the box beside Delete and Apply filter to XXX matching conversation.
    7. Lastly click on Create Filter option and reload the page.

    All your unread messages have now been deleted from your Gmail.

    It’s worth noting that this method will remove all of your unread emails as you receive them. If you keep the filter turned on, all your new unread emails will be deleted instantly and automatically.

    That is why, once you don’t need the filter, it is better to keep it turned off.

    Use Label:Unread to Remove Unread Gmail Emails

    If you require an even more handy method of removing all your unread emails, you can immediately input the “label:unread” filter into the Gmail homepage’s search bar. This will display you all of your unread mails and discussions across all of your folders.

    Then, tick the Select All box in the upper-left corner and click the trash can symbol above your mails. This will clear out all of the emails on a single page.

    Based on the platform you’re using, you could have 50 or 100 mails on one screen, and this will just delete the mails on that page.

    To delete them altogether, choose the option Select all conversations that match this search and all of your unread messages will be removed.

    Can I Delete All Unread Emails on Mobile Using Gmail App?

    There’s good news and bad news for Gmail users on Android and iOS devices.

    However, the filtering functionality is the same as on desktop, and you can just type in labels in the search field to find what you want.

    The bad news is that there’s no way to delete emails in bulk through the Gmail app because there’s no Select All option.

    This is why you should enter into your Gmail account using a browser and remove all of your unread emails using one of the techniques listed above.

    Frequently Asked Questions (FAQs)

    How do I Erase Thousands of Emails from my Gmail Account?

    The quickest way to erase thousands of messages in Gmail is to use an inbox filter. You can also use the select all option from the filters and delete all your mails.

    How do I Select All Unread Emails in Gmail?

    In the Search Mail bar at the top of your inbox, type is:unread, then press Enter. The total number of unread emails will be displayed. Tap the box at the top of the email list to choose them. You can now archive, delete, or mark as spam all of the communications you’ve selected in bulk.

    How do you Remove Emails in Bulk in Gmail?

    Start by sorting through your inbox and deciding what to keep or discard. To find all the mails you want to remove, use the Search Mail bar (by Unread status, by the sender, etc.). When the list appears, tick the “to select all emails, then delete them by clicking the trashcan button. Using an inbox cleansing application like Clean Email is a faster option.

    Final Words

    Congratulations! You have now removed all unread messages from your inbox. Similarly, you can use the highlighter to designate all messages as read, not important, assign or remove a label, and so on.

    A message will be transferred to your bin section once it has been removed. After 30 days, they will be automatically removed from the bin as well.

  • How to Find Photoshop CS5 and CS6 Serial Number on Computer?

    How to Find Photoshop CS5 and CS6 Serial Number on Computer?

    If you’re a student or a computer user, chances are you’ve installed some design programme on your computer, such as Adobe Lightroom or Adobe Photoshop CS5, CS6.

    It comes with a serial number that appears handy while using different tools, so if you have lost your Adobe Photoshop serial number, this is the right place for you.

    Today, we are going to discuss about how to find photoshop serial number on computer.

    You can find the Adobe Photoshop serial number in one of two ways: (1) manually accessing Registry Editor, or (2) utilising a product key finder programme. You can manually search for the Adobe CS6 serial number in the Registry or use a specialised programme.

    Search Adobe Photoshop Serial Number via Product Key Finder

    Using a product key finder, you can see the Adobe Photoshop CS5 or CS6 serial number. All product serial numbers are kept in the Windows Registry, as you can see from the above. As a result, you can access the Registry using a product key finder like iSumsoft Product Key Finder.

    Product key finder, unlike Windows Registry, locates the genuine serial number. It means that the product key finder’s serial number can be used to install Adobe CS5 or CS6 directly.

    1. First, you must download the software by going to this link.
    2. To install it, double-click on the setup file after it has been downloaded. To proceed, click the Next button.
    3. In the prompted window, click I Agree.
    4. Click the Install button in the next window. Then, to complete the installation, click Finish.
    5. The programme will start immediately after installation. In the main interface, click the Start Recovery button.
    6. After that, you’ll see a list of product keys for Photoshop, Windows, Microsoft Internet Explorer, and other installed software on the computer. From the drop-down menu, select Adobe Photoshop CS5 or CS6 and then Save To File.
    7. Then, to complete the process, follow the on-screen instructions. Open the folder that houses the information to see the serial number.

    How Can I Find the Serial Number for Photoshop in the Registry?

    You may get the Photoshop serial number from your computer’s registry by following the steps I’ve provided below –

    1. On your keyboard, press Windows + R.
    2. Press Enter after typing Regedit.
    3. After that, the Registry will open.
    4. Follow the path below to find the destination.
    5. Now you must choose your Photoshop version.

    After that, you’ll receive your Photoshop serial number.

    This way, you can simply retrieve your Photoshop serial number in the registry, regardless of whether you’re using Photoshop CS5, CS6, or any other version.

    Final Words

    Using the methods listed above, you should be able to locate the serial number for your copy of Adobe Photoshop CS5 or CS6. Furthermore, they may assist you in locating other Adobe products such as Lightroom, Bridge, Premiere Pro, and so on.

  • How to Factory Reset iPhone without Password?

    How to Factory Reset iPhone without Password?

    One of the advantages of using an iPhone is that you can be assured that your data is protected as long as you use a password.

    If you ever need to access an iPhone but don’t know the Password or it’s been disabled, the only method to do so is to factory reset it.

    It’s worth noting that if someone gets their hands on your phone, they can conceivably use it after deleting all of the data — which means the images of you doing those stupid poses will be gone.

    How to Factory Reset iPhone Without Password: Step by Step Guide

    You may restore your iPhone without remembering the passcode in a few different methods. This can be accomplished through the use of iTunes, third-party programmes, or iCloud. When you completely reset your iPhone without a password, all of your private data, photos, apps, and other things will be erased.

    Note: If you routinely backup your data, factory resetting your iPhone without a password can prevent data loss.

    How to Reset Your iPhone Through iTunes?

    If you have already linked your iPhone with iTunes, you will only be able to reset it through iTunes. When you begin the reset, make sure your iPhone is connected in and backed up to your iTunes account. This will assure that you can retrieve all of your deleted data afterwards.

    Here are the steps to reset iPhone using iTunes –

    1. Using the USB cable, connect your device to your computer and open iTunes.
    2. Select Restore iPhone from the drop-down menu.
    3. Next, select Restore from the iTunes dialogue box.
    4. Select Next in the iPhone Software Update window.
    5. Click Agree in the following window to agree the licencing conditions and proceed.
    6. Wait for iTunes to finish downloading iOS and reset your device.

    How to Reset iPhone Without Password Using Third-Party Software?

    Using EaseUSMobiUnlock, you may quickly and easily unlock your iPhone without having to enter a password.

    It’s useful if you’ve forgotten your iPhone password and want to erase it from your device.

    When you use the tool to open an iPhone, all of its data will be erased, allowing you to fulfil your objective of resetting the device. If you don’t wish to lose your data, make sure you back up your iPhone first.

    Then, to restore an iPhone without a password, simply follow the steps below –

    1. Open EaseUSMobiUnlock, connect your iPad to your computer, and then click Start.
    2. Look for the device you are using and then select Download Firmware to get the most recent firmware for it. If the firmware has already been downloaded, choose the package instead.
    3. To continue, click Verify Firmware after you’ve downloaded or selected the firmware.
    4. Once the verification is complete, tap on Unlock and fill out the form in the new window. After that, all you have to do is select Unlock to begin unlocking your iOS device.
    5. Wait for your device to be reset without a password using this tool.

    How Can I Use iCloud to Recover My iPhone?

    If you have previously enabled Find My iPhone, you can only restore your iPhone using iCloud.

    1. Log in to your iCloud account first.
    2. After that, choose Find iPhone and specify which device you’re looking for.
    3. Make sure you’re erasing the correct device. Then select Erase iPhone. The device will be entirely reset as a result of this action.
    4. If you already backed up your files and data to iCloud, you can restore everything to the device.

    Final Thoughts

    So, this was all about how to factory reset iPhone without Password.

    It is critical to emphasise the necessity of remembering your iPhone’s lock screen password. Also, it’s a good idea to write down the passwords somewhere you’ll remember it, since this will save you from having to reset or erase your iPhone, iPad, or iPod to remove the passcode.