Author: Vishal Patel

  • How to Transfer Money from Venmo to Paypal?

    How to Transfer Money from Venmo to Paypal?

    PayPal and Venmo, two of the most popular online payment platforms, allow users to send and receive money quickly and securely between each other’s accounts.

    Want to transfer money from Venmo to PayPal but aren’t sure if you’ll be able to do so? Is there a method to send it as well?

    If that’s the case, you’ve come to the correct place!

    So, can you transfer money from Venmo to PayPal?

    Direct transfers from Venmo to PayPal are not possible due to the lack of integration between the two services, but you can do it by linking the same bank account to Venmo as well as PayPal.

    As soon as the money is linked, transfer it from Venmo into the same bank account and then add it to your PayPal balance.

    How to Transfer Money from Venmo to Paypal?

    To get started, you’ll need the following things ready –

    • Make a PayPal account.
    • You must have a bank account in the United States in the same name as your PayPal account.
    • Use the same name on your Venmo account as you use on your bank account.

    To move funds from Venmo to PayPal, follow the instructions below –

    Step 1 – Open a bank account and connect it to your Venmo and PayPal accounts:

    Step 2 – Go to your Venmo, click Transfer to Bank, and enter the needed amount once the bank accounts are connected.

    Step 3 – Select your preferred transfer option: 1-3 business days or Instant, then hit Transfer.

    Step 4 – Return to your PayPal account and select the Transfer Money option3 from the drop-down menu.

    Step 5 – Select When you add money to your account, you’ll be able to see the bank account that’s linked to both your Paypal and Venmo accounts.

    Step 6 – Select the bank account you want to add and click Add. In 3-5 business days, the money will be in your PayPal wallet.

    Read Also: How to Transfer Money from Paytm to Phonepe: Step by Step Guide

    Is Venmo Free to Use? 

    Venmo is a free app that anybody may download and use.

    Venmo is popular because everyone uses it for free, but there are some costs that must be paid.

    It does not imply that you must pay fees on a monthly or annual basis.

    Frequently Asked Questions (FAQs)

    Can you Move Money from Venmo to PayPal?

    Regrettably, no, not directly. There is currently no direct connectivity between Venmo and PayPal, thus making that easy transfer is not an option.

    Will I be Charged if I Accept a Venmo Payment?

    No, receiving money with Venmo is completely free.

    How Long Does it Take to Transfer Money from Venmo to PayPal?

    If you want it done for free, it will take one to three business days, but if you need it sooner, you can pay a 1% instant transfer fee for immediate access to your assets.

    Can you Turn Venmo into Cash?

    Yes! Your Venmo Debit Card can be used to make cash withdrawals at ATMs or to get cash back when you make a transaction anywhere in the United States.

    Final Words

    While it’s convenient to be able to transfer money from your Venmo account to your PayPal account, the lack of connection between the two accounts results in a lot of steps and time spent waiting for the money to arrive. When converting currencies, you must also be particularly cautious.

  • How to Find Apple Watch After Battery Dies?

    How to Find Apple Watch After Battery Dies?

    Even the most diligent of us can misplace something from time to time. It shouldn’t be simple to lose your Apple Watch because it’s supposed to stay on your wrist the majority of the time, but it does happen.

    So, how to find Apple watch after battery dies?

    iCloud and Find My are two fantastic solutions that will assist in reuniting you with your misplaced Apple Watch. Before you can find any Apple device, you must first enable Find My App.

    Apple’s “Find My” feature, which is available on all Apple devices, allows users to monitor and locate their misplaced device.

    Even if your missing gadget is turned off, the agency will assist you in locating it by sending you the last known location.

    Read Also: How to Find Missing AirPods Case?

    How to Set Up the “Find My” on Your Apple Watch?

    All Apple customers should enable this function on all of their devices so that they can easily track and locate them if they misplace them. It will take you no more than five minutes to complete the tasks below.

    1. Open the Settings application.
    2. Your name will appear at the top of the screen; simply tap it to move on to the next page.
    3. After that, tap on “Find My” app.
    4. Do you want certain friends or relatives to be able to see where you are? If that’s the case, enable Share My Location. Otherwise, disregard it.
    5. We’re almost there; tap the Find My iPhone icon on your screen to activate it, then tap OK.

    Most importantly, make sure that Enable Offline Finding is enabled. It will assist you in locating your misplaced gadget, even if it is discharged or turned off.

    Next, turn on Send Last Location, and you’re finished.

    This will activate the “Find My” app on your phone as well as any other Apple device you possess. Apple Watch or AirPods, for example.

    What Is the Best Way to Find a Dead Apple Watch?

    Because you have Find My on your iPhone and Apple Watch, it will most likely be simple to locate your misplaced Apple Watch, even if it is dead or switched off. As a result, follow the actions outlined below.

    1. Open the Find My app on your iPhone or iPad.
    2. When you click on the Devices tab, a new page will open.
    3. A map of your Find My enabled devices will appear on your iPhone or iPod screen.
    4. If your Apple Watch is drained or turned off, it will show as an Apple Watch with a blank screen on the map and sidebar. If your Apple Watch is turned on, it will show as an Apple Watch with an active Home screen on the map and sidebar.
    5. Next, choose your Apple Watch from the list of Find My enabled devices.
    6. To acquire walking or driving instructions to your Apple Watch’s general location, go to the Directions tab.
    7. If the lost Apple Watch is not dead but is turned off, you can use Play Sound to locate it immediately.
    8. However, if your Apple Watch is drained or turned off, you can enable Notify When Found to send alerts and location updates to your iOS device the next time it is turned on.

    You’ve seen how to find a dead Apple Watch with your iPhone; however, if you don’t have an iPhone or iPad, you can borrow one from a friend or family member and use it to track the missing Apple Watch. Continue reading below.

    How Can I Locate my Apple Watch on a Computer?

    Follow the below steps to locate your Apple Watch from your computer with the help of iCloud credentials.

    1. Go to iCloud.com on your computer.
    2. Enter your Apple ID and password to log in.
    3. In the lower-right area of the menu, select Find iPhone.
    4. Go to All Devices and then to Apple Watch.
    5. Look on the map for your Apple Watch’s location.
    6. If the watch is handy, press the Play Sound button.

    What to Do If Apple Watch Cannot be Found in Find My App?

    It’s possible that you won’t be able to find your Apple Watch using Find My iPhone or have it play a sound.

    One such scenario is when the smartwatch’s battery dies; in this situation, the app may display the watch’s last known location.

    Wi-Fi-enabled Apple Watches will only be able to report their location when they are linked to a known Wi-Fi network.

    If you have a cellular Apple Watch, it should be able to communicate with you as long as it’s registered with your mobile carrier and has a good signal.

    In both circumstances, your sole choice is to use Find My iPhone’s last known position to locate the Apple Watch. If you still can’t find your watch, follow the instructions below to put it in Lost Mode.

    Turn on Apple Watch’s Lost Mode (From iPhone or iPad)

    If you can’t find your Apple Watch, you can put it in Lost Mode to lock it down and inform anyone who finds it. From an iOS device, follow these steps to complete the process –

    1. Locate and open the Find My app on your home screen.
    2. Select Devices from the drop-down menu at the bottom of the page.
    3. From the list of connected iOS devices, choose your Apple Watch.
    4. Under Mark As Lost, tap Activate.
    5. Confirm that you want to mark the device as lost by tapping.
    6. Enter a phone number that will appear on your Apple Watch if it is found.
    7. You can either type a personalised message or choose Done to utilise Apple’s default message.

    Enable Apple Watch’s Lost Mode from Mac

    You can also use any PC with an internet connection to activate Lost Mode.

    To enable lost mode for Apple Watch from a Mac, follow the steps below.

    1. Log in to iCloud.com using your Apple ID and password.
    2. Select Find iPhone from the icon grid.
    3. Select All Devices from the drop-down menu at the top of the screen.
    4. Select your Apple Watch from the drop-down menu.
    5. Your Apple Watch’s current position (or last known location) will now be displayed on the map. Select Lost Mode in the upper-right corner of the screen.
    6. Enter a phone number that will appear on your Apple Watch if it is found.
    7. To enable Lost Mode, type a custom message to display on your Apple Watch, then select Done.

    Final Words

    So, this was all about how to find Apple Watch after battery dies. If you have misplaced your watch or lost it then this article will definitely help you. It is important to note that enabling Find My App on your iOS device is very essential in order to get a hold of your lost/misplaced Apple watch.

  • Phone Tapping: How to Check if your Phone is Tapped?

    Phone Tapping: How to Check if your Phone is Tapped?

    Ever wondered whether your phone was bugged when you heard an odd noise, such as a click or static noise?

    If that’s the case, you’re not alone. Many people are worried that their personal and professional communications might be exposed.

    Third-party apps can be used to monitor Android phones, while jailbroken iPhones can be spied on.

    So, how to tell if your phone has been tapped?

    Using the in-built phone tapping code is a simple approach to find and remedy problem. These fast codes provide you access to sensitive data about your device’s security. It’s as simple as calling a phone number; the phone will immediately recognise your actions and provide you with the answers.

    Continue reading to learn more about these valuable cell phone codes and hacks.

    Read Also: How to Unlock Kyocera Phone?

    How to Know If Your Phone Has Been Tapped?

    1. Disturbing Background Noise

    When on a phone call, you may high-pitched humming, hear pulsating static, or other unusual background noises, which could indicate that your phone might be tapped.

    When you’re not on a call, you can hear weird sounds like clicking, beeping, or static, which could also indicate the same.

    Strange noises do appear on cell and landline calls from time to time, so this isn’t always a solid sign that something is amiss.

    2. Higher Data Usage and Phone Bills

    The first sign that someone is watching your phone is an increase in data usage. You may also notice an increase in your phone bills.

    The majority of fraudulent programmes upload your data over the internet. Check your data use to discover if any unexpected apps or software is consuming data in the background suspiciously.

    3. Battery Issues

    Battery issues were an indicator of a phone tap before iOS and Android were popular. When it comes to cell phones, hot batteries are still an issue.

    In any case, you’re undoubtedly extremely familiar with a battery that has overheated. You may have even gone to a phone retailer to express your dissatisfaction with the situation. Most of the time, you’ll just be told that it’s standard for cell phones.

    Apple, for example, is usually only concerned if your device has become so hot that it has shut down.

    It could, however, be a dangerous software snooping in the background if the phone gets warm or loses energy too quickly even when it is idle.

    Check your battery usage to see if it’s due to a common cause, such as a botched app update or apps running in the background, or if there’s something wrong with your device.

    4. Suspicious Behavior

    Someone may have hacked your phone with a spy app and is attempting to tap your calls if it starts turning on and off or installing apps on its own.

    Ads that Appear in the form of Pop-up Windows

    Strange pop-up advertising and inexplicable speed concerns could also be signs of spyware or a tapping app on your device. However, a more prevalent rationale is that an obnoxious advertisement is attempting to sell you something.

    Personal Information Is Posted on the Internet

    Another method to know if your phone is being tapped is if personal information that is exclusively held on the phone has been exposed online.

    Notes, emails, photos, and any other data you’ve saved to your phone should stay there unless you reveal it to the world on purpose. A hacker could remotely take your data and post your sensitive files online if your phone is tapped.

    Strange Text Messages

    If you receive strange SMS text messages from unknown senders including distorted letters and numbers, this is another strong clue that someone is trying to tap your phone.

    5. On-Device Fake or Unknown Apps

    Checking for an unusual app on your phone is one of the simplest ways to see if your phone is being tapped or has spyware installed.

    Spyware is frequently installed without your knowledge. So, go through your installed apps list and look for any strange programmes.

    If your phone has been tapped, use phone tapping code to see if it has been tapped.

    You can use these phone tapping codes to see whether your calls, texts, or other data is being routed to another number.

    See if Someone has Picked Up on my Unanswered Calls: *#61#

    Scammers can intercept your calls and divert them to a different number. Conditional call forwarding is the term for this. When your phone rings once and there are no further evidence of incoming calls, you should start to scent a rat. You might not even notice the call forwarding if you simply miss the call.

    Hackers can also use this type of attack to forward your messages to a different phone number.

    When your calls go unanswered, use the *#61# code to see if anyone receives them. If you see any unusual indicators, phone ##61# to have these settings automatically erased.

    Show who Gets my Info when I’m not Around: *#62#

    When your smartphone is turned off or you lose connectivity, dialling this phone tapping code will reveal who receives your text messages and calls. Don’t be alarmed if this code returns a number; it could just be your voicemail. If not, dial ##62# to silence the hackers’ ears on your phone calls.

    Use *#21# to Check for Diversion

    This code will reveal whether a spy app on your phone has been diverting your calls, texts, data, and so on. As a result, calls or messages are diverted even before they are delivered.

    When you dial this code, the status of each diversion will be displayed alongside the numbers.

    When Phone is Busy or a call is Denied, Show Who Gets my Data: *#67#

    When you’re on another line or refuse a call, this code notifies you of calls and messages delivered to other numbers. If you enter this code, you will receive a response that will tell you if someone is looking for you. If it’s a phone number you don’t recognise, call ##67#.

    Diversion Scan Number: *#21#

    Some hackers go even further and relay all of your calls and texts, regardless of whether you’re available or not. Unconditional data forwarding or diversion is the term for this type of attack.

    Final Thoughts

    Don’t be excessively concerned: most of us will not be the target of a phone tap. Nonetheless, it’s a good idea to brush up on some fundamental security precautions. Only download apps and games from official app stores; Apple and Google screen apps and games.

  • Path of Exile (POE) Crafting Guide for Beginners

    Path of Exile (POE) Crafting Guide for Beginners

    POE Crafting Guide

    Crafting in Path of Exile can prove to be a tedious and complex task, sometimes eluding even the veteran players of the game.

    What is PoE Crating? PoE crafting refers to the process of either creating or improving items by adding or removing modifiers from them. Players can craft different items through multiple methods including the use of certain orbs and other currency, or even with the help of the PoE crafting bench, vendor recipes, or masters.

    PoE Crafting – All you Need to Know

    All the PoE players require the game’s in-game currency to do any kind of crafting or trading with items.

    Generally, crafting requires you to invest a lot of your currencies. That is why players need to make sure that all their crafting attempts are successful, therefore making the whole process cost-efficient.

    This is also the reason why many players tend to avoid crafting items themselves and choose instead to buy the desired items from another player/crafter. Thus, even though crafting in PoE has its downsides, if you become good at it, you can benefit a lot from it.

    Before you begin with your crafting journey, you must know one universal thumb rule for Path of Exile – you should avoid advanced crafting for different equipment and weapons unless you have access to high-level items (item level > 80). This ensures that the player will have the highest tiers of modifiers available.

    But don’t worry about the whole complex-sounding process. We have created the ultimate PoE crafting guide to make it easier for all gaming enthusiasts!

    The Ultimate Guide to Crafting in Path of Exile

    All the items in Path of Exile have different values. Their rarity is attributed to their colors.

    For example, the color white symbolizes normal items, blue symbolizes magic items, yellow symbolizes rare items, and orange symbolizes unique items. In the four categories, unique items are the most valuable, and they can break most of the in-game rules that restrict other items.

    This particular element of the game represents the number of affixes that each item can have.

    For example, normal items have no affixes. Magic items can have up to 2 affixes while rare items can have up to 6 affixes.

    Furthermore, affixes can further be categorized into prefixes and suffices.

    For example, magic items can have 1 prefix and 1 suffix, but they cannot have 2 affixes of the same kind. Rare items can have 3 prefixes and 3 suffices.

    This element of items is important because different modifiers can be either suffixes or prefixes.

    For instance, resistance is one modifier that will always be a suffix.

    Implicit Modifiers

    Apart from prefixes or suffixes, you have another modifier that is called an implicit. It is neither a suffix nor a prefix.

    Usually, implicit modifiers associate themselves with particular base items. They are quite lucrative when it comes to crafting in PoE because they guarantee that you will have one particular mod on the resulting item.

    Item Base

    The next important attribute for an item is its base. The names of all the items in the game represent their base. The base of the item is absolute. It won’t change even if you craft the item from normal into magic, rare, or unique. Because of the steadfast nature of the base, the implicit of the item also remains the same.

    Shaper/Elder Bases

    An item can also have the Shaper or Elder base. These categories of bases are represented by the cosmic or tentacle backgrounds respectively. You can spot items with these bases on the map with Shaper or Elder influence.

    Some affixes are exclusive only to items with Shaper or Elder bases.

    Advanced Mod Descriptions

    As we have mentioned before, the maximum number of affixes that any item can have in PoE is 6. But you might have seen many players wielding items that look as they have more than 6 affixes.

    So how does that happen?

    To find out, you need to look at the advanced mod descriptions tab of the item. To get more comprehensive information about any item, go to Options > UI > and check the “Advanced Mod Descriptions” setting. Once done, you can hold the Alt key and hover your cursor over the name of any item. This will bring up all the extra information.

    Here you can see that even if items that look as though they have 7 affixes only actually have 5 or 6 affixes. This implies that with enough crafting, you can add another prefix to the item, which makes it more valuable and useful.

    The entire advanced mod descriptions tab holds information like the name and tier of each affix along with the numeric range of each modifier.

    The tier of the affix is an important attribute. The tier of your item will also dictate the possible numeric range of your affix. The highest tier that your item can have is 1 while the lowest is about 13.

    Item Level

    The item level is another major attribute for any item within the game. The level of your item will determine the possible tier range for your affixes.

    Just remember that tier 1 is the highest, and the higher the tier, the larger will be the values of each affix. Thus, bigger item levels will allow items to have higher tiers.

    Different Types of Crafting in PoE

    Now that we have introduced you to the most basic structure of different items in the game, let us talk about some basic PoE crafting methods.

    Currency Crafting

    The most commonly used crafting method in Path of Exile is through the in-game currency orbs. These orbs can modify an item in different ways. The most basic currency orbs affect the quality of the item.

    • To give you an example, players can use armorer’s scrap to improve upon their armor.
    • Similarly, a blacksmith’s whetstone can improve the physical damage caused by the weapon.
    • Finally, the glassblower’s baubles can enhance the duration of the flask’s effects and buffs.

    All of these currencies are capable of enhancing the qualities of each item by up to 20% depending upon the type of the item.

    For example, these currencies can increase the quality of white items by 5% with each orb, 2% on magic items, and 1% on rare and unique items.

    Next up, we have orbs that players can use to upgrade item levels. For example, you can use these orbs to upgrade items from one kind of a rarity to another.

    • Orb of Transmutation can be used to upgrade a normal (white) item into an upgraded version like a magic item. This item will have one or two affixes.
    • Orbs of Alchemy, on the other hand, can upgrade a white item into a rare one that contains up to 4 to 6 affixes.
    • Regal Orb is a fairly valuable one. Players can use it to upgrade their magic items to rare items. This orb adds a single affix each time, with the current modifiers being retained as the new ones are added.
    • Orb of Chance is an exciting orb. When you use it, it can transform any normal (white) item into a different random rarity. Getting a unique item out of using the Orb of Chance is a rare instance.

    Please note that using these orbs won’t change the base type of the item, neither will it change the implicit of the item.

    Next up, we have orbs that can help players remove or modify the existing mods from an item:

    • Blessed Orb is an interesting currency as it can re-roll all the values of implicit modifiers if your items have one. It works on all kinds of rarities.
    • Orb of Augmentation can allow players to modify their items by adding an extra affix to a magic item that only had a single one.
    • Orb of Alteration holds similar properties. Players can use this orb to re-roll random mods on a magic item.

    These are the basic orbs that players should know about before they go on an adventure of crafting in the game. You can read up more about the more rare orbs with enhanced abilities on the game’s website or wiki.

    Crafting Bench

    The other basic crafting method is to use the hideout Crafting Bench.

    You get access to your hideout following the completion of a quest in Act 2. The NPC Helena will be the one who gives you access to your hideout. While there are other benefits of the hideout, the most important benefit is the availability of the crafting bench.

    Normally, you can use the crafting bench to add a single affix on a magic or rare item which has less than the maximum amount of affixes allowed. When you first encounter the bench, it will come with some default recipes.

    However, you can find more as and when you play the game and completely different types of quests and content.

    You can retrieve some of these recipes in some parts of the Delve mine, or after unveiling the items that the Syndicate members drop. The more esoteric of these recipes can be found in the Incursion Temple rooms once you complete the prophecies.

    It is important to remember that the affixes that you add through the crafting bench will have lesser values than the ones that are naturally rolled. However, it is still a great option if you want to improve your gear at a cheap rate.

    However, the biggest benefit of the Crafting Bench is that it offers the players some control and flexibility when they wish to customize their items. On the other hand, up-gradation through currency orbs is completely random and based on luck and chance.

    Final Thoughts

    In this article, we have introduced you to all the avenues of crafting a special, overpowered item in Path of Exile. However, the process is still complex and would take some personal experience for players to get the hang of it.

    We recommend that you use a PoE crafting simulator called the Craft of Exile before you try out your luck in-game and waste your valuable resources.

    The craft of Exile, an online tool, aims to make crafting easier for PoE players to find out the easiest, best, and most cost-effective methods to achieve their crafting goals.

    We hope that this article was able to help you. Enjoy playing, enjoy crafting!

  • How to Repair a Bow in Minecraft with Anvil, Grindstone, or Crafting Table?

    How to Repair a Bow in Minecraft with Anvil, Grindstone, or Crafting Table?

    Learn How to Repair a Bow in Minecraft

    Minecraft is one of the longest-serving and most popular games in 2021. Among the many immersive components of Minecraft is the ability to create and use weapons. The bow is one of the most common and efficient weapons in the game.

    A lot of people use a common bow to protect themselves and for hunting in Minecraft. That being said, the prolonged use of the weapon makes it susceptible to damage. As a result, you can accidentally break your bow in Minecraft while using it. But is there anything that can be done once you break your favorite weapon?

    Absolutely!

    In this article, we’ll discuss three methods on how to repair a bow in Minecraft.

    Read Also: Aka.Ms/Remoteconnect Minecraft Login Error (Fixed)

    When Should I Repair my Bow?

    Being a gamer myself, I completely understand the frustration that you would feel when your bow breaks down in the middle of the game. So why does it happen?

    Unfortunately, that’s just how Minecraft works!

    Every item and weapon in Minecraft comes with a fixed amount of HP (hitpoint). The HP of an item keeps on decreasing as and when you use them in-game.

    A bow is a weapon that you would use frequently, it will keep on losing its stats and HP until eventually, it breaks down. When this happens, you can either repair your bow or craft a new one!

    Please note that crafting and repairing are two separate processes, and we’ll mostly cover the repairing process in this article.

    What Kind of Bow Can I Repair?

    Before you learn how to repair a bow in Minecraft, you should know that the game uses two types of bows.

    First, you have the more commonly used bow called the normal bow. It functions regularly and is a good choice for hunting and protecting yourself.

    Second, you have the enchanted bow. This is the bow that comes with enhanced abilities and powers. This is a more powerful bow as compared to the regular one and thus offers the players more flexibility.

    Now comes the important part – do enchanted bows break as well?

    Unfortunately, the answer is yes.

    With regular use, enchanted bows are as vulnerable to breaking down completely as the regular ones.

    Fortunately, the game allows you to repair both of them, which makes the experience even more immersive.

    3 Fool-Proof Methods to Repair a Bow in Minecraft

    There are three different ways through which you can repair a bow in Minecraft. The first is the most common method which requires the use of an Anvil. However, this method is not the first preference for the more experienced gamers as Crafting Anvil requires a lot of iron. The second method involves the use of Crafting Table, while the last method requires the use of Grindstone.

    In this article, we’ll provide a comprehensive guide on how to use each of these three methods to repair a bow in Minecraft.

    1. Repairing a Bow Using Anvil

    Repair a Bow in Minecraft using Anvil
    Repair a Bow in Minecraft using Anvil

    This method is the most common one, used by tons of Minecraft players to repair all their broken items. Thankfully, you can also use an anvil to repair your regular or enchanted bows.

    The anvil is a useful alternative to the grindstone. The anvil allows players to rename as well as combine items in your inventory. But before you use an anvil to repair your bow, you will need to craft an anvil.

    To do this, you will need 3 iron ingots using which you can cast iron blocks and 4 iron ingots for repairing the bow.

    Once you’ve made sure that you have all the required items, you can proceed with the following steps:

    Craft an Anvil

    • Open a 3×3 grid crafting table.
    • You will first need to place three iron blocks in the first row.
    • Place one iron ingot in the middle row.
    • The remaining three iron ingots will go on the last row of the grid.

    The result of this formation will be an anvil.

    Repairing a Bow using an Anvil

    Now that we have an anvil at our disposal, we can go ahead and repair our bow. For this, you will need to make sure that you have an anvil in your inventory along with all the items that you require to craft a bow.

    • Go to your Minecraft inventory and open the anvil.
    • Place the bow that you want to repair in the first slot while placing the unit of material that you need to craft a bow in the second slot.
    • Finally, the result of the process will be a repaired bow.

    Note that if your bow is enchanted, your bow will be repaired without the anvil hurting any of its abilities.

    2. Repair a Minecraft Bow with a Crafting Table

    How to Repair a Regular Bow in Minecraft Using Crafting Table
    How to Repair a Regular Bow in Minecraft Using Crafting Table

    A crafting table is an item that all Minecraft enthusiasts are familiar with. You can use a crafting table to repair your bows in Minecraft.

    However, the crafting table has one major downside – it is not suitable for fixing enchanted bows. While crafting tables can fix regular bows without any issue, it won’t do the same with enchanted bows.

    If you fix an enchanted bow using a crafting table, it’ll lose some of its magic and qualities. Thus, if you want to repair an enchanted bow, using the anvil is still the best option.

    Creating a Crafting Table

    A player should have at least four wooden blocks to create a crafting table.

    • Open your inventory by pressing E.
    • Place the wooden blocks 2×2 on the crafting section.
    • On the right side box, you’ll be able to see the Crafting Table. Now you can save it.

    Repairing a Bow Using a Crafting Table

    • Open the crafting table in Minecraft.
    • You will need to place two ordinary bows in the 3×3 blocks in the Crafting Table.
    • The resulting bow will be a repaired bow with full stats and HP.

    3. Repairing a Bow Using a Grindstone

    Grindstone to Repair an Enchanted Bow
    Grindstone to Repair an Enchanted Bow

    Grindstone is a simple alternative to an Anvil. It is a great option if you want to repair an enchanted bow.

    You can use a grindstone to combine different tools and armors without incurring any extra cost. Grindstone also doesn’t require any extra inventory items and you can find them for free.

    The prerequisite for crafting a grindstone is as follows: 2 sticks, 1 stone slab, 2 oak plants.

    Once you have all the necessary items, proceed with the following steps:

    • Open the crafting table in Minecraft.
    • You can now craft the grindstone using the items mentioned above.
    • Once you have crafted the grindstone, take two bows and place them on the grinding slot.
    • The result will be a repaired bow with enhanced abilities.

    Final Thoughts

    In this article, we have discussed the various methods that players can use to repair their regular and enchanted bows in Minecraft. While all the three steps are efficient in their way, each has their own ups and downs.

    The correct method depends on the gamer’s requirements and inventory.

  • How to Create Discord Poll on Mac and Windows PC?

    How to Create Discord Poll on Mac and Windows PC?

    With the popularization of online interactions, Discord has become a leading name among the list of established social media platforms.

    If you are an online gamer, influencer, or content creator then having a Discord channel can allow you to keep your followers updated and interested in your work.

    Creating a Discord poll is a great way to keep your fans engaged within your Discord server.

    But not many people know how to create a poll on Discord. There are multiple ways to do this, and Discord users are still confused about the right method.

    But don’t worry. In this article, we’ll walk you through on how to make a poll on Discord step by step.

    Read Also: How to Change Discord Profile Picture (PFP)?

    3 Ways to Create a Poll on Discord

    Here are three simple and effective methods to create a Discord poll.

    1. Creating Polls Through Emoji Reactions

    Create Discord Poll Using Emoji Reactions

    Usually, Discord features require the use of bots.

    However, creating Discord polls using emojis, won’t require the poll bot Discord usually offers.

    Here’s how this works –

    • Through an emoji reaction poll, users can answer poll questions by clicking on certain emojis, and each of these emojis represents a different answer.
    • This method works perfectly when you don’t want to use a bot. Inviting bots to your server usually offers a smoother experience, but may involve a lot of hassle.

    To create a Discord poll using emoji reactions, do the following –

    Step 1. Open Discord: Open the Discord app by tapping on the gamepad icon on your device. You can also access Discord through your web.

    Step 2. Open the Relevant Server: On the left side of the Discord window, you’ll see the list of servers that you are a part of. Click the initials/profile picture of the server where you want to create a poll. If you are the owner or the admin of the server, you can make an emoji reaction poll.

    Step 3. Create a Channel: You will then get an option to create a dedicated channel especially for your poll. To do this, click on the plus (+) sign near the “TEXT CHANNELS” heading. Next, type in a name for the channel and then tap on “Create Channel”.

    Step 4. Create User Permissions for the Channel:

    Here’s what you need to do:

    • Find and tap on the gear icon next to the name of the channel.
    • Select “Permissions“.
    • Under “Role/Members”, select @everyone.
    • Click on the green “tick” (✓) tick located on the right side of the “Read Message History” heading.
    • Click on the red “cross” (X) next to every other option while scrolling down.
    • Finally, click on “Save” changes before clicking the X sign on the upper right corner of the window.

    Step 5. Type in your Poll Question: After this, you can frame your question within the channel’s text box.

    Step 6. Set Reaction Emojis to your Question: After this, you will need to set different emojis that each corresponds to a different answer.

    To do this, hover your mouse pointer over the question and click on the “Smiley” face. After this, choose the emoji that you want to use as a reaction. For example, you can choose the wink emoji for yes. Then choose other emojis that you want to associate with other answers. For example, you can use the crying emoji for no. Similarly, each emoji will represent a different answer that you choose.

    Step 7. Tell Members to Vote: The users on your Discord channel can then click on different emojis to vote their favorite pick. The number of votes for each category will be displayed next to their corresponding emojis.

    Step 8. Count the Votes: Once done, you can tally up the votes and compare the winner. This is a fairly simple process as all the information will be displayed.

    2. Creating Discord Polls through Poll Bots

    Create Discord Polls Using Poll Bots

    Creating a Discord poll by inviting a poll bot to your channel is more efficient.

    Here’s how you can do it –

    Step 1. Go to the top.gg website and click on “Invite” in the poll bot listing.

    Step 2. You will then have to sign in to your Discord account. Select the server where you want to create a poll under the “Add to Server” drop-down.

    Step 3. Click on “Continue” and then “Authorize”.

    Step 4. Now, open your Discord application through the gamepad icon on your device. Log in to your account.

    Step 5. From the left panel, select the server where you installed the bot. Open the channel where you want the poll to be created.

    Step 7. You can now create the poll.

    There are 3 types of polls that you can create through this method:

    1. Yes/No Poll

    • Type +poll your question here on the message box and hit enter.
    • The poll bot will then display your question along with a thumbs up, thumbs down, and shrugging reaction emojis.
    • The members on your channels can then use different reaction emojis to vote.

    2. Multiple Reaction Poll

    • Type +poll (your question) [option 1] [option 2] [option 3]… on your message box and hit enter.
    • The poll bot will then display your question along with all the alphabetical emojis that correspond to different answers.
    • Users can cast votes accordingly.

    3. Strawpoll

    • Type +strawpoll(your question) [option 1] [option 2]… on your message box and hit enter.
    • The poll bot will then display your question along with a link to the poll on strawpoll.me.
    • Members of the channel can then cast their votes through strawpoll.

    3. Creating Polls Through EasyPoll Bot

    Create Discord Poll Using Easypoll Bot

    EasyPoll is one of the most commonly used Discord bots because of its simple and effective nature.

    Step 1. Go to easypoll.bot/invite on your browser. Sign in to your Discord.

    Step 2. Select the server where you want to create a poll and click on “Continue”. Remember that you must be the founder or admin of the server to create polls.

    Step 3. You can then review the permissions. It is recommended that you do not make any changes to the predefined permissions unless necessary. The default settings are there to make it easier for users. Once done, click on “Authorize”.

    Step 4. Click on “Join EasyPoll Discord Bot”. This will open up a welcome screen for the easypoll bot.

    Step 5. Select the channel where you want to create your poll. Type in /easypoll on your text box to get a list of all Easypoll’s main commands.

    Step 6. Type in /poll or timepoll and press the tab button. Simply use /poll when your poll doesn’t need to be time-sensitive. Timepoll is better when you want to specify the time limit of the poll. After pressing the tab button, you will be required to enter the poll question.

    Step 7. Enter the poll question and then press the tab button. Some additional poll options will be displayed.

    Step 8. If you are doing a timed poll, enter the length and press tab.

    Step 9. Enter the possible answers to your questions. To this:

    • Click on allow multiple choices at the top.
    • You can type true if you want to allow people to select more than one answer. Type false otherwise.
    • Click on answer1 and type the first possible answer. Press tab.
    • Click on answer 2 and type the second possible answer. Press tab.
    • Repeat the process till you type in all the possible answers.

    Step 10. Finally, press Enter to start the poll. Anyone in the channel will be able to participate in the voting.

    Step 11. If you are using a timed poll, it will end automatically. However, if it is an untimed poll, you will need to type /closepoll to end it manually. Once done, you can end the poll and view the results.

    Final Thoughts

    This article gave a comprehensive guide on how to create a Discord poll through 3 different methods. Each of the methods is simple to execute. The only difference lies in the number of additional features and flexibility that each method offers.

  • Extratorrent.cc Proxy List – Unblock Extratorrent Mirror Sites

    Extratorrent.cc Proxy List – Unblock Extratorrent Mirror Sites

    Do you remember how popular extratorrent.cc used to be?

    It was arguably the biggest torrent platform following the shutdown of Kickass Torrents.

    Unfortunately, extratorrents.cc shut down all its operations in 2017 after a mutual decision by its owners. The website stopped functioning, and the news came as a shock to the millions of users who had come to love the website.

    But all hope is not lost. Do you know that there are some proxies available that can help you unblock extratorrents and use them?

    What are Proxies or Mirror Sites?

    You might have come across the term “proxy” many times in your life. A web proxy is built on the same model. Web proxies are mediators or middlemen that operate between the clients and the torrent websites.

    These proxies are generally hosted in regions where there are little to no restrictions on torrent activities. Thus, when a client from a different region tries to gain access to any blocked torrent website, the request first goes through the proxy server. The request then gets directed to the torrent site, which redirects the response back to the client. In this manner, proxies are capable of unblocking different torrent websites in areas where they are restricted.

    About Extratorrents

    If you know a thing or two about piracy, you might have heard about extratorrents. It has established itself in the pages of history as one of the most popular and longest-serving torrent websites.

    Extratorrent first surfaced in 2006. Back then, piracy was a huge hit on the internet. Millions of users flooded in to use extratorrent’s services every month. It had a huge client base from all over the world. At one point in time, extratorrent became the second most frequently visited torrent website on the internet, only behind The Pirate Bay.

    While torrent websites make frequent appearances and disappearances, extratorrent provided consistent service for a long time. In 2016, it celebrated its tenth anniversary.

    Like every other torrent website, extratorrent received a tremendous amount of criticism and flak for distributing copyrighted material for free. The website managed to survive the pressure for quite some time.

    Unfortunately, 2017 was the last year where the original extratorrent was found on the internet. The news came as a heart-breaking revelation for all torrent enthusiasts.

    The impact of extratorrent was such that people could not come to terms with the fact that their favorite torrent website was shut down. Immediately after the collapse of the original extratorrent, mirrors and proxies started surfacing. If you don’t know what a mirror is, it’s quite simple – mirrors are replicas of the original websites that look and provide the same kind of services as the original.

    The first extratorrent mirror appeared only after a short few minutes following the closure of the original website. Due to the popularity of extratorrent, you’d find hundreds of mirrors today.

    However, most of them are slow, buggy, or blocked by ISPs, especially in South Asian countries like India, Bangladesh, and Pakistan where torrent viewership is high.

    So which one of these mirrors and proxies are usable? Let’s find out.

    List of Proxy Sites to Unblock Extratorrent

    These are some of the working proxies that we’ve tried and tested in the year 2021 –

    LinkStatus
    Proxy 1Online
    Proxy 2Online
    Proxy 3Online
    Proxy 4Online
    Proxy 5Online
    Proxy 6Online
    Proxy 7Online
    Proxy 8Online
    Proxy 9Online
    Proxy 10Online

    You can use any of these proxies to get the same feeling and experience as using the original extratorrent website that rocked the torrent world back in 2017.

    Do you Need VPN to Access Extratorrent Mirror Websites?

    No, you do not!

    You can use any of the mirrors that we mentioned above in the article without the added protection of a VPN. The mirror websites use a process called cloning to fetch the homepage of the original extratorrent.

    Due to this reason, these mirrors and proxies require regular link updates to remain functional. That is why you might find that many of the proxies are not working sometimes. In such a case, you can simply move on to the next link!

    Can these Mirrors and Proxies be banned by the Government in your Region?

    Fortunately, it is not technically possible to ban the mirrors and proxies of extratorrents. The mirrors merely act as an intermediate between the client and the website servers. If for some reason, you are unable to gain access to extratorrent through any of the mirrors or proxies, the simple solution is to just move on to the next available proxy!

    Final Thoughts

    In this article, we compiled a list of working proxies for extratorrent in 2021. We tried and tested each of these links to ensure that they are in working order. If you find that any of the links have become dysfunctional, you can simply try out the next one.

    Happy torrenting!

  • How to Factory Reset MacBook Pro?

    How to Factory Reset MacBook Pro?

    Are you trying to figure out how to factory reset MacBook Pro?

    If you’re thinking about selling or trading in your old MacBook Pro, you’ll want to erase all of your data.

    Of course, it isn’t the only reason you use the self-wiping features on your devices. You might be trying to free up some iCloud storage.

    Perhaps your Apple Watch isn’t functioning perfectly, and you think a fresh start might be the answer.

    I’ve detailed how to factory reset MacBook Pro (or iMac) to a like-new condition below.

    Make sure you have a recent backup of your MacBook Pro before you factory reset it.

    Things to do Before Resorting your Mac to Factory Settings

    Before we get into the details of how to wipe a Mac clean, there are a few things you should do first, such as backing up your data, logging out of your accounts, and turning off iCloud.

    Sign Out of your Accounts

    Did you know that the stuff you’ve bought for Apple TV or Music can only be played on five devices? 

    This implies you can only authorize your account on a maximum of 5 Macs. If you want to give your Mac to someone else, ensure it isn’t connected to your account.

    To restrict the number of devices connected, certain apps with a limited licence, such as Apple TV and Music, use an authentication system.

    Before learning how to restore Mac to factory settings, it’s an excellent idea to deauthorize these apps, including purchased Adobe products (Illustrator, Photoshop, and so on).

    Read Also: How to Download Music from Apple Music to Computer?

    Make a Backup of your Data

    Before learning how to reset Mac, an essential thing to do is to back up your data to avoid losing access to your hard drive’s contents. 

    You don’t want to lose videos or photographs from years ago on your MacBook.

    Disable iCloud

    By opting out of iCloud, you may ensure that any bookmarks, reminders, notes, or other saved cloud data are unavailable to new users. 

    Specific tools, such as Find My, may still allow you to interact with a computer that has been wiped clean if you do not sign out of your iCloud account. You don’t want to discover that you still have access to your old computer after it’s been sold.

    Log out of your iMessage Account

    Before performing a factory reset on a Mac, be sure you’ve signed out of iMessage. If your computer is set up to send and receive iMessage chats, you’ll want to make sure your private messages aren’t accessible to a new owner.

    Bluetooth Devices Must be Unpaired

    This is not a required step, but it is recommended if you sell or give away your Mac but maintain the Bluetooth devices you used to connect to it, such as your keyboard, mouse, AirPods, or trackpad. If the Mac is within your Bluetooth range, this will prevent inadvertent pairing.

    How to Factory Reset MacBook Pro?

    Have you finished backing up your data and signed out of everything? 

    If you answered yes, you’re ready to clean your Mac and give it a fresh start. The steps below will show you how to reset your MacBook Air or Pro.

    Step 1 – In Recovery Mode, Restart your Mac

    This is a straightforward procedure. The directions, however, varied depending on the type of machine.

    We’ll show you how to restart Intel-based and M1 Macs in Recovery mode in the sections below.

    Intel Macs should be Restarted in Recovery Mode

    • Choose Restart from the Apple menu in the top left corner of the screen.
    • Hold down the Command and R keys on the keyboard at the same time when the system restarts until the Recovery Mode window appears.
    • To verify the operation, enter your admin password.
    • The macOS Utilities window should now appear.

    M1 Macs should be Restarted in Recovery Mode

    • Select Shut Down from the Apple menu.
    • Hold down the power button until you see the Options screen.
    • Continue by selecting Options > Continue > fill in your administrator password
    • The macOS Utilities window should now appear.

    Step 2 – Delete All Data from the Hard Drive

    To delete your hard drive, follow these steps:

    • In the Utilities window, select Disk Utility.
    • Select a startup disc.
    • Erase is the option at the top of the Disk Utilities window.
    • From the options, select Mac OS Extended Journaled version.
    • Select erase option.

    When the operation is finished, select Quit Disk Utility from the Disk Utility menu in the top left corner of the screen.

    Step 3 – Restart the Computer and Reinstall the Operating System

    • After wiping the hard drive, you’ll be prompted to confirm whether or not you want to reinstall the Mac OS by following the on-screen instructions.
    • That’s all there is to know about Macintosh formatting. The computer will complete a new operating system installation using factory settings.
    • When passing your Mac to a new owner, pressing and holding the Command + Q keys will stop the process and allow the new owner to finish any essential information.

    To turn the Mac off and make it ready for the next user, select Shut Down. If you want to keep your Mac, you’ll have to download any software you used previously.

    Your Mac should no longer contain any traces of your personal data now that it has been wiped clean. It’s now ready to start a new life with you or with someone else.

    Final Words

    So, this was all about how to factory reset MacBook Pro. If you are thinking about re-selling or something is not working right in your device, then factory reset is one of the best options.

  • Why is my Laptop so Slow: Reasons and Solutions

    Why is my Laptop so Slow: Reasons and Solutions

    Sometimes, when I just want to play games or work peacefully, I have to ask myself this one simple question – why is my laptop so slow?

    Over the years, I could almost feel the change in my laptop’s processing speed. It became slower and slower until gradually it became useless.

    If you want to avoid that situation, you need to start asking that question earlier. There might be plenty of reasons why your laptop might be running slower than it used to.

    Fortunately, such technical issues have solutions as well. Thus, if done right, you can get your laptop back to its optimum performance.

    Here’s how –

    8 Reasons Why Your Laptop is Slow and How to Fix Them

    A slow laptop isn’t the problem. The slow speed becomes an issue when your laptop acts slower than its natural processing speed.

    In such a case, there might be some fault or issue that is inhibiting the potential of your laptop. You need to address and fix them to get your laptop back to its maximum capability.

    1. You have too many Programs Running in the Background

    I remember that when I had to run high-resolution games on my laptop, I used to manually close all the unnecessary applications that run in the background.

    Even if you close some programs, they keep on running in the background. This wastes a lot of your laptop’s processing power and RAM usage, causing your laptop to run slowly.

    There’s a simple fix for this.

    Solution

    The most effective solution is to simply close the background programs manually.

    To do that, you can use the Windows Task Manager. Hit Ctrl + Alt + Delete simultaneously on your keyboard and select Task Manager. Alternatively, you can just hit Ctrl + Alt + Esc buttons to open the Task Manager directly.

    In the task manager, click on Processes to see all the programs that are running in the background.

    Close the ones that are eating up your computer’s processing speed.

    Please note that some default windows programs need to run in the background at all times. Closing them might cause your system to crash.

    2. There are too many Start-up Programs

    Every time you boot your laptop, some start-up programs run automatically. While some of these programs might ask your permission to run, most of them simply start running on their own.

    If your laptop has a large number of start-up programs, it’ll eat up a lot of memory causing it to lag.

    Solution

    You can disable the unnecessary and excessive start-up programs that you don’t need. To do this, click Ctrl + Alt + Esc to open Task Manager.

    On the top of the window, click on Startup to view additional details on start-up programs. Here, you’ll see a list of programs that run automatically when you boot your laptop.

    Select the programs that you don’t want to run automatically when you start your laptop and click on the “Disable” button on the bottom right of the window.

    3. There are too many Temporary Files on your Laptop

    Your laptop creates temporary files as and when you are creating or editing a file.

    Ideally, your laptop should get rid of all the temporary files when you close a program.

    However, some temporary files often remain stored in your computer’s drive. These files usually come with the “.tmp” extension or start with the tilde (~) or dollar ($) sign.

    Solution

    On your laptop’s start menu, search for ‘Disk cleanup’ and then click on open. You will then see a pop-up window. Use the window to choose the drive where you want to perform the cleanup.

    Usually, the temporary files are stored in the C drive. Click on OK and make sure to check the box next to Temporary Files.

    4. Your Operating System is Outdated

    Trust me, I know how frustrating the OS update reminders are. I used to avoid them with all my heart.

    Unfortunately, if you don’t update your OS frequently, your laptop might lack the latest driver updates and software patches. Over time, this will cause your laptop to slow down and leave them vulnerable to virus and security threats.

    Solution

    The simple solution is to check if your operating system is up to date.

    To check, use the search bar on your laptop’s start menu to type “update” and hit enter. Click on Open and then select Download if it shows any available updates for the operating system.

    5. Your Laptop is Infected with Different Kinds of Viruses

    Viruses are the ultimate killjoys for laptop enthusiasts. They can cripple your system’s performance and make it run slower than a snail on a highway.

    If your laptop is infected with viruses, you need to get rid of them as soon as possible.

    Solution

    The solution is simple – use a trusted antivirus software. If you don’t use any antivirus software, we recommend you buy one. Or if you want an urgent fix, there are many free alternatives available on the internet.

    Use any of your preferred antiviruses to conduct a deep scan on your laptop. The scan results will clear if your laptop is infected with any viruses. If it detects any viruses, simply ask the antivirus to get rid of them.

    In Case of Malware: Even if your antiviruses show that your computer is perfectly safe, that might not be the case. Certain malware can elude the watchful gaze of any decent antivirus. Hence, we recommend that you run a malware scanner on your laptop as well.

    6. There are Fragmented Files that are Affecting your Laptop’s Performance:

    A computer’s files are stored at different data points within the memory. They are not altogether like a train. So when you delete, create, or edit, any files, some of the data might become fragmented.

    The different pieces of files will be stored at different parts of your laptop’s hard drive. This causes your laptop to slow down because then your processor will have to jump between various data points to find and grab different pieces of information.

    Solution

    Windows 10 conducts a defragmentation process every week. However, if your laptop is running slow, you can defragment your files manually as well.

    You can do this by using the search bar in your laptop’s start-up menu. Type in Defrag in your search bar and hit enter. Then click on open; you will see a pop-up window. On that window, click on Analyse to view details on how fragmented your files are.

    If you find that you have a lot of fragmented files, click on Optimize. Wait for the drive to reach 0% fragmented files and then reboot your laptop. Check if there is any difference in your system’s performance.

    7. Your Hard Drive is Updated

    Is your laptop using the conservative hard disk drive (HDD)?

    While HDD served its purpose well, it has now become obsolete. Nowadays, solid-state drives (SDDs) are trending in the market. That is because SSDs are more durable, last longer, and it can read and write data several times faster than SSD.

    Solution

    If your laptop is not an old one, it might have empty M.2 slots where you can install an SSD. You can do it manually using a screwdriver or consult a professional. If your laptop does come with an M.2 slot, you can use your old HDD as a backup drive.

    8. Your Laptop doesn’t Have Enough RAM

    The higher the amount of RAM on your laptop, the better it will run concerning the intensity with which you lose your laptop.

    Bigger applications and multitasking require a high amount of RAM. If you try to do heavy operations on a laptop with low amounts of RAM, it’ll not run properly.

    Solution

    First, you need to find out how much RAM your laptop has. You can do this by locating the “My PC” icon on your desktop, right-clicking on the icon, and then choosing “Properties”. Alternatively, search for “About” in your search bar at the bottom of your screen and click on open. You will see your laptop’s RAM under Device Specifications.

    If you find that your RAM is not enough, you can upgrade it only if your laptop comes with detachable ram Cards. Some of the laptops have RAM cards that are soldered firmly to the motherboard. In such a case, you cannot swap them out with an upgraded alternative.

    Moreover, before you upgrade your RAM, you will need to get some extra information like what is the maximum amount of RAM that your laptop can handle, how many RAM slots you have, and so on.

    Final Thoughts

    We’ve given a comprehensive list of all the problems that could be the reason behind your laptop running slow.

    We recommend that you try each of the solutions that we have mentioned one by one and reboot your laptop to analyze any changes or improvements. If you have tried all the solutions and your laptop is still running slow, you might, unfortunately, have hit a dead end.

    You can consult an engineer to check your laptop for hardware issues, or simply buy a new one.

  • How to Ground Yourself When Building a PC?

    How to Ground Yourself When Building a PC?

    Disclaimer: Building a computer requires prior knowledge and necessary precautions. Please make sure that you know what you are doing, or else you might end up damaging your computer, injuring yourself, or burning your house down.

    The above disclaimer is a good representation of how important it is for you to know how to ground yourself when building a PC.

    If you have only started venturing into the exciting world of building PCs, you might not know a lot about static, and how it can dismantle your most expensive and delicate parts and components. Even something as little as a simple wrong touch can deteriorate or destroy an entire electric component.

    So how can you prevent this? The answer is grounding.

    That being said, you should know that everyone on the internet has their way of doing it. There are countless debates on tech forums where people are trying to defend their methods while discarding the others.

    But you don’t need to get into that. We got you covered.

    What is Grounding and why is it Necessary?

    Grounding yourself in terms of electrical engineering is removing any amount of excess voltage or charge from an object that you are in contact with. This process will help secure you against any form of electric shock that comes when you are operating with machines, electronics, and other objects that are prone to electrical accidents.

    There are many ways to ground yourself when building a computer, and people use different methods to protect themselves.

    So why is it important to ground yourself while building a computer?

    First and foremost, it is for your safety.

    Secondly, grounding also helps protect your computer’s internal components that can be damaged through an electrostatic discharge (static electricity).

    While it is fortunate that the likelihood of you or your PC being destroyed with static electricity is low, accidents can and do happen. Make sure that you take all the necessary precautions before you set out to work on your PC.

    Preparation and Precautions to Take Before Building a PC

    Grounding yourself is necessary, but so is taking the necessary precautions. Here’s what you need to do before you begin the process of ground yourself.

    1. Avoid Working on a Soft Surface

    First and foremost, you should only assemble your computer on sturdy surfaces like a wooden table, countertop, and so on. This reduces the probability of excess static build-up.

    Avoid soft surfaces like carpets, blankets, and towels at all costs!

    2. Stand Barefoot on a Hard Surface

    Never stand on a carpet or wear your socks while building your PC as it gives some amount of charge to your body. If you have to stand on a soft surface then make sure that you take excessive precautions.

    Wearing a rubber slipper, or shoes with rubber soles can do the trick.

    3. Avoid Static-Friendly Garments

    If your clothing is made of static-inducing materials like wool or synthetic fabrics, you need to change into something else. Cotton clothing is the best option while you are working on building a computer.

    4. Avoid Dry Environments

    Static build-up is a greater threat if you are working in a dry atmosphere. If you are building your PC in a dry environment, you can run a humidifier if you possess one. If not, you need not invest that kind of money just for this. This is an optional precaution that can be skipped in most cases.

    But if you wish to stay on the safe side, you can hang a wet cloth in front of a fan to humidify your workspace.

    5. Store all Electrical Components in Antistatic Bags

    Last but not the least, all the brand new, store-bought computer components should remain in antistatic bags until you are ready to install them. This prevents any kind of static build-up on the said components.

    How to Ground Yourself When Building a PC: 6 Steps

    Here’s what you need to do –

    1. Learn About How Grounding Works

    The human body can transfer some built-up static to any sensitive computer component upon contact. The solution for this is to release the static into something more durable. This can be achieved by using something metallic that is directly or indirectly touching the floor.

    2. Ground Yourself Through Your Computer’s Case

    This is the most common solution used by the majority of computer builders. Before you touch or work with a component that can be destroyed or deteriorated by ESD (like the motherboard), you will need to touch an unpainted metallic area on your computer’s case.

    3. Ground Yourself Again After Every Two Minutes

    For this, you will need to get in direct physical contact with a metal object every other minute. Please make sure that this object is an unpainted metal with a clear ground path. A good example of such an object is the metal radiator on your computer’s case.

    4. Using Anti-Static Wristband

    If you have done your homework, you must already know about these wristbands. Using an anti-static wristband is the simplest and most effective solution. You can buy one for a cheap price at any of the nearby electronics stores. All you’ll need to do is strap the wristband tightly around your skin and clip it to any grounded, metal object.

    Some tips to help you make a smart investment:

    • Avoid wireless wristbands; they are not effective.
    • Try to get a wristband with a clip rather than a loop as they are easier to work with.
    • If you do get a wristband with a loop, simply slip it over the center screw on a wall outlet plate.

    5. Use a Wire to Ground Yourself

    If you can’t find an anti-static wristband, you can use a copper (or any other conductive material) wire around your wrist and tie the other end to a grounded, unpainted metal object.

    6. Use an ESD Mat

    Don’t want to take any risks?

    Simply buy an ESD mat that is rated for “conductive” or “dissipative”.

    After buying it, make sure that you place the computer parts on the mat and regularly touch the mat as you work. You can also buy an ESD mat with a spot where you can clip your anti-static wristband as an added measure.

    Final Thoughts

    A lot could go wrong when you are trying to build a personal computer from scratch. Although people rarely take any measures other than the bare minimum to protect themselves and their delicate electrical components, it is best to be safe.

    Many unfortunate accidents have taken place; accidents that could’ve been avoided if appropriate measures were taken.

    Go through the article carefully and follow the instructions to have a safe PC building experience.

  • How to Remove a Like on Facebook: Step-by-Step Guide

    How to Remove a Like on Facebook: Step-by-Step Guide

    Here I will walk you through steps to remove a like on Facebook using your desktop and mobile devices. So, if you have mistakenly like any page or post and want to unlike it then keep reading this post to learn how to remove a like on FB.

    Believe it or not, Facebook is still the leading online social media platform. Everything that we use, from Instagram to WhatsApp, comes under the massive umbrella of Facebook. And while a large concentration of people might have moved to other trending social media giants like Instagram, Facebook is still at large.

    With over 2.8 billion active users, Facebook churns out a large amount of content every day. Users spend hours on scrolling through their news feeds and liking all the posts that they find interesting.

    Sometimes, people like a post mistakenly and might want to remove that like. Often, people realize that they’ve liked a post unintentionally sometimes after they engaged with the post. It is almost impossible to encounter the same post twice on your newsfeed unless you receive a notification from it. In such situations, users should know how to remove a like on Facebook.

    Read Also: How to Receive Payment on Facebook Business Page?

    How to Remove a Like on Facebook Posts?

    In this article, we’ll tell you how to remove an accidental like on Facebook by following a simple yet effective procedure. At the same time, the article would also cover how you can unlike certain pages on Facebook that you don’t find appealing.

    The best way to do both is to find the post or the page that you want to unlike through your Activity Log. It makes it simple for the users to relocate the posts or the pages on which they left accidental likes.

    The good thing is that you can unlike a post or a page through both your mobile and desktop. Here’s how you can do it.

    Step to Unlike Facebook Posts on Desktop

    If you wish to unlike a particular post through your desktop, follow these simple steps –

    Step 1: Open Facebook on your web browser through the link www.facebook.com.

    Step 2: Log into your account by entering your E-mail address and password combination.

    Step 3: You will then see your News Feed. Click the down arrow [⬇] located on the top right corner of your screen to access the drop-down menu.

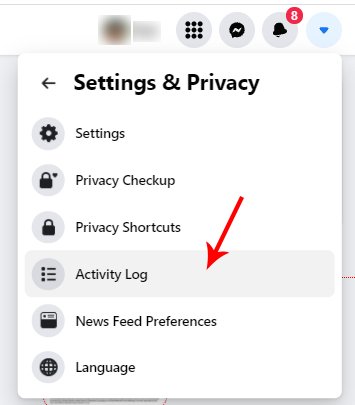
    Step 4: On the menu, find and click on the Settings and Privacy option and select Activity Log option.

    Activity Log
    Activity Log

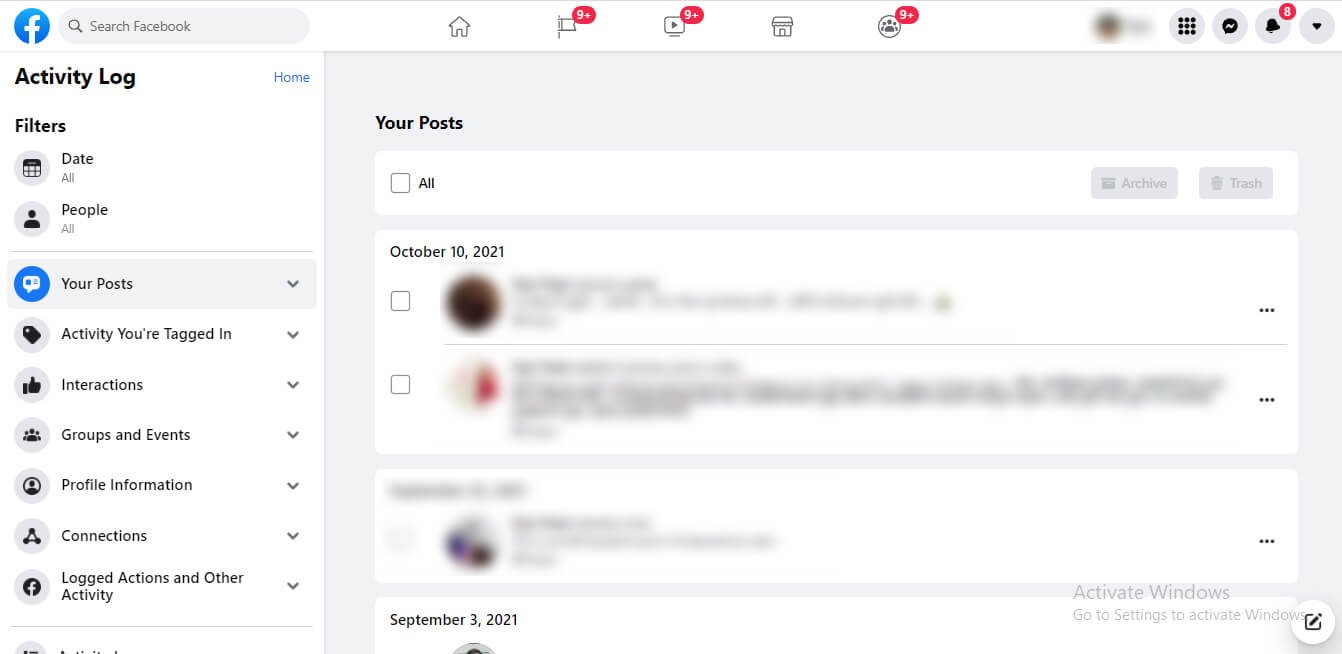
    Step 5: You will see different categories. Click on Your Posts option on the left side.

    Activity Log Your Posts Option
    Activity Log Your Posts Option

    Step 6: You will now be able to see all the posts that you have liked and shared recently. Scroll down until you find the post that you want to unlike.

    Step 7: Click on the Edit (pencil-shaped) icon on the right side of the post. You will see a drop-down menu.

    Step 8: Click on the Unlike option. If you have reacted to the post, you will see a Remove Reaction button instead. Clicking on it will remove your like/reaction from the post.

    Step 9: Repeat the same procedure for all the posts that you want to remove.

    Steps to Unlike Facebook Posts on Mobile

    Most users access Facebook through mobile applications. The procedure for removing a like on post through the Facebook app is slightly different.

    Here’s what you need to do –

    Step 1: Open the Facebook app on your smartphone and log into your account.

    Step 2: You will now see your News Feed. Find the Hamburger (☰) icon on the top of your screen.

    Step 3: Click on the Hamburger icon (three lines). A menu will appear.

    Step 4: Find and tap on Settings & Privacy.

    Step 5: Another expanded menu will appear. Tap on Settings.

    Step 6: Scroll down and tap on Activity Log to open the activity page.

    Step 7: On the activity page, tap on Category, a button located on the top of the screen.

    Step 8: Another menu will appear. Here, find and tap on Likes and Reactions. It will open the list of posts that you have reacted to recently.

    Step 9: Scroll through the list of posts that you have liked to find the one that you want to unlike.

    Step 10: Tap on the Down arrow located next to the post. A menu will appear.

    Step 11: Tap on the Unlike/Remove Reaction button on the menu. This will remove your reaction from the post.

    How to Unlike Facebook Page?

    Next up, you might want to unsubscribe from seeing the posts on a page that you might not like. In such a situation, you need to unlike the page.

    Here’s how you can do it:

    On Desktop

    Step 1: Open Facebook on your web browser.

    Step 2: Log into your account.

    Step 3: Click on your name/profile picture on the top of the screen.

    Step 4: Click on the About button located below your cover picture.

    Facebook About Section
    Facebook About Section

    Step 5: Scroll down to the Likes section to see a list of things that your account likes.

    Step 6: Scroll down until you find the page that you want to unlike.

    Step 7: Click on the Liked button on the right of the name of the page. A drop-down menu shall appear.

    Step 8: Click on the Unlike button, and you will remove your like immediately.

    On Mobile

    Step 1: Open the Facebook application and log into your account.

    Step 2: Find the Hamburger (☰) icon on the top of your screen and tap on it. Then choose the See your profile option at the top of the menu.

    Step 3: Click on the Aboutbutton which is near the top of your profile.

    Step 4: Scroll down until you find the Likes button. Tap on it.

    Step 5: Tap on See All at the bottom of your Likes section.

    Step 6: Tap on All Likes at the top of your screen. This will show you a list of your liked pages.

    Step 7: Find the page that you want to unlike. Then tap on the name of the page to open it.

    Step 8: On the next screen, find the Liked (blue thumbs-up) button on the top right.

    Step 9: Click on the Unlike button to unlike the page immediately.

    Final Thoughts

    Unliking a post on Facebook is a simple procedure. The interface is simple to understand and doesn’t require a lot of data.

    The same goes for unliking a Facebook page. If you want to unlike a post, chances are that you might want to unlike the page that posted it as well. You can do so by following the detailed guides that we have provided.

  • How to Drop Items in Oblivion?

    How to Drop Items in Oblivion?

    Here, you will learn how to drop items in Oblivion step by step. So, if you are an active game player and facing problem in dropping and grabbing items then keep reading for help.

    The Elder Scrolls series has a massive fan base owing to its immersive experience and proactive community.

    Even after more than a decade of its release, Oblivion is still a rage in the market with many gamers still trying to unlock the many secrets of the game and enjoying the tinge of nostalgia that comes with it. Even the Elder Scrolls V: Skyrim is a much more popular part of the series, Oblivion offers a lot of things that Skyrim lacks.

    Even today, the mod community is active on the forum providing several new additions to the game to keep the gamers enticed and waiting for more.

    But one thing that the Elder Scrolls enthusiasts are always confused about is how to drop items in Oblivion. This is something that is barricading their complete gaming experience, as dropping unnecessary items from your Oblivion inventory is highly satisfying as well as makes your character lighter and more agile.

    Dropping Items in Oblivion

    Let’s get one thing right – Oblivion has a lot of items just waiting to be picked up and explored by the user.

    Chances are that you might be the kind of gamer who wants to experiment with different kinds of items and just collect everything that you find on your journey. If you are such a pick-and-pack enthusiast, you might find yourself burdened under the weight of all the items that you are carrying in your inventory.

    In such a case, you might want to free up some space in your inventory by dropping the items that you don’t need. Although you might be attached to your items, sometimes it’s just better to say goodbye and move on!

    The good thing about Oblivion is that dropping items might not necessarily mean that it is goodbye forever. There are containers in the game that can hold your valuable items in a safe and secure location, while also freeing up your inventory space. But if you don’t wish to safeguard your items and merely get rid of them, you can even drop them anywhere in the world.

    So, let’s move on to the focal point of the article –

    How to Drop Items in Oblivion: Step by Step Guide

    Dropping Items on the Ground

    Dropping items on the ground is the quickest way to get rid of all the excess weight in your inventory. But beware, once you drop an item on the ground and move away from that location, you might not find the item there the next time you come back.

    The first thing you need to do is open your inventory. You can open your inventory through your Journal and then going to the inventory page.

    • PC – Open the Journal by pressing the tab button. Locate and click on the Fist icon next to your health, magic, and stamina bars.
    • Xbox 360 – Press the B button on your controller and then use LT/RT to flip between different pages until you find the inventory page.
    • PS3 – Tap the O key on your controller and use the L1/R1 buttons to flip between different pages until you find the inventory page.

    The next step is to drop any item on the ground. You can do so by selecting the item that you no longer need and then clicking on the Drop command. Here’s how you can do it on different platforms:

    • PC – Hold the Shift button and click on the item you want to drop. Alternatively, drag and drop the item out of your inventory window.
    • Xbox 360 – Highlight the item that needs to be discarded from your inventory and then press the X button on your controller.
    • PS3 – Highlight the item that needs to be discarded from your inventory and then press the Square (□)button on your controller.

    Dropping and Grabbing an Item

    Apart from this, you can also drop and grab an item. Through this option, your character will hold the released item in front of you until you let go of the drop button. Then the item will fall to the ground. Note that equipping an item is not the same as grabbing it. When you are grabbing an item, you are just moving it around the world in your arms.

    Here’s how you can do it:

    • PC – Locate the item that you want to drop. Click and hold the item to grab it, and release the left mouse button to finally drop it.
    • Xbox 360 – Highlight the item that you no longer lead. Press and hold the LB button on your controller. Release the LB button to drop the item.
    • PS3 – Highlight the item that you no longer lead. Press and hold the L2 button on your controller. Release the L2 button to drop the item.

    So these are all the different ways in which you can drop an unnecessary item on the ground. Next up, let’s figure out how to put an item safely in a container.

    Dropping Items in a Container

    1. Finding the Right Container

    First, you’ll need to find a container that can hold your items. It is easy to find a container in Oblivion – they’re just about everywhere! However, not all containers can safely store your items. To test the security of a container, place a random item in it and wait for about 73 game hours. Check the container, and if the item is still there, it’s safe.

    2. Interacting with the Container

    You can interact with a container in Oblivion to open it. Get close to the container and press the Use command to open it.

    • PC – Press Spacebar.
    • Xbox 360 – Press the A button.
    • PS3 – Press the X button.

    3. Switching Between Inventory and Container

    After opening the container, you can flip between the list of contents stored in the container and your inventory.

    • PC – You can alternate between your inventory and container by pressing the left Sack icon or the right Sack icon respectively. Holding Shift plus right or left arrow keys also helps you move back and forth between the two.
    • Xbox 360 – You can open the inventory by pressing LT and use RT to view the container.
    • PS3 – You can open the inventory by pressing L1 and use R1 to view the container.

    4. Choose the Item you Want to Move

    Next up, you will need to highlight the item that you move to the container/inventory. For instance, if you select an item in your inventory, it will move to the container. And if you select an item in the container, it will move to your inventory.

    • PC – Left click to select the item you want to move. Press the Enter key.
    • Xbox 360 – Highlight the item that needs to be moved and then press A.
    • PS3 – Highlight the item that needs to be moved and then press X.

    Don’t Waste Your Items – Sell Them

    If you want to have an immersive experience as an in-game collector of items, you can even sell your collected items. It’ll free up your inventory and also give you some cash. Here are some tips on how to be an excellent trader:

    1. Don’t Drop High-value Items

    You can check the value of the item from your inventory. There’s a gold column that gives a rough idea of what the item is worth. Although it is almost impossible to get that value from the vendors, you can surely work on your mercantile skill to become an expert seller. Always try to sell high-value items as dropping them would be wasteful.

    2. Drop Low-value, High-weight Items

    Free up your inventory by getting rid of all the items that are worth peanuts in value and weight the most. This will give you more room to keep valuable items.

    3. Store High-end Items in Containers

    If you want to raise your mercantile skill before you sell your high-value items, you can simply store them in safe containers. Make sure to read our guide on how to find and store items in a safe container mentioned earlier in the article.

    Final Thoughts

    Oblivion is the kind of game that offers an immersive experience. The usability and value of the items that are scattered across its huge map add to its excellent gaming experience.

    Oblivion enthusiasts often hail themselves as collectors and embark on the journey to find the most precious artifacts that they can find in the game. Later on, it is up to them if they want to store it and keep it as a souvenir or sell it to a trader to gain massive profits.