Category: How To

  • How to Grow Bamboo in Minecraft?

    How to Grow Bamboo in Minecraft?

    Here I will explain how to grow Bamboo in Minecraft step by step.

    Bamboo is a type of plant that is found in Minecraft’s jungles. It looks like a long green branch with leaves on the edges and is the quickest growing plant in the game.

    Bamboo may be used for cooking, smelting, breeding pandas, and constructing scaffolding and sticks in Minecraft.

    Bamboo in Minecraft may be cut down with an axe or by hand, just like wood, and it acts similarly to sugar cane.

    When one lower component of the plant breaks, the rest of the plant breaks. Bamboo appears in Minecraft as a little brown sprout that matures into a tall plant.

    Read Also: How to Get Seagrass in Minecraft?

    Where To Find Bamboo in Minecraft?

    Bamboos are most abundant in the game’s tropical biomes, where they can be found naturally. They are usually found in single shoots along river sources that run through densely forested rainforests. The tricky part would be collecting them as quickly as possible.

    You can mine them, but only within a certain amount of time. Cutting them with a sword or an axe is the simplest method. 

    Bamboo is found in the following locations in Minecraft –

    Pandas

    When a panda is killed in the Java edition, it drops one Bamboo. When a panda is killed in the Bedrock edition, it will drop 0-2 Minecraft bamboo. If you’re robbing, the drop will rise by 1 based on your level.

    Fishing

    Bamboos are frequently caught while fishing because the fishing spots are usually adjacent to water sources. These points are primarily found in the jungle biomes, where they must be discovered as rubbish objects. Because they are uncommon in most locations, it is one of the easiest ways to locate them.

    Loot

    Shipwrecks and supply boxes from the Jungle Temple also contain Minecraft bamboo.

    How to Grow Bamboo in Minecraft?

    Follow the below steps to grow Bamboo in Minecraft –

    Step 1 – Locate a Bamboo Plant

    You must first locate a bamboo plant in your Minecraft world. (The Jungle is where you’ll find Bamboo.)

    Step 2 – Hit the Plant

    After locating a bamboo plant, it must be struck and broken.

    Step 3 – Replant

    Bamboo, as you might have imagined, needs water to thrive. So, either use a bucket to provide water or find a natural stream and grow the Bamboo there. To cultivate Bamboo in Minecraft, you must replant your gathered Bamboo.

    Note: The Minecraft bamboo will reach a height of 2 or 3 blocks in a matter of days. 

    Because they develop quickly, this technique of growing them can be rapid and straightforward. You can then cultivate your plant and use it for various applications.

    What are the Uses of Bamboo in Minecraft?

    Apart from collecting and growing it, the resource has a variety of uses in the game.

    Farming

    You can start a bamboo farm and use it for various purposes later. To grow the top-level player, you must be a level 9 or above player.

    Fuel

    One of the most common Minecraft bamboo applications is as a furnace fuel. Each Bamboo Minecraft smelts 0.25 items, so if you make two bamboos and use them as fuel, you’ll get 0.5 items.

    Pandas

    Once you’ve planted many bamboos, you can use them to feed the pandas and grow them more quickly.

    Appearance

    Bamboos can be used as materials for decorating your world because their appearance changes as they grow to different blocks in the game.

    FAQs on Bamboo in Minecraft

    Is Bamboo a Good Fuel Source Minecraft?

    Yes, raw Bamboo can be used as a source of energy. It only smelts a quarter of an item, so you’ll need four bamboos to make one item, but the fact that automated fuel manufacturing is now possible is worth it.

    Is Bamboo Rare in Minecraft?

    Bamboo plants are challenging to come by. Yes, these are extremely rare goods in Minecraft. The trick here is to hunt for them near water sources so that you have the best chance of catching them. You can grow as many as you like once you’ve collected them.

    Does Bamboo Constantly Need Water in the Game?

    Yes, Bamboo in Minecraft, like in the real world, requires a lot of water to grow because it grows similarly to sugarcane. They need to be watered at regular intervals, so they should be grown near water sources.

    How to Create a Bamboo Farm in Minecraft?

    Depending on your preference for Bamboo growing in Minecraft, you may easily make a bamboo farm. Redstone farming and ordinary bamboo farming are the two forms of bamboo cultivation.

    Final Words

    So, this guide was all about how to grow Bamboo in Minecraft.

    If you are trying to build a bamboo farm or want to be around Bamboo, this article will guide you on growing them effectively. Bamboo is simple to grow because it doesn’t require tilled soil or special blocks.

  • How To Create And Edit Your YouTube Videos?

    How To Create And Edit Your YouTube Videos?

    As a video creator and marketer, editing is probably the most critical task of post-production. If you can’t create and edit shots seamlessly, or if you can’t use the right frames, your video clip will look unsophisticated and may even adversely trigger your audience.

    To fix this, you can either go for free YouTube video editing software or buy reasonable video editing software abundantly available on the net.

    YouTube has a video editor that is completely free and accessible from the platform. You must learn how to create a Youtube video and everything about YouTube and follow best practices when editing videos.

    Read Also: How to Translate YouTube Comments in Different Languages?

    How to Use YouTube Video Editor?

    YouTube Video Editor is a straightforward editing tool that allows you to cut clips from any part of the video. Therefore, keep reading to learn how to crop video directly on your video platform. Here is what you need to do –

    Step 1 – Sign in to your official YouTube account and log in to YouTube Studio.

    Step 2Click Content on the YouTube Studio Editor Sidebar Dashboard.

    Step 3 – Under Upload, click the video’s thumbnail as you will find that the software is compatible with different format types like MOV, 3GPP, MPEG-PS, WebM, and WMV, and that too for the best quality. For other format, you need to use other online video-makers to convert any video to MP4. In this way, you can upload the video file to YouTube without degrading the quality of the video YouTube Studio Editor Channel Content Dashboard.

    Step 4 – Click Editor in the left sidebar.

    Step 5 – Crop the beginning of the conclusion of the video. Select Crop to trim any part of the video. It’s next to the video timer, just above the timeline panel.

    Step 6 – You can use the YouTube Studio Trim Video option to cut out the first or last part of the raw video that you don’t want in the final version. Click on Preview to confirm your edits, and if you’re happy with it, click Save in the upper right.

    Step 7 – You can also crop the clip from the center of the video. Select Crop to cut out a specific clip from the center of the video. Then, click the beginning of the part of the clip you want to delete in the Timeline window and press Split.

    Step 8 – Use the YouTube Studio split video to split the video and drag it to the other side to cut it from the video. Click Preview to see the edited video, then click Save when you’re happy with it.

    Step 9 – You can add credits to the video by clicking the end screen icon at the bottom of the timeline window.

    How to Create and Edit YouTube Videos?

    While it’s essential to understand how to edit a video, you must be editing the video for the final product that your users are interested in.

    Here are some crucial points to consider, add, edit, and recreate in your promotional videos when editing a video during post-production.

    Create Attractive Thumbnails for any Video

    Thumbnails are the first chance viewers will see before watching a video, so they are the first chance to get attention and attract viewers.

    Thumbnails can be screenshots of a particular moment in a video or text-based title, but they should be attractive and interesting to the viewer who wants to know more.

    Tell a Story

    Make sure the video has a flow, and you follow the essential elements of storytelling (start, middle, end).

    Use Attractive Elements in all Videos

    Add compelling elements to your video while editing using a YouTube video editor is a great way to attract viewers.

    Attractive features include images, graphics, text, animations, patterns, shapes, music, and fun transitions. You don’t want to lose focus on quality content, so choose elements that make sense and compliment your video.

    Create a Basic Video Editing Style

    Maintain a consistent way of editing videos, thumbnail styles, music, transitions, and other additional elements that you always use. This provides a consistent framework that attracts viewers’ attention and makes them want more.

    Keep it Simple

    You may want to do everything you can to attract your audience, but try not to go overboard and overwhelm your audience. Your ulterior motive should be to make your video creation and editing process simple and keep your video posts away from too many elements. These can be some images that you can discard later, unwanted transitions, rambled or loud music, and text of your video content.

    Video Editing Workflow

    It’s important to follow a reliable process for all edits, regardless of the type of video you’re editing. Let us look at the editing process at a glance:

    Step 1 – Import Footage

    Get footage from the camera and download it onto your computer. You can also record and edit on your mobile phone, using a genuine mobile editing app considering your mobile phone’s storage.

    Step 2 – Organize the Clips

    After importing clips, you must review and rename each clip and create a folder or bin. You can organize all the ingredients in, trim the edges of the clip and use the required parts to end the clip.

    Step 3 – Adjust the Cuts and get into Color Correction

    After making the necessary cuts and trims, you may want to adjust the color of the clip. You must correct the white balance and adjust the color balance between the clips. You can add the color of your preferred style.

    Step 5 –Add Graphics, Titles, Transitions, and Effects

    You can add animations, descriptions, transcriptions, hashtags, and thumbnails and even fix unstable video and sound issues.

    Step 6 – Check your Audio Mix

    Make sure the audio levels are balanced. At this point, you need to move the conversation, commentary, or music up and down to balance the soundtrack and make it easier to hear the important parts.

    Step 7 – Export and Upload Videos!

    Watch the final video a few times to make sure you haven’t missed anything before creating the video file.

    Conclusion

    No matter which online YouTube video editor you choose, you should be more focused on it and then make the final edits.

    Editing should be fun, and you must ensure you put the right message of your brand and products across. These were some of the best tips and tricks to get you started with video editing.

    If you’re looking for minimal editing and need advanced features, you can use one of the YouTube video editors available online.

  • How to Get Seagrass in Minecraft?

    How to Get Seagrass in Minecraft?

    This tutorial will show you how to get Seagrass in Minecraft.

    Seagrass is a rare, naturally occurring element that may be used to block lava in Minecraft. It’s a non-solid plant block that shears can be used to harvest.

    Seagrass can occasionally grow on gravel in Minecraft, but it is uncommon and is dependent on the water source nearby the gravel.

    Can you Farm Seagrass in Minecraft?

    To grow Seagrass, you need to spread Bonemeal to the water’s surface, then AFK-left click the shears to cut the grass. As shears break, new ones can be handed to the user, permitting for continual farming. When things get too tough, players can kill turtles, as drop a few bits of Seagrass when they die.

    Though it isn’t a particularly efficient harvesting method in and of itself, it is possible to apply the looting enchantment on a player’s weapon to acquire substantially more Seagrass by killing turtles.

    With a third-level looting enchantment, Turtles can drop up to five Seagrass after death.

    INTERESTING FACT: Turtles love Seagrass as a food source. It can be used to breed turtles, speed up their growth, and when a turtle is killed, it will drop 0-2 bits of Seagrass, or more if your sword has a looting enchantment.

    Don’t want to massacre zillions of turtles yet need a significant quantity in Minecraft?

    No problem — just spread some bonemeal on the seafloor and you’ll actually be swimming in it.

    How to Get Seagrass in Minecraft?

    To make Seagrass, you only need shear. In Survival mode, trim the Seagrass (found underwater) with a pair of shears to add it to your inventory.

    So, here’s how to get seagreass in Minecraft –

    1. Locate a Seagrass

    To begin, go to the Ocean biome and look for Seagrass growing on submerged sand blocks. So search for a large body of water with kelp and Seagrass flourishing.

    2. Hold your Shears

    Then, from the Hotbar, choose the shears and position them in your hand. On the Seagrass, place the + sign (pointer). The chunk of Seagrass should be marked in your game window.

    3.Use Shears

    After completing the previous two procedures, you’ll need to use shears to clip the Seagrass from the sand blocks.

    Here’s how to do it:

    • When using the Java Edition on a PC or Mac, you must left-click and hold on to the Seagrass.
    • In the Education Edition, left-click and hold on to the Seagrass is required.
    • To use the Windows 10 Edition, you must left-click and hold the Seagrass.
    • In the case of Pocket Edition (PE), tap and hold on the Seagrass.
    • On the PS3 and PS4, press and hold the R2 button on the PS controller.
    • On both the Xbox One and Xbox 360, you must press and hold the RT button on the Xbox controller.
    • Press and hold the ZR button on the controller when using Nintendo Switch.
    • On the Wii U, press and hold the ZR button on the gamepad.

    Now that you’ve discovered Seagrass underwater, cutting it off may cause it to float towards you. Clipping with shears is required at this point until the smaller ones begin to appear.

    4. Gather the Seagrass

    After that, make sure you collect the Seagrass before it vanishes. Seagrass is a handy item to have on hand and should be stored in your inventory for later usage.

    Read Also: How Big is a Chunk in Minecraft?

    The Best Ways to Use Seagrass in Minecraft

    Let’s talk about the various uses of Seagrass in Minecraft today.

    Protection Against Spawning

    Unless creative mode is activated, every player in Minecraft will experience mafia spawn. If a player’s house, property, or room is surrounded by Seagrass, he is less likely to spawn, if at all. In Minecraft, they can protect players from the throng.

    Composting

    Bone meal can be used to grow anything in the garden in Minecraft, particularly crops. 

    A player can enter certain things, such as bones, into a composter to make bone marrow. A player can boost his level by one by putting gathered seaweed in a composter.

    Turtle Breeding

    In Minecraft, turtles are an uncommon breed that can only be found on beaches or sand biomes. They can be carried by a lead and housed in a breeding enclosure.

    In order to breed turtles, the player can give them seaweed, which will cause their health to deteriorate, resulting in breeding. It’s the same with all of Minecraft’s animals.

    Decoration

    Seagrass has a limited number of functions in Minecraft, although one of them is basic decoration. Seagrass can only be planted in water with at least two water blocks above the planting block; this cannoy be planted on stone or grass.

    Player’s Fuel

    Seagrass may be dried and used as player fuel in Minecraft. A player will require an oven or a smoker and fuel, such as coal, to dry Seagrass. Cooking Seagrass in the oven or smoker will dry it out, allowing the player to utilise it to refill their health swiftly.

    FAQs on Minecraft Seagrass

    Is Seagrass Rare in Minecraft?

    Seagrass can be found in rivers, underwater caverns, marshes, and ocean biomes in Minecraft. Seagrass can occasionally grow on gravel in Minecraft, but it is uncommon and is dependent on the water source surrounding the gravel.

    Where can I Find Seagrass?

    Seagrass grows naturally on the ocean floor or when Bonemeal is applied to the bottom of a body of water. It can only be harvested with Shears; mining the block without them will result in nothing being dropped. Turtles can also drop up to one pound of sea grass.

    What is the Best Way to Get Seagrass in Minecraft Bedrock?

    In order to obtain Seagrass, you must use Shears. Seagrass can also be made by using Bone Meal in Water. Other than that, you can get Seagrass in Minecraft by killing turtles.

    Final Words

    If you are a new player, finding Seagrass in Minecraft can be challenging.  This article explains how to get Seagrass in Minecraft, and its amazing uses.

  • How to Screen Record on iPhone 12, Pro, and Pro Max?

    How to Screen Record on iPhone 12, Pro, and Pro Max?

    Here, I will explain how to screen record on iPhone 12, 12 pro, and 12 pro max to make screen recording videos for your YouTube channel or for any other purposes.

    Screen recording feature helps you to make video tutorials or you can even screen record of any problem you are facing on your iPhone 12 and show that recorded video to the technician.

    Fortunately, all iPhone with iOS 11 and later versions have in-built screen recorder and hence you don’t need to rely on any third party screen recording software or apps.

    If you don’t find screen recording option in the control center of your iPhone 12 then you need to add it manually.

    No worries, here I will explain everything you need to know when it comes to record screen on iPhone 12 and its succeeding models.

    So,

    Where is Screen Record on iPhone 12?

    In iPhone 12, 12 pro, and 12 pro max, screen recording option will be found in the control center. Swipe down from the top to access the screen recorder in control center. Recording will start in 3 seconds if you click on the Screen Recorder icon.

    All of your screen captures will be stored to the Photos app, where you may freely modify and share them. You can incorporate the audio from your iPhone as well as your own narrative in your screen recordings.

    Now, let’s discuss how to start recording everything that appears on your iPhone 12 screen quickly and easily with this comprehensive guide.

    How to Add Screen Record to Your iPhone 12?

    In order to make it easier to access the controls when recording your screen on iPhone 12, you must first add the screen record option to your Control Center. Here’s how to add screen recording option in the control center of your iPhone 12 –

    1. Open the Settings app on your iPhone 12.

    2. Next, select Control Center.

    3. Select Screen Recording option.

    4. Next to it, tap the Plus (green Plus) symbol.

    Now, the feature to record your screen will be accessible in your Control Center.

    Note: In the “Included Controls” option, you may change your control centre by adding or removing features. Remove items with the red subtraction button or add items with the green adding button.

    How to Record Your Screen on iPhone 12?

    Once you’ve added the screen recording option to your Control Center, capturing your screen on iPhone 12 is easy.

    Check out below steps to learn how to screen record on iPhone 12 pro

    1. From the upper-right corner of the screen, scroll down.

    2. Select the Screen Record option.

    3. Wait for the recording to start for 3 seconds.

    4. Everything that appears on your screen will now be recorded until you press stop.

    5. To stop screen recording, tap the red status bar at the upper left of your screen.

    6. Press the Stop button.

    Quick tip: Your screen recorder will only capture the audio from your iPhone by default. If you wish to narrate your screen recording, hold down the record button while pressing and holding your finger on it. You’ll be given the choice to switch on your microphone.

    How to Locate and Modify your iPhone Screen Recording?

    The newly created recording is now added to the Camera Roll. Launch the Photos app and look for the most recent video to find it.

    You may share or modify it just like any other photo or video from here.

    You might want to edit the beginning or conclusion of your video if you’re a perfectionist. You can crop the clip and save it as a new clip; this will not damage the unedited version, but it will provide you with an edited one to share.

    1. Open the Photos app and locate the video.

    2. Select Edit.

    3. Tap and drag the arrow at the beginning of the video to the right at the bottom of the screen. It’ll turn into a yellow frame.

    4. Adjust the frame’s size to cut the video down to the parts you wish to keep. You can play the edit at any moment to make sure you like it.

    5. Select Done, then Save as New Clip.

    What Are the Restrictions on Screen Recording?

    Everything can’t be recorded on your iPhone 12. The main issue is that online streaming apps like Disney+, Netflix, and Amazon Prime Video don’t allow this.

    Since pirating shows you’re watching would be possible otherwise, it would be against their terms and conditions policy.

    But, for the most part, you may capture anything on your iPhone 12, including social media videos, game clips and more.

    Quick Tip: Because phone calls and notifications are recorded, you may want to use DND mode anytime you record a screen.

    FAQs on iPhone Screen Recording

    Why can’t I Find the Screen Recording on my iPhone?

    You must ensure that Screen Recording is turned on on your iPhone. You may enable it by going to Settings > Control Center > Customize Controls > Screen Recording.

    Can I Screen Record on iPhone XS Max?

    On the iPhone XS Max, you can capture your screen. Slide down the control centre from the top right side of the screen. After that, click the screen recording button and wait for three seconds for the recording to begin.

    How Long can you Record Screen on iPhone?

    You can record as much as you want for as long as you want. The only constraint is how much free space there is on your device. You should be aware that your video recording may stop in the middle of a long session at any time.

    Where did Screen Record go on iPhone?

    All of your screen captures will be stored to the Photos app, where you may freely modify and share them. You can incorporate the audio from your iPhone as well as your own narrative in your screen recordings.

    Final Words 

    So, this was all about how to screen record on iPhone 12, pro and pro max. If you are new to this, follow the above article to help you understand the entire screen recording process on iPhone without any trouble.

  • How to Clean and Get Water Out of iPhone Charging Port?

    How to Clean and Get Water Out of iPhone Charging Port?

    Did you drop your iPhone in water and want to know how to get water out of charging port? Don’t worry, here I will explain how to clean iPhone charging port with water inside.

    If you use a lightning cable or accessory with your iPhone X or later, your iPhone can sense moisture in the lightning port and notify you.

    When moisture is spotted in the charging port of an iPhone, the message “Liquid Detected In Lightning Connector” or “Charging Not Available” is displayed.

    Cleaning out the port could be the solution to this issue.

    To say the least, this is a daunting process; it’s a delicate component, and one wrong move could result in your Phone’s internals being damaged.

    But don’t panic; we’ve outlined everything you’ll need to know to get your iPhone charging again.

    Things To Do When Liquid Is Detected in iPhone Charging Port

    To begin, disconnect all accessories and wires from your iPhone and do not reconnect them until it is totally dry.

    Gently tap your Phone on your hand with the charging port facing down to expel any excess moisture. Place your iPhone in a well-ventilated and dry place.

    Try charging by connecting a lightning accessory or a lightning cable after at least 30 minutes.

    If you continue to receive an alert, liquid may still be present in the charging port or under the pins of your charging cable.

    Store your iPhone for up to a day in a well-ventilated, dry location. You can attempt charging or connecting a lightning item again during this period. It could all take up to 24 hours to completely dry.

    How to Get Water Out Of iPhone Charging Port?

    To fast remove water from your iPhone charging port, follow the steps below –

    Method 1: Compressed Air

    1. Turn off your iPhone first.

    2. Now, with the help of a flashlight, investigate the charging port

    3. Next, take a can of compressed air and hold it over the port for a few brief blows to clear any accumulated dust.

    4. Check to see if the problem has been resolved by plugging in your iPhone.

    Method 2: Toothpick 

    If any debris stops your iPhone from charging properly, then a toothpick can come to the rescue. 

    A toothpick can help you clear out any visible dust/debris inside the charging port of an iPhone.

    Some people suggest to wrap a toothpick in cotton but this later continues to add more dust rather than removing it.

    1. Put the toothpick inside charging port very carefully and loosely.

    2. Move it around from side to side to see if it picks up any debris right away.

    3. If there is dirt on the toothpick, use a dry cloth to wipe it off or start over with a new toothpick.

    4. Check to see if the problem has been resolved by plugging in the Phone in between movements.

    CAUTION: Using an external heat source, cotton swab, paper towel, or toothpick in the Lightning connector is not recommended by Apple. It also warns against putting your iPhone in a rice bag. This can cause your device to be spoiled by small rice particles.

    Read Also: How to Factory Reset iPhone without Password?

    What You Should Not Use

    While blowing hard into the charging port may seem like a good idea at the time, it may cause more harm than good. 

    The port and its contact points are not safe for wet, heated air from your mouth.

    Avoid placing chemicals, cleaning products, or sharp items such as pins or metal rods into the charging port on your iPhone. 

    Experts warn that doing so could harm the internal mechanism, which is made up of thousands of tiny metal lines.

    The charger will not operate if the contact points are damaged, no matter how thoroughly you clean it.

    FAQs on How to Clean iPhone Charging Port

    What to do if your iPhone and Charging Port aren’t Wet but still Show the Alert?

    Even if your lightning accessories and charging port aren’t wet, you may still receive an alert while attempting to plug them. The most reason for can be a damaged cable or accessory is damaged, or that it is not original.

    Does Putting your iPhone in Rice Really Work?

    Several websites claim that this trick works, but it doesn’t. Placing your iPhone in an uncooked rice bag can damage it and cause more dust and starch to enter the charging port.

    How can you Tell if your Phone has been Damaged by Water?

    Below are some indications you may experience if your phone has been damaged by water –

    1. When using headphones, there is a lot of static.
    2. Sound will be distorted, including phone calls and music.
    3. A distorted or dark display screen.
    4. Lack of ability to charge.

    Is my Phone Ruined if it Gets Wet?

    Now, for the good news. You should be fine if you backed up everything. But, more crucially, phones do not perish when they come into touch with water, so you may repair them even if they are severely damaged. All you have to do now is act quickly and take the appropriate steps.

    Final Words

    Do not be alarmed if your iPhone or charging port becomes wet. When liquid is discovered in your charging port iPhone literally warns you instantly. Follow the dos and don’ts outlined in this article to discover how to rapidly remove water from the charging port and protect your iPhone from damage.

  • How to Drag Click on Any Mouse?

    How to Drag Click on Any Mouse?

    Here I will explain how to drag click with any mouse so that you can enhance your online video game playing experience.

    If you’re reading this, you’ve undoubtedly heard about the advantages of high CPS (clicks per second) in particular games like Roblox, Minecraft, Clicker Heroes, and so on.

    One of the most successful strategies for winning some games is to use a high number of clicks per second. As a result, players had to think outside the box.

    Let us discuss about the drag clicking mouse strategy.

    This approach has grown in popularity, and it has swiftly made its way into a variety of popular games.

    The nice part is that learning to drag click isn’t nearly as complicated as it may appear.

    Getting the hang of it, though, may not always make you a better player right away but it takes some time to get used to.

    Once you’ve mastered it, it’ll help you play better in a variety of games. Not only that, but it may also assist you in completing various time-consuming chores more rapidly.

    So, is it possible to drag click with any mouse?

    All mouse does not support drag clicking. Drag clicking on an ordinary mouse will make it stop operating in a few months. For drag clicking, you’ll need a special mouse.

    What Is Drag Clicking?

    Drag clicking, also known as tap clicking or Fazer clicking, is a mouse method in which users drag their fingertips across the left and right buttons with force. This method has been shown to generate more mouse clicks than any other method.

    The friction between the mouse and button and the player’s finger allow for drag clicking. Drag clicking is when you move your hand while clicking the mouse button.

    As a result of the friction, gravity pushes the mouse downward and as you move the mouse over the button, the friction hits the button again as it bounces back. When this entire procedure is repeated, the CPS can climb to as high as 32 CPS.

    How to Drag Click?

    You would think that drag clicking is an easy operation based on the previous description.

    Nevertheless, sliding or dragging your finger on a mouse button isn’t the only way to do it. You can master this art with practice, but specific mouse devices made for drag clicking perform better than conventional mouse.

    The first step is to make sure your hands are dry, and your mouse’s surface is spotless. Sweat and dust might cause friction problems when dragging your finger across the mouse button.

    Follow these steps to become a pro at drag clicking –

    1. Hold the mouse normally, with your thumb on the left side and your ring/little finger on the right. Place your index (left mouse button) and middle (right mouse button) fingers above the mouse button’s upper edge.

    2. To drag click, gently push the mouse button in a downward motion while flicking your wrist at an angle (towards the front of the mouse). Allow your finger to glide through the button without pressing too hard. As you move your finger across the mouse button, you’ll notice a little vibration. You’ll know you’re doing it correctly when you hear a “grinding noise.”

    3. Use an online tool like RapidTables to verify that your drag clicks are truly working. It’s completely free to use, and there’s no need to install anything on your computer.

    The Advantages of Drag Clicking

    Naturally, with more clicks, you can quickly outsmart your opponents in a variety of popular games. Below are some major benefits of drag clicking –

    • If you play competitively in Minecraft or other FPS shooters, you will get the advantage from a higher CPS. More clicks each instance means more damage you can deal, which means your overall DPS could rise.
    • You can easily win games by putting out 30+ CPS and dealing extra damage by dragging clicking. The number 30 can be increased to better levels with the help of practice, making you unbeatable.
    • Another application of drag clicking is in first-person shooter games. In these games you can set your weapon to single-fire mode. After spotting an enemy, you can fire more rounds and have great recoil control. Nevertheless, you may need to practise drag-clicking a little more if you want to pull this off precisely, as your aim may suffer if done incorrectly.

    Disadvantages of Drag Clicking

    You should now have a decent understanding of what drag clicking is and how to accomplish it. However, there are a few disadvantages to consider before doing it –

    • Tap clicking exerts a lot of load on mouse switches, reducing their life expectancy.
    • Some Minecraft servers, such as Hypixel, SaicoPVP, and Mineplex, regard drag clicking as an unfair advantage and penalise players that engage in it. Check sure the server you’re playing on enables tap clicking or doesn’t explicitly forbid it before attempting to execute the strategy.

    Tips and Techniques for Better Drag Clicking Performance

    The Drop and Drag Method

    Simply following a few simple guidelines will assist you in mastering the drag-and-drop technique! Simply follow these simple guidelines to learn the art of dragging and dropping.

    Keeping a Firm Grasp

    Position your little/ring finger on the right side of your hand and your thumb on the left to grasp the mouse. To activate the left-hand menu bar, left-click with your index finger and right-click with your middle finger.

    To give the button a professional appearance, these should be put on the upper border. This helps you to have a more stable grip on the mouse in your hand and better control over it.

    Examine the Surface

    Before using the mouse, check for dust on the surface and make sure your hands are clean and dry. Keep dust and sweat away from the mouse button if you want to get the most out of it.

    Performing Drag-and-Drop Clicks

    Drag clicks are made by holding down the mouse button and flicking your wrist to the right or left, depending on your choice (towards the mouse front). By sliding your finger over the button before pushing it, you can avoid pressing it too hard.

    Put in Some Practice Time

    If you don’t put in the time to practise, it doesn’t matter how excellent your mouse is. Practice makes a man perfect.

    Handle with your Palms

    It is preferable to get a mouse that is easy to hold. Because it aligns your fingers in the appropriate spot for the movement, drag clicking necessitates a palm grip.

    Using Online Resources

    If you’re not sure if your drag-clicks are working, you can check using any internet tool. These don’t need to be downloaded and can be used right away after being accessed.

    Best Drag Clicking Mouse

    Glorious Model O

    If you explore the Internet for the greatest drag clicking mouse, you will undoubtedly come across Glorious Model O.

    This corded gaming mouse has been made to feel as though it were wireless. It also features a durable honeycomb shell that keeps your hand cool.

    This type is ideal for drag clicking and being lightweight and attractive. The matte variant has precisely the proper amount of friction to help you get a higher CPS.

    ROCCAT ROC-11-730 Kone Pure Ultra

    Thanks to its ergonomic design and ultra-lightweight construction, the Kone Pure Ultra is a one-of-a-kind mouse. It is one of the lightest mouse on the market, weighing only 66g.

    It has a new ROCCAT Owl-Eye 16,000dpi optical sensor, which allows for more precise aiming and tracking.

    It also includes a dirt-repellent coating that makes cleaning a breeze. The Kone Pure Ultra is designed for gamers who place a premium on speed.

    Is it Okay to Use Tape for Drag Clicking?

    In reality, using tape for drag clicking is acceptable because it improves dragging and clicking efficiency. Here are some suggestions that we can use:

    Silicone Grip Tape: If you want to boost your clicking speed by two clicks per second then it is possible with this tape. It’s pricey, but it’s better than electric tape.

    Razer Tape: It is not only the most expensive, but it is also the most effective. 1.5-2 cps is the increase. The dependency on mice is the only issue. I can attest to the fact that it works with Razer mice.

    Electric Tape: It is a fantastic and cost-effective option. While dragging, this method gains 1.5 CPS.

    Drag Clicking FAQs

    How to Drag Click with any Mouse?

    A regular mouse cannot be used to drag click. You’ll need a gaming mouse to drag click for the best experience. For example, Razer, Steelseries, and Golorous are among the best drag clickers.

    Can I Drag Click without a Tape?

    Yes, you certainly can. You can drag click without a tape on your hand if your hand is moist enough to create frictions.

    Can I Get Banned using Drag Clicking?

    It is debatable. Some games may prohibit you from playing by accusing you of employing drag clicking to gain an unfair advantage. Otherwise, everything is fine. As a result, carefully read the regulations and policies before implementing them.

    Final Thoughts

    Increasing your CPS by dragging your mouse across the screen is a wonderful technique to do it. You will notice an immediate improvement in your performance results.

    It’s simple to learn how to drag click; just make sure you use the right mouse. Some people are unable to cope with the stress of this procedure. After you’ve found the appropriate tool, all it takes is a little practise, and your foes won’t stand a chance.


  • How to Make Charcoal in Minecraft?

    How to Make Charcoal in Minecraft?

    Here I will explain how to make Charcoal in Minecraft step by step and will also explain the difference between coal and charcoal in the Minecraft game.

    Charcoal is used in a variety of ways in Minecraft. It is a substitute for coal that is made by smelting wood in a furnace. It has the same applications as regular coal. On the other hand, Charcoal cannot be made into a coal block. Plus, Charcoal and coal cannot be stacked together.

    In addition to having a similar look, Charcoal has the same properties as coal and may be used to manufacture torches and power minecarts with furnaces.

    The only place you can locate it is on the surface, as it does not have an ore block of its own, like coal.

    While Charcoal is used in place of coal, getting it is somewhat different.

    So, 

    How to Get Charcoal in Minecraft?

    Charcoal can be made by smelting logs or wood in a furnace. It doesn’t matter what kind of wood you use as long as the logs are still intact. 

    Burning wooden planks is not possible in a furnace to produce Charcoal. You can, rather, burn your logs with planks as a fuel source.

    What is Charcoal, Exactly?

    Charcoal is a substitute for coal, with a smelting time of 80 seconds, the same as coal.

    As a result, converting logs to Charcoal is more resourceful than using wood as a fuel in any other way.

    It’s worth mentioning that Charcoal and Coal cannot be stacked, and while they’re similar in function, they’re not the same. Charcoal is more of a slacker’s version of coal.

    The disadvantage of employing Charcoal instead of Coal is that it cannot be made into a block variant.

    If you didn’t know, coal can be turned into a Block of Coal, which expands the capacity of each furnace by one slot and burns for 800 seconds.

    This is 10 times more efficient than a single Coal, making the utilisation of blocks more efficient.

    How to Make Charcoal in Minecraft?

    In Minecraft, you’ll need the following ingredients to manufacture Charcoal –

    • Furnace
    • Logs of wood (of any variety)
    • Source of Energy

    Burning wood logs is the major ingredient in the production of Charcoal. Trees can be found nearly anywhere, and each log yields one pound of Charcoal.

    A furnace is built with eight cobblestones, and if you don’t spawn in the sky, you can always dig down for more stone.

    Here’s how to make charcoal in Mincraft game –

    1. First, locate a tree and click and hold your mouse on its trunk until a block of wood splits. This should be done for each block of wood you mine.

    2. Cut down whichever tree you like. It’ll be alright if you just use your hands.

    3. After you’ve gathered your wood logs, make boards out of one of them. You can now make a table using your four planks.

    4. Make a pickaxe and place it on your crafting table to gather some stone. Make a furnace in your crafting table with at least eight cobblestones. Place your wood logs on top of your furnace once it’s been turned on. Put your furnace in place, and you may now manufacture Charcoal with any remaining wood.

    (If efficiency is a concern, logs and planks will cook 1.5 things. Turning logs into planks for fuel is far more efficient, as each log yields four planks with the same cooking efficiency. You can also use leftover sticks to fuel your furnace, which will return 0.5 things each stick. Any leftover wood can be used to power it. Breaking it down any more would result in a loss of cooking time because two planks produce four sticks. As a result, using wooden planks is the most efficient option.)

    5. Put your favored fuel beneath the logs and wait for them to complete cooking.

    6. Your Charcoal is now ready to use!

    Read Also: How to Repair a Bow in Minecraft with Anvil, Grindstone, or Crafting Table?

    What Is the Difference Between Coal and Charcoal in Minecraft?

    Charcoal is a substitute for coal, with a smelting time of 80 seconds, the same as coal. As a result, converting logs to Charcoal is more efficient than using wood as a fuel in any other way.

    It’s worth mentioning that Charcoal and Coal cannot be stacked, and while they’re similar in function, they’re not the same.

    Charcoal is more of a slacker’s version of coal. The disadvantage of employing Charcoal instead of Coal is that it cannot be made into a block variant.

    If you didn’t know, coal can be turned into a Block of Coal, which expands the capacity of each furnace by one slot and burns for 800 seconds.

    This is 10 times more efficient than a single Coal, making the utilisation of blocks more efficient. Coal’s only functional benefit is in this area.

    What Is The Best Way To Use Charcoal In Minecraft?

    In Minecraft, Charcoal is fairly similar to ordinary coal. You can use your charcoal to fire your furnace for the same cooking time as coal. This implies that after you’ve cooked your first piece of Charcoal, you can utilise it to generate more Charcoal.

    You may light the environment around you by turning Charcoal and sticks into torches, much like conventional coal.

    For a campfire, you can also use Charcoal instead of coal.

    FAQs on Minecraft Charcoal

    Should you Make Charcoal in Minecraft?

    Charcoal is a product made from smelting logs or wood. It can be used as a fuel source or to make torches and campfires. Charcoal cannot be exchanged or converted into a block of coal.

    Which is Better Charcoal or Coal in Minecraft?

    When you use Charcoal as a fuel in a furnace, it smelts one thing per piece, whereas coal smelts three items per piece. For this reason, coal is significantly more difficult to obtain than Charcoal, although it generates 16 goods each stack against 8 for Charcoal.

    What Can We Make with Charcoal Minecraft?

    Usually one charcoal takes 80 seconds to burn in a furnace and it can be used to craft torches and cook 8 items using it as a fuel.

    Final Words

    So, this was all about how to make Charcoal in Minecraft.

    While you can substitute Charcoal for coal in crafting recipes, you can’t manufacture a block of coal with it. It’s also not possible to trade it with villagers. You’ll need to harvest coal from caves or chests if you wish to construct coal blocks for decoration or as a more powerful fuel source.

  • How to Show Battery Percentage on iPhone 12, Pro, Pro Max?

    How to Show Battery Percentage on iPhone 12, Pro, Pro Max?

    Are you thinking about how to show battery percentage on iPhone 12?

    The battery percentage is not displayed in the taskbar on the iPhone X and later models with Face ID. This is the case because newer iPhones, such as the iPhone 12 and 11 have a broad notch at the top. As a result, there isn’t enough room on the iPhone 12 to show the battery percentage.

    On the other hand, iPhone 8 and older models with Touch ID support have a built-in setting to enable the battery percentage icon.

    On iPhone 12 and related models, you can’t turn on battery percentage on the status bar. Nevertheless, you can still see how much battery life your iPhone has left.

    So,

    How to Show Battery Percentage on iPhone 12 Pro?

    Slide down from the top right corner of your phone to reveal the control centre, where the battery percentage on your iPhone will show next to the battery indicator.

    This solution has the advantage of allowing you to see the battery status even while your device is locked. Make sure the Control Center is accessible even when the phone is locked.

    There are several ways to see how much battery you have left on your iPhone.

    Read the next section of this article to get a better idea.

    How to Show Battery Percentage on iPhone 12, Pro, and Pro Max?

    Make Use of Widgets

    The widget allows you to keep track of the battery life of Bluetooth devices such as Apple Watch and AirPods.

    Follow the below steps –

    1. On your home screen, long-press (touch and hold) an empty place.

    2. In the top-left corner, tap the Plus icon.

    3. Scroll down to the Search Widgets area and hit the Batteries widget.

    4. Select the size of the widget.

    Tip: For iPhone, choose the small widget. Select the medium or large widget if you have other devices connected, which both display the battery percentage.

    5. Select Add Widget and then Done.

    This method can be used on your device if you wish to see the battery percentage all the time.

    Note: Swipe left on the home screen if you don’t want to add a specialized battery widget. On the widgets page, you can see the Batteries widget.

    Ask Siri

    If you’re a frequent Siri user, you’ll be pleased to learn that you may ask Siri any of the questions listed below. Nevertheless, there could be many more things you could say, so trust your gut and Siri will most likely give you what you want. Simply consider asking any option mentioned below.

    — Hey Siri

    • How much battery do I have left?
    • What is the current state of my battery?
    • What is the percentage of the battery?
    • Is there any remaining battery?
    • What is the state of the battery?
    • Is the battery charged?

    Charging

    You might already be aware of the fact that iPhone displays the battery percentage as soon as you plug it in for charging.

    This is another effective method to check the battery percentage on iPhone 12. 

    You’ll be able to view regardless of whether you charge your device using the MagSafe charger, lightning connection, or wireless charging.

    As long as the date and time were already displayed on your lock screen, a battery icon and percentage (e.g., “75% charged”) would briefly replace the date and time before they reappeared.

    When you wake the display from its sleep state, whether charging over a wired or wireless connection, the date on the lock screen will indicate the current “Charged” level as a percentage, e.g., “10 percent charged.”

    Third-Party Apps

    If none of the previous methods for displaying battery percentage on iPhone 12 satisfied you, third-party apps can display the existing battery percentage on iPhone in the app or widget.

    Final Words

    Now you know how to check your battery percentage on the iPhone 12.

    While the battery percentage on the iPhone 12 cannot be permanently displayed, there are several ways to check it. You may use the Control Center, add a widget to the iPhone Home Screen, or simply ask Siri. Another alternative is to tap the screen while the iPhone is charging.

  • How to Remove Bookmarks on Mac (Chrome, Safari, Firefox)

    How to Remove Bookmarks on Mac (Chrome, Safari, Firefox)

    Learn how to remove bookmarks on Mac Google Chrome, Safari, or Firefox browser. Deleting bookmarks on Macbook will help you to stay organized and improve your user experience while using different browsers on Macbook.

    So, let’s get started…

    The Internet is a large space with an almost infinite number of fantastic websites and exciting content.

    Saving a webpage as a bookmark in your browser is the greatest way to ensure you don’t forget about it when you find something new online that you want to return to later.

    Bookmarking is a simple approach for creating your virtual world. People save news articles, blogs they read, music videos they wish to view, and even documents they need to work on in their bookmarks.

    You may organise your bookmarks into folders or have them appear in the menu bar below the URL field in Safari.

    In reality, bookmark saving has become so widespread that it’s getting increasingly difficult to locate the relevant Bookmark!

    We save something to refer to later but never erase it, resulting in a jumble of bookmarks we don’t need over time. Hence, knowing the right steps to remove bookmarks on Mac is very useful when you want to get rid of some bookmarks or bookmark folders.

    One thing to consider is that they are unique to the browser you’re using. 

    Here, we’ll look at how to delete bookmarks from Safari, Firefox, and Google Chrome for Mac users.

    Note: Deleting a bookmark in one browser does not guarantee it will be deleted in another, so be sure to delete each Bookmark separately in each browser.

    How to Remove Bookmarks on Mac Safari?

    How do I delete bookmarks on Macbook saved on Safari browser? Follow the below exact steps to remove bookmarks from Safari browser on Mac –

    1. On your Mac, open Safari.

    2. On the top-left side of the window, click the Sidebar symbol. It will open all of your browser’s favourites.

    3. While the sidebar is open, click the bookmark icon (open book) to get a list of all your current bookmarks. Then select Bookmarks from the drop-down menu.

    4. Right-click on the Bookmark you want to remove and select Delete.

    5. Click the Delete button.

    How to Delete Bookmarks on Macbook Google Chrome?

    Removing bookmarks on Macbook Google Chrome browser is very simple and straightforward. Follow the below steps –

    1. Open Chrome browser on your Mac

    2. Select Bookmarks from the Mac menu bar at the top of the screen.

    3. Open the Bookmark Manager tab in Chrome by clicking Bookmark Manager.

    4. Right-click the Bookmark you want to delete and select Delete.

    5. Double-click the folder that contains the Bookmark you want to delete.

    6. Press and hold the “Command” key, click each Bookmark you wish to delete, and then press the Delete key on Chrome.

    Chrome verifies the deletion but also allows you to undo it. The Bookmark will not be retrievable if you do not select Undo when it displays.

    How to Get Rid of Bookmarks on Mac Firefox?

    Mozilla Firefox is another bookmarking-enabled browser for Mac users. To delete saved bookmarks on Firefox using Macbook, follow the below steps –

    1. In the top right corner of the browser, click the Books symbol.

    2. Select Bookmarks from the drop-down menu and navigate to the folder containing your bookmarks.

    3. Select the Bookmark you want to delete with a right-click or control-click.

    4. From the drop-down option, select Delete to permanently delete it.

    Why Would You Want to Delete of Your Bookmarks?

    There are a variety of reasons why you would want to erase your bookmarks from your MacBook.

    The most prevalent explanation is simply one of organisation.

    You may no longer want to visit the website you bookmarked and hence no longer require it to be stored.

    By reducing clutter and unnecessary links in your bookmark toolbar, deleting bookmarks can help you stay organised with the bookmarks you do want to keep.

    Some people keep their bookmarks after creating them and never delete them. This can cause your computer to lag and waste space that could be put to better use.

    Read Also: How to Factory Reset MacBook Pro?

    Mac Bookmarks FAQs

    How do I delete bookmarks that I don’t want?

    Right-click on a Bookmark and then left-click on Delete to remove it from the Bookmarks bar. To delete a Bookmark from Other Bookmarks, left-click on Other Bookmarks, locate the Bookmark you want to delete, right-click, and select Delete.

    Why won’t my bookmarks go away?

    To hide the bookmarks bar, right-click it and uncheck the Show bookmarks bar option. To conceal the bookmarks bar, click the three vertical dots symbol in the top right corner, go to the Bookmarks menu, and uncheck the Show bookmarks bar option.

    How do you edit bookmarks on Mac?

    To change the description of a bookmark, double-click a folder in the sidebar, then Control-click the item and select Edit Description from the menu. Select Bookmarks > Edit Bookmarks to manage your bookmarks.

    Final Words

    So, this was all about how to remove bookmarks on Mac.

    The instructions for deleting one, numerous, or even folder bookmarks are the same whether you’re using Chrome, Firefox, or Safari.

    Note that each internet browser has its own set of bookmarks, so if you use more than one, you’ll have to erase bookmarks from each one.

    Without deleting them, bookmarks will live indefinitely, so you may choose whether or not to remove them.

  • wmlink/2step: WalmartOne 2 Step Verification

    wmlink/2step: WalmartOne 2 Step Verification

    WalmartOne 2 Step Verification | wmlink/2step

    If you are scratching your head and thinking about how to do 2 step verification at Walmart?” then this is the place to be, as I am going to unravel all your question’s answer.

    What is Walmartone 2 Step Verification?

    It’s a six-digit rotating reference code that’s used in addition to the standard Asda login. It also provides the code to you by SMS, app, or phone call.

    To put it another way, it is necessary to keep your data secure.

    You must input another code each time you use the Walmartone app on any of your devices (this second code).

    NOTE: It’s worth mentioning, that if you’re using Facebook Workplace on your smartphone, you could already have this set up and won’t need it.

    To join, one must be a Walmart employee. Walmartone is only accessible to Walmart employees. You may sign up using your computer or phone.

    wmlink/2step Walmartone 2 Step Verification Steps for Employees

    Follow the below steps to set up wmlink/2step

    wmlink/2step Walmartone 2 Step Verification
    wmlink/2step Walmartone 2 Step Verification
    1. Go to https://svipreg.wal-mart.com Symantec VIP 2 Step Verification to set this up when on the Asda network.
    2. Next, to login enter your Asda PC user ID and Password.
    3. Make sure that UK is chosen.
    4. Also check if your name is shown in the top right corner. If you don’t see your name then log out and try logging in again.
    5. Next, you must select one of the options: text message, voice call, or app.
    6. When you go to www.WalmartOne.com on your phone in the future, you’ll be given the 6-digit number.

    Text Messaging Setup

    Set Up Text Messaging for Walmart 2 Step Verification
    Set Up Text Messaging for Walmart 2 Step Verification
    1. Begin by choosing your country code, then add your number without the 0 in at the starting.
    2. Now, choose send code to get your phone number confirmed.
    3. Next, you will receive a six-digit code.
    4. Then submit.

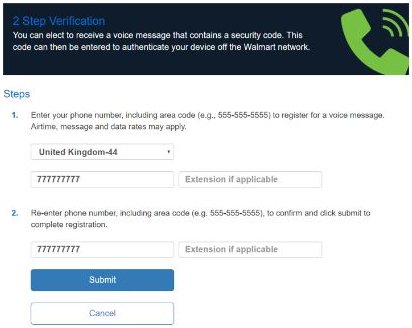
    Voice Call Set Up

    Voice Call Set Up for wmlink 2step
    Voice Call Set Up for wmlink 2step
    1. First, choose your country code.
    2. Then enter your phone number without adding 0.
    3. Next, enter your same phone number again.
    4. Lastly click on submit.

    Voice App Set Up

    Setup Voice App
    Setup Voice App
    1. First, download the VIP Access app on your smartphone using either Google play store or App store on iOS.
    2. After the downloading is completed, you’ll be prompted to enter your User ID and Security code.
    3. Then Submit.

    Register for Two Step Verification on Walmart?

    1. First, go to https://wmlink.wal-mart.com/2step to get to the official site for two-step verification at your store.
    2. You will be redirected to Walmart Wire’s workplace.
    3. There will be a search box where you may put 2-factor verification or 2 step verification.
    4. Stick to the instructions on the page.

    Uses of wmlink/2step

    You may use 2-step verification and sign in at Walmart/Sams Club to check your working time, pay, paycheck stubs, perks, leaves, and other work information. This information is easily accessible to associates through computer or phone.

    You may use your mobile phone or an internet browser to get to it.

    You do not need a cell phone to get a voice call or text message; you may obtain a verification code for the authentication process using a landline or phone.

    Need More Assistance with wmlink/2step?

    You can visit https://one.walmart.com/website.

    Contact number: 479-273-4357 (US-based employees)

    If you need more assistance then get in touch with helpdesk in your country for employees/associates.

    Final Words

    This was all about the login procedure of WalmartOne 2 step verification. In this article I have discussed about various important aspects related to wmlink 2step.

    So, if you are an employee of the ever-growing Walmart company then this whole process of 2 step verification can be beneficial for you.

  • How to Change Instagram Icon on iPhone and Android Devices

    How to Change Instagram Icon on iPhone and Android Devices

    Do you like to have custom Instagram app icon on your iPhone or Android device? Here, you will learn how to change Instagram Icon step-by-step without any hassle.

    So, let’s get started…

    The Instagram app has evolved significantly over time. We’ve seen a lot of changes, from the internal UI to the branding.

    We see a standard camera design with numerous colour gradients when it comes to the logo.

    Although this design is free of flaws, some people prefer to use a different logo.

    Instagram offered the ability to alter the Instagram icon from the app’s settings for a short period, although this was merely to commemorate the app’s 10th anniversary.

    However, in the year 2022, there is no function that allows you to modify the Insta app’s icon.

    People initially heard of Instagram as a photo and video-sharing social networking software. Facebook owns the platform, which is today popular and one of the most widely used social networking programmes.

    Instagram offers a variety of services, including photo sharing, photo posting, liking, commenting, and messaging (DM), as well as Instagram story filters.

    On Android and iOS smartphones, this article shows how to modify the Instagram app icon.

    So,

    Can you Change Instagram App Icon?

    Yes, you may alter the logo of the Instagram app on your mobile screen. To make a custom icon for Instagram, utilise the Shortcuts app for iOS or iPad.

    You can use a third-party app to create a personalised Instagram logo for your Android device.

    How to Change Instagram Icon on Android?

    If you’re using an Android device, there are a few options for changing the Insta app icon. You can alter the Instagram icon on some Android smartphones using a built-in capability.

    However, this isn’t something that everyone has. So, here is the easiest way to use a different Instagram app icon on your Android device.

    Using a Third-Party App

    X Icon Changer App to Change Instagram Icon
    X Icon Changer App to Change Instagram Icon

    1. Go to Google Play and download X Icon Changer.

    2. Tap and hold the background on your home screen, then choose Widgets.

    3. Scroll down to X Icon Changer and tap it.

    4. Press and hold the X Icon Changer app.

    5. When the home screen shows, drag the icon to the desired location and release it.

    6. Look for and open the Instagram app.

    7. Tap OK after selecting a new shortcut. There are numerous possibilities available, or you can create your own.

    You’ll notice a new symbol on your home screen. Press and hold the application and select Remove from Home or drag it to the Trash to delete the initial Instagram icon from your Home screen.

    Note that X Icon Changer is ad-supported, which means you can use it for free but may be required to watch some short advertisements.

    How to Change Instagram App Icon on iPhone?

    Modifying the Instagram icon on an iPhone is as easy as it is on an Android device. Nevertheless, there are a few elements you must have before we begin.

    The most critical need is that your iPhone is running iOS 14 or later.

    We’ll be using the Shortcuts app from Apple. On the device, the app comes pre-installed. So all you have to do now is open the app.

    Shortcuts App to Change Instagram Icon on iPhone
    Shortcuts App to Change Instagram Icon on iPhone

    1. On your iPhone, open the shortcut app.

    2. In the top right corner, click the ‘+’ icon.

    3. Give your shortcut a name and click Add Action.

    4. Now look for and select the Open App option.

    5. Select the app you want to use. We’re going to go with Instagram.

    6. From the top, hit the blue icon, then tap the Add to Home Screen option on the next screen.

    7. It will now show you a preview of how the shortcut icon will appear.

    8. To change the icon, go to Home Screen Name and Icon and tap on the existing icon.

    9. Select the symbol on your smartphone using the Choose Photo option.

    10. When you’re finished, return to the home screen. The new shortcut with Instagram and your personalised symbol will appear here.

    Now you may use Instagram or any other app to upload new and existing icons. So that’s how you can change the Instagram app icon on your Android or iPhone home screen. You may alter the icons for any other programme using the same approach.

    Instagram App Icon FAQs

    Is it safe to change the Instagram app icon using Third-Party applications?

    Yes, you can use any third-party applications you like. As with everything you’re doing with the app’s icon. This process will not use your account. As a result, your privacy is not jeopardised.

    Why can’t we change the Instagram app Icon through the app anymore?

    Instagram’s function, which debuted in 2020, was only available for a limited time. It was released as part of Instagram’s 10th-anniversary celebration. The feature has been deactivated for a year.

    Final Words

    So, this was all about how to change Instagram icon on iPhone and Android. Follow the above guide if you want to try out something new with the Instagram app.

    Alternatively, you can also try mobile phone themes to have custom app icons experience.

  • How Can I Read My Husband’s Text Messages Without Touching His Phone?

    How Can I Read My Husband’s Text Messages Without Touching His Phone?

    Are you suspecting that your boyfriend or husband is chatting with someone secretly and thinking how can I read my husband’s text messages without touching his phone? No worries, here I will discuss some apps that may help you out.

    So, let’s get started…

    At some point, women have to cope with unfaithful relationships.

    Perhaps your husband is having an affair with someone or has some illicit hobbies that he’s keeping hidden from you.

    Plus, you have all the right to know about what’s going in his life.

    So, 

    How Can I Read My Husband’s Text Messages Without Touching His Phone?

    You’ll be able to view his phone, call history, SMS, and messages without actually touching it with the help of third-party apps. Most of these monitoring programmes are paid versions that function on all devices, including laptops, smartphones, and tablets.

    Keep reading to know the names of applications you can use to read text messages of your husband’s phone.

    Read Also: How to Install Spy Software on Cell Phone Remotely?

    Is It Necessary for Me to Check My Husband’s Messages?

    If you have reason to believe your husband is cheating on you, you should investigate your concerns. Finding out who he has been messaging and what he does with his smartphone is the only way to discover the truth.

    Thanks to technology and the internet, you may now learn everything you need to know about someone by looking through their phone or analysing their phone activity.

    Here are some indications that your partner is cheating or dishonest to you.

    • Your husband suddenly becomes very protective of his phone.
    • Your husband leaves the room to take phone calls.
    • He re-entered his passwords.
    • He’s Always Smiling While Looking at His Phone.
    • Every time you ask to use his phone, your partner becomes defensive.
    • He continues to lie about the tiniest details.

    But, can you read cheating spouse text messages free?

    There might be a number of apps online claiming to spy on your husband’s phone for free, but most of them are useless.

    Apps to Read Husband’s Text Messages Without Touching his Phone

    Spy apps are monitoring apps that allow you to track the activity of another person’s phone no matter where they are.

    Spy applications have grown in popularity over time, and you can now download almost any spy programme you want with only a few clicks.

    We’ve listed some of the best spy apps for reading messages and spying on all the activities he has been doing on his phone without touching it.

    Note: It’s important to remember that using these spy software is straightforward. You only need to put them on the target device, and you’ll be able to track your husband’s activity.

    1. mSpy

    mSpy
    mSpy

    mSpy is one of the most trusted phone monitoring programmes on the market, and it’s also quite simple to use.

    Installing this spy tool is simple and painless, and it allows you access to practically everything on your target’s phone.

    The best part about mSpy is that it works with both Android and iOS devices, making it excellent for both platforms. It also has useful features like SMS trackers and social media tracking.

    Features of mSpy

    • Go through your SMS messages
    • Keep track of where the gadget is
    • Send and receive instant messages
    • Gather all information about their phone calls
    • Email address tracker

    Subscription Plans for mSpy

    The mSpy app comes with three different plans: A one-month subscription costs $48.99 a month, while a three-month subscription, which is the most popular, costs $27.99 per month.

    On the other hand, a 12-month subscription costs $11.66 per month.

    2. XNSPY

    XNSPY
    XNSPY

    XNSPY is another useful spy programme that comes with a variety of features and functionalities.

    To begin with, this app works on both iPhone and Android smartphones. It also has some basic functionality, such as GPS location tracking, keylogging, and recording surroundings.

    You can effortlessly track your target’s current location at any time using this tracking tool.

    Every keystroke made on the target’s device can also be recorded and viewed. For example, if the target types “You are so gorgeous,” the programme saves the words and allows you to view them when you’re ready.

    Features of XNSPY

    • Monitoring of phone calls and messages
    • Tracking your whereabouts via GPS
    • Reports
    • Online Activity Observation
    • Recording

    Subscription Plans for XNSPY

    The basic edition of the XNSPY phone tracking app costs USD 4.99, while the premium version costs USD 7.49 for the same time period (1 month).

    3. Cocospy

    Cocospy
    Cocospy

    The Cocospy monitoring solution is a mobile phone spy tool that allows you to maintain tabs on both online and off-line activity taking place on a target smartphone.

    This spy programme is designed to run in stealth mode, which means it can watch a smartphone without alerting its owner.

    The Cocospy tracker is simple to set up. The procedure starts with you installing the app on your own device. After that, you can continue on to the phone you want to target.

    Features of Cocospy

    • Call Recording
    • Spy on Social Media
    • Tracking of media files
    • Spy on Messages
    • Geofence Alerts and Location Tracking
    • Tracking your browser’s history

    Subscriptions Plans for Cocospy 

    You have three options when you install this software: basic, premium, and family. The most affordable option is $39.99 per month. If you want to use the premium plan, it will cost you $49.99 per month, and the family plan will cost you $69.99 per month.

    4. PhoneSpector

    PhoneSpector
    PhoneSpector

    Users of PhoneSpector can see practically everything on a phone or tablet without having physical access to it.

    After the software has been downloaded and installed, it remotely accesses the target phone and transfers the data to the user’s secure account for review.

    In your user dashboard, you can then see everything. The fact that PhoneSpector is simple to install and use and its extensive capabilities and superb customer care staff set it apart from other spy apps.

    Features of PhoneSpector

    • Tracking through GPS
    • Text Messages Received, Sent, and Delete
    • Check your Snapchat messages
    • Images and Videos

    Subscriptions Plans for PhoneSpector

    The Basic Package costs $2.99 per month, while the Pro Package costs $6.99 per month. 

    You will be charged $29.99 for the Basic Package for 10 months and $69.99 for the Pro Package.

    Frequently Asked Questions (FAQs)

    Is There a Way to See What My Husband is Doing on His Phone?

    Yes, with the help of third-party spy apps you can figure out what your partner is doing on their phone without touching it.

    What App Can I Use to Spy on My Husband?

    To spy on your husband’s phone, you can use apps like mSpy, PhoneSpector, XNSPY, and Cocospy.

    Is My Phone Being Remotely Accessed?

    If you suspect your phone has been hacked, keep an eye out for the following signs:

    • Your phone overheats all the time, even when it’s not in use.
    • On your phone, you notice new or unusual apps.
    • Apps start up and shut down on their own.

    Final Words

    So, this was all about how can I read my husband’s text messages without touching his phone.

    You won’t waste your time or money with the mobile monitoring apps we’ve listed in this guide. Spying on someone without their consent can cost you your relationship, so always keep the pros and cons in mind before taking any step.