Category: How To

  • How to Ground Yourself When Building a PC?

    How to Ground Yourself When Building a PC?

    Disclaimer: Building a computer requires prior knowledge and necessary precautions. Please make sure that you know what you are doing, or else you might end up damaging your computer, injuring yourself, or burning your house down.

    The above disclaimer is a good representation of how important it is for you to know how to ground yourself when building a PC.

    If you have only started venturing into the exciting world of building PCs, you might not know a lot about static, and how it can dismantle your most expensive and delicate parts and components. Even something as little as a simple wrong touch can deteriorate or destroy an entire electric component.

    So how can you prevent this? The answer is grounding.

    That being said, you should know that everyone on the internet has their way of doing it. There are countless debates on tech forums where people are trying to defend their methods while discarding the others.

    But you don’t need to get into that. We got you covered.

    What is Grounding and why is it Necessary?

    Grounding yourself in terms of electrical engineering is removing any amount of excess voltage or charge from an object that you are in contact with. This process will help secure you against any form of electric shock that comes when you are operating with machines, electronics, and other objects that are prone to electrical accidents.

    There are many ways to ground yourself when building a computer, and people use different methods to protect themselves.

    So why is it important to ground yourself while building a computer?

    First and foremost, it is for your safety.

    Secondly, grounding also helps protect your computer’s internal components that can be damaged through an electrostatic discharge (static electricity).

    While it is fortunate that the likelihood of you or your PC being destroyed with static electricity is low, accidents can and do happen. Make sure that you take all the necessary precautions before you set out to work on your PC.

    Preparation and Precautions to Take Before Building a PC

    Grounding yourself is necessary, but so is taking the necessary precautions. Here’s what you need to do before you begin the process of ground yourself.

    1. Avoid Working on a Soft Surface

    First and foremost, you should only assemble your computer on sturdy surfaces like a wooden table, countertop, and so on. This reduces the probability of excess static build-up.

    Avoid soft surfaces like carpets, blankets, and towels at all costs!

    2. Stand Barefoot on a Hard Surface

    Never stand on a carpet or wear your socks while building your PC as it gives some amount of charge to your body. If you have to stand on a soft surface then make sure that you take excessive precautions.

    Wearing a rubber slipper, or shoes with rubber soles can do the trick.

    3. Avoid Static-Friendly Garments

    If your clothing is made of static-inducing materials like wool or synthetic fabrics, you need to change into something else. Cotton clothing is the best option while you are working on building a computer.

    4. Avoid Dry Environments

    Static build-up is a greater threat if you are working in a dry atmosphere. If you are building your PC in a dry environment, you can run a humidifier if you possess one. If not, you need not invest that kind of money just for this. This is an optional precaution that can be skipped in most cases.

    But if you wish to stay on the safe side, you can hang a wet cloth in front of a fan to humidify your workspace.

    5. Store all Electrical Components in Antistatic Bags

    Last but not the least, all the brand new, store-bought computer components should remain in antistatic bags until you are ready to install them. This prevents any kind of static build-up on the said components.

    How to Ground Yourself When Building a PC: 6 Steps

    Here’s what you need to do –

    1. Learn About How Grounding Works

    The human body can transfer some built-up static to any sensitive computer component upon contact. The solution for this is to release the static into something more durable. This can be achieved by using something metallic that is directly or indirectly touching the floor.

    2. Ground Yourself Through Your Computer’s Case

    This is the most common solution used by the majority of computer builders. Before you touch or work with a component that can be destroyed or deteriorated by ESD (like the motherboard), you will need to touch an unpainted metallic area on your computer’s case.

    3. Ground Yourself Again After Every Two Minutes

    For this, you will need to get in direct physical contact with a metal object every other minute. Please make sure that this object is an unpainted metal with a clear ground path. A good example of such an object is the metal radiator on your computer’s case.

    4. Using Anti-Static Wristband

    If you have done your homework, you must already know about these wristbands. Using an anti-static wristband is the simplest and most effective solution. You can buy one for a cheap price at any of the nearby electronics stores. All you’ll need to do is strap the wristband tightly around your skin and clip it to any grounded, metal object.

    Some tips to help you make a smart investment:

    • Avoid wireless wristbands; they are not effective.
    • Try to get a wristband with a clip rather than a loop as they are easier to work with.
    • If you do get a wristband with a loop, simply slip it over the center screw on a wall outlet plate.

    5. Use a Wire to Ground Yourself

    If you can’t find an anti-static wristband, you can use a copper (or any other conductive material) wire around your wrist and tie the other end to a grounded, unpainted metal object.

    6. Use an ESD Mat

    Don’t want to take any risks?

    Simply buy an ESD mat that is rated for “conductive” or “dissipative”.

    After buying it, make sure that you place the computer parts on the mat and regularly touch the mat as you work. You can also buy an ESD mat with a spot where you can clip your anti-static wristband as an added measure.

    Final Thoughts

    A lot could go wrong when you are trying to build a personal computer from scratch. Although people rarely take any measures other than the bare minimum to protect themselves and their delicate electrical components, it is best to be safe.

    Many unfortunate accidents have taken place; accidents that could’ve been avoided if appropriate measures were taken.

    Go through the article carefully and follow the instructions to have a safe PC building experience.

  • How to Remove a Like on Facebook: Step-by-Step Guide

    How to Remove a Like on Facebook: Step-by-Step Guide

    Here I will walk you through steps to remove a like on Facebook using your desktop and mobile devices. So, if you have mistakenly like any page or post and want to unlike it then keep reading this post to learn how to remove a like on FB.

    Believe it or not, Facebook is still the leading online social media platform. Everything that we use, from Instagram to WhatsApp, comes under the massive umbrella of Facebook. And while a large concentration of people might have moved to other trending social media giants like Instagram, Facebook is still at large.

    With over 2.8 billion active users, Facebook churns out a large amount of content every day. Users spend hours on scrolling through their news feeds and liking all the posts that they find interesting.

    Sometimes, people like a post mistakenly and might want to remove that like. Often, people realize that they’ve liked a post unintentionally sometimes after they engaged with the post. It is almost impossible to encounter the same post twice on your newsfeed unless you receive a notification from it. In such situations, users should know how to remove a like on Facebook.

    Read Also: How to Receive Payment on Facebook Business Page?

    How to Remove a Like on Facebook Posts?

    In this article, we’ll tell you how to remove an accidental like on Facebook by following a simple yet effective procedure. At the same time, the article would also cover how you can unlike certain pages on Facebook that you don’t find appealing.

    The best way to do both is to find the post or the page that you want to unlike through your Activity Log. It makes it simple for the users to relocate the posts or the pages on which they left accidental likes.

    The good thing is that you can unlike a post or a page through both your mobile and desktop. Here’s how you can do it.

    Step to Unlike Facebook Posts on Desktop

    If you wish to unlike a particular post through your desktop, follow these simple steps –

    Step 1: Open Facebook on your web browser through the link www.facebook.com.

    Step 2: Log into your account by entering your E-mail address and password combination.

    Step 3: You will then see your News Feed. Click the down arrow [⬇] located on the top right corner of your screen to access the drop-down menu.

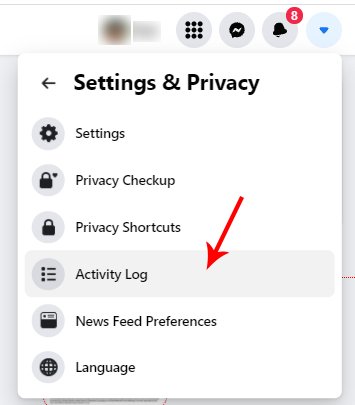
    Step 4: On the menu, find and click on the Settings and Privacy option and select Activity Log option.

    Activity Log
    Activity Log

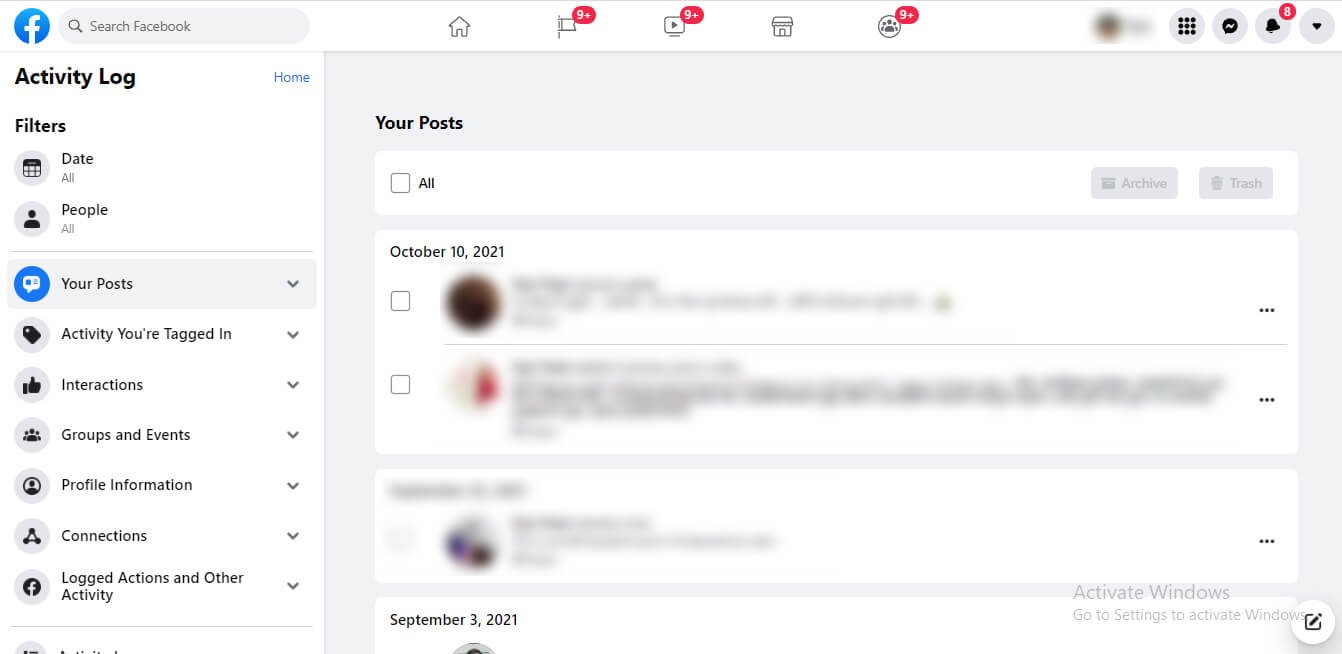
    Step 5: You will see different categories. Click on Your Posts option on the left side.

    Activity Log Your Posts Option
    Activity Log Your Posts Option

    Step 6: You will now be able to see all the posts that you have liked and shared recently. Scroll down until you find the post that you want to unlike.

    Step 7: Click on the Edit (pencil-shaped) icon on the right side of the post. You will see a drop-down menu.

    Step 8: Click on the Unlike option. If you have reacted to the post, you will see a Remove Reaction button instead. Clicking on it will remove your like/reaction from the post.

    Step 9: Repeat the same procedure for all the posts that you want to remove.

    Steps to Unlike Facebook Posts on Mobile

    Most users access Facebook through mobile applications. The procedure for removing a like on post through the Facebook app is slightly different.

    Here’s what you need to do –

    Step 1: Open the Facebook app on your smartphone and log into your account.

    Step 2: You will now see your News Feed. Find the Hamburger (☰) icon on the top of your screen.

    Step 3: Click on the Hamburger icon (three lines). A menu will appear.

    Step 4: Find and tap on Settings & Privacy.

    Step 5: Another expanded menu will appear. Tap on Settings.

    Step 6: Scroll down and tap on Activity Log to open the activity page.

    Step 7: On the activity page, tap on Category, a button located on the top of the screen.

    Step 8: Another menu will appear. Here, find and tap on Likes and Reactions. It will open the list of posts that you have reacted to recently.

    Step 9: Scroll through the list of posts that you have liked to find the one that you want to unlike.

    Step 10: Tap on the Down arrow located next to the post. A menu will appear.

    Step 11: Tap on the Unlike/Remove Reaction button on the menu. This will remove your reaction from the post.

    How to Unlike Facebook Page?

    Next up, you might want to unsubscribe from seeing the posts on a page that you might not like. In such a situation, you need to unlike the page.

    Here’s how you can do it:

    On Desktop

    Step 1: Open Facebook on your web browser.

    Step 2: Log into your account.

    Step 3: Click on your name/profile picture on the top of the screen.

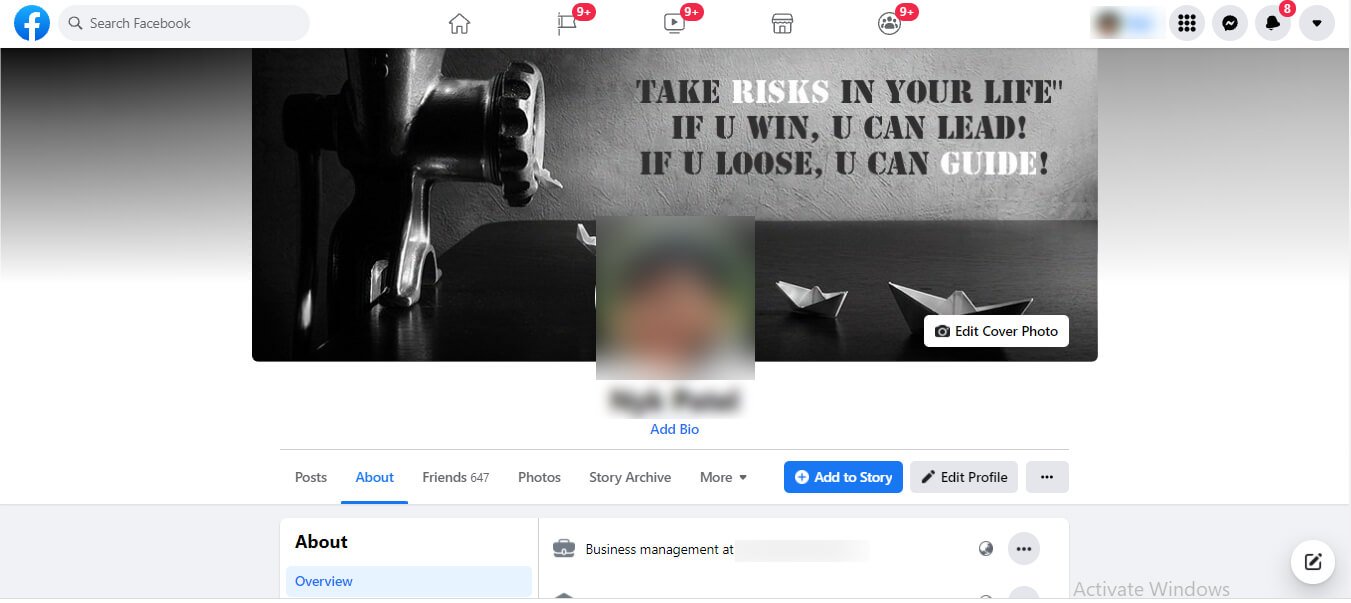
    Step 4: Click on the About button located below your cover picture.

    Facebook About Section
    Facebook About Section

    Step 5: Scroll down to the Likes section to see a list of things that your account likes.

    Step 6: Scroll down until you find the page that you want to unlike.

    Step 7: Click on the Liked button on the right of the name of the page. A drop-down menu shall appear.

    Step 8: Click on the Unlike button, and you will remove your like immediately.

    On Mobile

    Step 1: Open the Facebook application and log into your account.

    Step 2: Find the Hamburger (☰) icon on the top of your screen and tap on it. Then choose the See your profile option at the top of the menu.

    Step 3: Click on the Aboutbutton which is near the top of your profile.

    Step 4: Scroll down until you find the Likes button. Tap on it.

    Step 5: Tap on See All at the bottom of your Likes section.

    Step 6: Tap on All Likes at the top of your screen. This will show you a list of your liked pages.

    Step 7: Find the page that you want to unlike. Then tap on the name of the page to open it.

    Step 8: On the next screen, find the Liked (blue thumbs-up) button on the top right.

    Step 9: Click on the Unlike button to unlike the page immediately.

    Final Thoughts

    Unliking a post on Facebook is a simple procedure. The interface is simple to understand and doesn’t require a lot of data.

    The same goes for unliking a Facebook page. If you want to unlike a post, chances are that you might want to unlike the page that posted it as well. You can do so by following the detailed guides that we have provided.

  • How to Drop Items in Oblivion?

    How to Drop Items in Oblivion?

    Here, you will learn how to drop items in Oblivion step by step. So, if you are an active game player and facing problem in dropping and grabbing items then keep reading for help.

    The Elder Scrolls series has a massive fan base owing to its immersive experience and proactive community.

    Even after more than a decade of its release, Oblivion is still a rage in the market with many gamers still trying to unlock the many secrets of the game and enjoying the tinge of nostalgia that comes with it. Even the Elder Scrolls V: Skyrim is a much more popular part of the series, Oblivion offers a lot of things that Skyrim lacks.

    Even today, the mod community is active on the forum providing several new additions to the game to keep the gamers enticed and waiting for more.

    But one thing that the Elder Scrolls enthusiasts are always confused about is how to drop items in Oblivion. This is something that is barricading their complete gaming experience, as dropping unnecessary items from your Oblivion inventory is highly satisfying as well as makes your character lighter and more agile.

    Dropping Items in Oblivion

    Let’s get one thing right – Oblivion has a lot of items just waiting to be picked up and explored by the user.

    Chances are that you might be the kind of gamer who wants to experiment with different kinds of items and just collect everything that you find on your journey. If you are such a pick-and-pack enthusiast, you might find yourself burdened under the weight of all the items that you are carrying in your inventory.

    In such a case, you might want to free up some space in your inventory by dropping the items that you don’t need. Although you might be attached to your items, sometimes it’s just better to say goodbye and move on!

    The good thing about Oblivion is that dropping items might not necessarily mean that it is goodbye forever. There are containers in the game that can hold your valuable items in a safe and secure location, while also freeing up your inventory space. But if you don’t wish to safeguard your items and merely get rid of them, you can even drop them anywhere in the world.

    So, let’s move on to the focal point of the article –

    How to Drop Items in Oblivion: Step by Step Guide

    Dropping Items on the Ground

    Dropping items on the ground is the quickest way to get rid of all the excess weight in your inventory. But beware, once you drop an item on the ground and move away from that location, you might not find the item there the next time you come back.

    The first thing you need to do is open your inventory. You can open your inventory through your Journal and then going to the inventory page.

    • PC – Open the Journal by pressing the tab button. Locate and click on the Fist icon next to your health, magic, and stamina bars.
    • Xbox 360 – Press the B button on your controller and then use LT/RT to flip between different pages until you find the inventory page.
    • PS3 – Tap the O key on your controller and use the L1/R1 buttons to flip between different pages until you find the inventory page.

    The next step is to drop any item on the ground. You can do so by selecting the item that you no longer need and then clicking on the Drop command. Here’s how you can do it on different platforms:

    • PC – Hold the Shift button and click on the item you want to drop. Alternatively, drag and drop the item out of your inventory window.
    • Xbox 360 – Highlight the item that needs to be discarded from your inventory and then press the X button on your controller.
    • PS3 – Highlight the item that needs to be discarded from your inventory and then press the Square (□)button on your controller.

    Dropping and Grabbing an Item

    Apart from this, you can also drop and grab an item. Through this option, your character will hold the released item in front of you until you let go of the drop button. Then the item will fall to the ground. Note that equipping an item is not the same as grabbing it. When you are grabbing an item, you are just moving it around the world in your arms.

    Here’s how you can do it:

    • PC – Locate the item that you want to drop. Click and hold the item to grab it, and release the left mouse button to finally drop it.
    • Xbox 360 – Highlight the item that you no longer lead. Press and hold the LB button on your controller. Release the LB button to drop the item.
    • PS3 – Highlight the item that you no longer lead. Press and hold the L2 button on your controller. Release the L2 button to drop the item.

    So these are all the different ways in which you can drop an unnecessary item on the ground. Next up, let’s figure out how to put an item safely in a container.

    Dropping Items in a Container

    1. Finding the Right Container

    First, you’ll need to find a container that can hold your items. It is easy to find a container in Oblivion – they’re just about everywhere! However, not all containers can safely store your items. To test the security of a container, place a random item in it and wait for about 73 game hours. Check the container, and if the item is still there, it’s safe.

    2. Interacting with the Container

    You can interact with a container in Oblivion to open it. Get close to the container and press the Use command to open it.

    • PC – Press Spacebar.
    • Xbox 360 – Press the A button.
    • PS3 – Press the X button.

    3. Switching Between Inventory and Container

    After opening the container, you can flip between the list of contents stored in the container and your inventory.

    • PC – You can alternate between your inventory and container by pressing the left Sack icon or the right Sack icon respectively. Holding Shift plus right or left arrow keys also helps you move back and forth between the two.
    • Xbox 360 – You can open the inventory by pressing LT and use RT to view the container.
    • PS3 – You can open the inventory by pressing L1 and use R1 to view the container.

    4. Choose the Item you Want to Move

    Next up, you will need to highlight the item that you move to the container/inventory. For instance, if you select an item in your inventory, it will move to the container. And if you select an item in the container, it will move to your inventory.

    • PC – Left click to select the item you want to move. Press the Enter key.
    • Xbox 360 – Highlight the item that needs to be moved and then press A.
    • PS3 – Highlight the item that needs to be moved and then press X.

    Don’t Waste Your Items – Sell Them

    If you want to have an immersive experience as an in-game collector of items, you can even sell your collected items. It’ll free up your inventory and also give you some cash. Here are some tips on how to be an excellent trader:

    1. Don’t Drop High-value Items

    You can check the value of the item from your inventory. There’s a gold column that gives a rough idea of what the item is worth. Although it is almost impossible to get that value from the vendors, you can surely work on your mercantile skill to become an expert seller. Always try to sell high-value items as dropping them would be wasteful.

    2. Drop Low-value, High-weight Items

    Free up your inventory by getting rid of all the items that are worth peanuts in value and weight the most. This will give you more room to keep valuable items.

    3. Store High-end Items in Containers

    If you want to raise your mercantile skill before you sell your high-value items, you can simply store them in safe containers. Make sure to read our guide on how to find and store items in a safe container mentioned earlier in the article.

    Final Thoughts

    Oblivion is the kind of game that offers an immersive experience. The usability and value of the items that are scattered across its huge map add to its excellent gaming experience.

    Oblivion enthusiasts often hail themselves as collectors and embark on the journey to find the most precious artifacts that they can find in the game. Later on, it is up to them if they want to store it and keep it as a souvenir or sell it to a trader to gain massive profits.

  • How to Change Discord Profile Picture (PFP)?

    How to Change Discord Profile Picture (PFP)?

    Change Discord Profile Picture (PFP)

    Discord is one of the most popular social media platforms in 2021. In a world dominated by giants like Instagram, Facebook, and WhatsApp, Discord brought something unique to the table.

    Discord is now home to thousands of communities specializing in anything from gaming to sports, with users engaging in live, proactive debates and discussions on their areas of interest. The dynamic nature of Discord has compelled many of its users to think about their Discord profile picture.

    In this article, we will discuss steps to change Discord PFP on desktop and mobile.

    Why Change your Discord Profile Picture?

    By default, your Discord pfp (profile picture) would be a generic icon that is indistinguishable within a large community. Many users who are not as enthusiastic about Discord don’t bother learning how to change profile picture on Discord, simply because they don’t feel the need to.

    But if you are genuinely active on Discord and part of several communities of friends, families, and online acquaintances, then you might want to create a unique personality. This is where an attractive, distinguishable profile picture can help you.

    A Discord profile picture, more popularly known as your avatar, is what other users would see next to your Discord username. Both the attractiveness of your username and your profile picture plays an important role in expressing the personality of your profile. Creating a unique username-profile picture combination is the only way to establish a recognizable identity within several Discord communities that you have become a part of.

    Now that you’re ready to move on from the basic default Discord profile picture, let us talk about how you can change it on your mobile device or desktop.

    How to Change Discord Profile Picture Through Web Browser?

    Changing your Discord avatar through the web browser is not the same as changing it through the Discord Android or iOS applications.

    Here’s how you can do it through a web browser on your desktop/laptop.

    Change Discord Profile Avatar on Desktop
    Change Discord Profile Avatar on Desktop

    Step 1: Open discord.com on your web browser.

    Step 2: Locate and click on the gear icon that is displayed in the lower-left corner next to your username.

    Step 3: Click on Edit Profile which comes under My Account next to your username and account info.

    Step 4: Click on the Change Avatar button. Alternatively, you can also click on your current avatar.

    Step 5: Browse through your selection of images to choose the perfect pfp for Discord.

    Step 6: Select your preferred image and use the preview window to crop and adjust the Discord profile picture size.

    Step 7: When everything is set, click on the Apply button.

    Step 8: After you are done with uploading the image, click on the green Save button.

    There you have it, you have now successfully changed your Discord profile picture to a new one.

    Steps to Change Discord Profile Avatar on Mobile

    The majority of the users access Discord through their smartphones. The Discord Android and iOS applications are some of the most downloaded social media apps in the market.

    Here’s what you need to do to change your Discord profile picture through the Discord app:

    Change Discord PFP on Mobile
    Change Discord PFP on Mobile

    Step 1: Open the Discord app on your smartphone.

    Step 2: Locate and tap on the Hamburger icon located in the upper left corner.

    Step 3: Tap on your avatar/profile picture on the bottom right of the screen.

    Step 4: Find and tap on User Settings.

    Step 5: Now open My Account and then tap on your current avatar/profile picture.

    Step 6: Now browse for your preferred image and select it. A preview window shall appear.

    Step 7: Use the preview to crop and adjust the dimensions of the image. If you don’t wish to make any changes, skip the step and directly click on Upload.

    And that’s it, your Discord account will have a brand new profile picture/avatar.

    How to Put GIFs as your Discord Profile PFP?

    If you are an active user on Discord, you might have seen several people using those floating, animated GIFs as their profile pictures. Impressive, right?

    Animated GIFs help users stand out in large and established communities. It gives the users a sense of uniqueness and importance. Unfortunately, this feature is not available for all the users of Discord.

    The privilege of having a GIF as your profile picture/Avatar on Discord is only limited to subscribers of Discord Nitro. Unlike the normal version of Discord that you might be using, Discord Nitro is the premium alternative that allows users to have several special perks and other special features.

    If you wish to enjoy the freedom of putting animated avatars/profile pictures and other enhanced features on Discord, you can learn more about Discord Nitro through their official website.

    Final Thoughts

    Customizing and changing your Discord avatar is not rocket science. It is a simple process that requires little to no effort.

    Discord is a community-based platform, and it is always a pleasure for us to help out our fellow Discord enthusiasts.

  • How to Find Missing AirPods Case?

    How to Find Missing AirPods Case?

    Do you belong to the unlucky category of people who have misplaced their AirPods case? Trust me, you are not alone. Here you will learn how to find Airpods case when it goes missing with or without Airpods in it.

    AirPods cases are minuscule, making it easy for anyone to lose them. You could lose sight of them when you are working out at the gym, watering your plants, or even while lazing around on the couch.

    The small stature of your AirPods case makes them difficult to spot, and it’s a pain to look for them once you’ve lost them.

    So, is there a concrete way to find your lost AirPods case?

    Since the issue is so widespread, Apple couldn’t help but devise a solution for the convenience of their valued customers.

    Read Also: How Long Do AirPods Last Before They Break?

    Finding Lost AirPods Case

    Without a case, your AirPods is like a canvas without any painting on it. The case is necessary for the proper functioning of your AirPods – they’re just not of any use if one or the other goes missing!

    But don’t feel too bad about losing your valuable AirPods case. It is not uncommon for Apple users to lose their devices. And this is why Apple has launched the popular ‘Find My’ application.

    So let’s sideline the panic for a while, and try these steps that might help you find your lost AirPods case.

    How to Find AirPods Case with AirPods In Them?

    Most of the time people tend to lose their cases with AirPods resting in them. In this situation, finding your AirPods case might be easier.

    Here’s how to find Airpods case with AirPods inside them –

    1. Open the “Find my iPhone” or “Find My” application on your device.
    2. Check all your paired devices. Find and select your AirPods from the list.
    3. Check if the application is displaying a green LED light next to your AirPods.
    4. If yes, it means that your AirPods are nearby. Tap on the ‘Play’ icon to play music.
    5. Increase the volume until the sound is audible to you.
    6. Now you can easily locate your AirPods by following the sound.
    7. If you still cannot hear anything, tap on the ‘Car’ icon to follow the directions that will lead you to their last recorded location.

    How to Find Lost Airpods Case without AirPods in Them?

    Sometimes you might come across a tricky situation where you need to know how to find missing AirPods case when it is empty – that is, there are no AirPods inside.

    Unfortunately, unlike last time, you won’t have the option to trace your AirPods case through sound this time.

    But don’t worry, there’s still hope!

    1. Open the “Find my iPhone” or “Find My” application on your device.
    2. Select your AirPods from the list of paired devices.
    3. Ensure that it is displaying a green LED light next to your AirPods.
    4. If yes, it means that your case is lying nearby and is within the Bluetooth connectivity range. Now you can stop panicking and start looking for your case.
    5. If there’s a grey light next to it, it means that your case is either out of range or its battery is dead. Either way, it’s bad news for you.

    All is not lost, though – you don’t have to spend extra cash to buy a new pair of AirPods. You can easily get a new case from any of the Apple stores. This time, you might want to try a different, more stylish, and secure case.

    Can you Find AirPods Case Without iPhone?

    Now if both your iPhone and your AirPods are out of your sight that can be nerve-wracking. The combined cost of both the devices is larger than the cost of my entire outfit!

    But in situations like this, you might want to stop panicking and look for tangible solutions. Fortunately, Apple has you covered with a suitable solution.

    1. You can use the “Find my iPhone” feature through iCloud.com.
    2. Sign in to your account through your Apple ID (make sure that you sign in with the account that is connected with your AirPods) and password.
    3. Locate the “All Devices” option and then click on it.
    4. Click on your AirPods.
    5. Under each device, you can see their last known location. You can trace your AirPods and your iPhone through this information.

    What if None of the Solutions Work for Me?

    If the above mentioned solutions aren’t working for you, it’s bad news. Your AirPods are either stolen or are too far away from you to locate them. Now, you should think of Can Your Stolen Airpods Be Used By Someone, if yes, then you need to act fast.

    Either way, your best solution is to report the missing items to the police and buy a replacement from your nearest Apple store. The serial number of your AirPods can be used to purchase a replacement for a fixed fee.

    Final Thoughts

    Losing your AirPods case can be nerve-wracking. It is an expensive item, after all. Fortunately, Apple provides us with several solutions that we can implement to find our missing devices. If not, we can always opt for a replacement. We won’t get the replacement for free, so that’s a bummer. But we won’t have to pay the full amount either.

    Something is always better than nothing!

  • How to Apply for Walmart Credit Card?

    How to Apply for Walmart Credit Card?

    Apply for Walmart Credit Card

    Walmart is one of the most well-known retail chains in the world. If you shop at Walmart frequently, you might want to consider getting a Walmart credit card.

    You may be qualified for a Walmart Mastercard or a Walmart store card, depending on your credit history which you can use everywhere.

    You’ll need a decent credit score for a store card, and for a Walmart Mastercard, you’ll need a high credit score. 

    It is important to note that Capital One issues Walmart Credit cards, and a credit score of 640 is minimum for eligibility.

    Types of Walmart Credit Cards

    There are two types of Walmart credit cards available –

    1. Walmart Store Credit Card
    2. Walmart MasterCard

    The Walmart Store Credit Card can be used to make purchases at the following locations:

    • Supermarkets and Walmart shops
    • Walmart.com
    • Markets in the neighbourhood
    • Walmart and Murphy USA Gas Stations (These are the two of the most well-known retailers in the United States.)
    • Sam’s Clubs (It is a chain of nightclubs in the United States)

    The Walmart MasterCard can be used anywhere that accepts MasterCard. You can also apply online or in a Walmart store for this card.

    Read Also: Survey.Walmart.com: Take Walmart Survey and Win $1K Gift Card

    How to Apply for Walmart Credit Card Online?

    Follow the below steps to apply for Walmart credit card

    Apply for Walmart Credit Card Online
    Apply for Walmart Credit Card Online
    1. Open your web browser and go to  www.walmart.com/creditcard.
    2. Now, click on the blue “Apply Now” button on the left side of the page. Note: If you don’t have a Walmart account, you must create one before proceeding further.
    3. Next, click on “Create Account” option and enter your Name, email address and create a password.
    4. After that click on the blue “Create Account” button.
    5. Now that your account has been successfully created go to  https://www.walmart.com/account/login page and Sign In to the account you just created.
    6. Next, you will be asked for information like Name, address, phone number, email address, yearly income, Monthly mortgage or rent payment, Duration of residence at current home, date of birth, social security number, Mother’s maiden name. 
    7. Click on Continue.

    Please note that all these details are necessary for the eligibility and application of a Walmart credit card.

    How to Get Walmart Credit Card In Store?

    Well, other than the online self-application, you can also apply for Walmart credit card straight from the store.

    Simply ask the cashier that you wish to opt for their credit card and they will do the rest.

    Also note, all the necessary information in online application will also be needed when you apply from the store.

    So, don’t forget to carry that if you want to be done with the application process on the same day.

    Advantages of Getting a Walmart Credit Card

    Customers can benefit from the Walmart Store Credit Card and Walmart Master Card. These advantages include:

    Program of Cash Back

    Customers who use the Walmart Store Credit Card or the Walmart Master Card are automatically enrolled in the Walmart rewards programme. The cashback programme gives you money back on your everyday purchases.

    • On purchases made at Walmart.com, you’ll get 5% cashback. The promotion is also valid for purchases, including pickup & delivery.
    • Fuel purchases made at Walmart and Murphy USA petrol stations earn you 2% cashback
    • On all other transactions, you’ll get 1% cashback. This covers Walmart physical shops, Neighbourhood Markets, and Sam’s Club transactions. The cashback rewards offer is valid anywhere MasterCard is accepted.

    Shoppers receive these benefits in the form of monthly statement credits.

    There are no restrictions to the number of awards that customers may earn each month. As long as your account is in great condition, your rewards will not expire.

    Other Benefits for Cardholder

    • Security Alerts via text, email and phone if any suspicious activity happens to your account. 
    • $0 Fraud Liability, means you will not be accountable for unsanctioned charges.
    • You can easily lock your card if it has been misplaced or stolen.
    • Check balance, make payments and manage your account with the help of Capital One® Mobile App.

    Frequently Asked Questions (FAQs)

    What do you Need to Apply for a Walmart Credit Card?

    You must be 18 years or older and have a credit score of at least 640 in order to apply for Walmart credit card. Other requirements include social security number and working email address.

    Can you Apply for a Walmart Card Online?

    Yes, you can apply for Walmart card at www.walmart.com/creditcard. Simply click on Apply Now button and start the application process.

    Can I Apply in Store for Walmart Credit Card?

    Yes, you can apply for Walmart credit card by visiting the store physically. Request the cashier about the same, and they will help you with the application process.

    How Hard is it to Qualify for a Walmart Credit Card?

    Obtaining a Walmart Credit Card is not tricky. Walmart offers credit cards to customers with good credit or better. Candidates with average credit, defined as a credit score of 640 or above, are eligible for both cards. To obtain either card, you must be a United States resident and at least 18 years old.

    Final Words

    Walmart credit card is a great way to save money and earn rewards for your existing purchases at this global retail store.

    In the United States alone, there are more than 5,000 Walmart stores and your credit card can be used in all of them.

    So, if you are a frequent shopper and would like to get those additional cash backs then apply for Walmart credit card today.

  • How to Fix “Comcast Email Not Working” Issue?

    How to Fix “Comcast Email Not Working” Issue?

    Is your Comcast Email Not Working? There might be several reasons to it that include, antivirus software or firewall settings, web browser compatibility, internet connection, Comcast’s email settings, etc.

    Here, I have discussed all the possible causes that stop your Comcast Xfinity Email from working and given 100% working solutions to each.

    So, let’s get started…

    Comcast Email is growing recognition as a result of unique features such as quick receiving and sending of mails, safe login, and so on.

    If you have a Comcast email account, you are probably aware of the majority of the features available.

    Nevertheless, there are times when you are unable to use Comcast email and are confronted with a variety of additional issues that prevent you from utilising your email.

    While there are a variety of causes for Comcast email access issues, you can fix the situation and maintain access to all of your emails by using some efficient yet simple troubleshooting techniques.

    Here’s an in-depth look at how to fix Comcast email not Working problem.

    We’ve compiled a list of the best and most effective solutions that can help you get rid of the problem in the matter of seconds.

    The Following is a list of issues that can arise while using Comcast –

    Most Common Problems with Comcast Email

    If your Comcast email isn’t working, it might be due to a variety of reasons. Here’s a summary of the most common problems with Xfinity email services –

    • Comcast email platform is slow.
    • Comcast email is unable to deliver messages.
    • An Xfinity email account that has been hacked.
    • No messages are being received.
    • An error occurred while attempting to sign into your Xfinity account.
    • Comcast’s email became unresponsive all of a sudden.
    • Having trouble logging into your Comcast email account.
    • On Android, Comcast email has stopped working.

    Why Isn’t My Comcast Xfinity Email Working?

    After you’ve identified the potential problems with Comcast email, you’ll need to understand the causes of the problems so that they may be quickly resolved and troubleshooting becomes less stressful.

    If your Comcast email isn’t working, one of the above causes could be to blame.

    • In your area, the Comcast email server is unavailable.
    • To view Comcast emails, you’re running an out-of-date or damaged browser.
    • The internet speed has a low signal strength.
    • If you’ve set up your Comcast account with Outlook, you’ll see that the email settings are wrong.
    • Your Xfinity email account has been hacked or compromised.
    • The conflict is caused by any third-party software.

    Troubleshooting the Problem of Comcast Email Not Working

    When Comcast email stops working or responds at all, everything comes to a standstill, and you won’t be able to send or receive emails until the problem is resolved.

    Luckily, there are certain solutions you can use to resolve all of the significant issues with your Comcast email account from Xfinity.

    Follow all of the troubleshooting steps thoroughly, whatever difficulty you’re having, follow the instructions:

    Fix Comcast Email Not Working
    Fix Comcast Email Not Working

    #Solution 1 – Internet Connection

    The internet connection is a critical aspect that causes the majority of common or technical problems. Comcast.net can be difficult to use due to a bad connectivity issue. Check whether you can open URLs in your browser; if not, do the necessary steps, such as:

    1. Check the cable connections and make sure they are in the correct ports.
    2. Check your modem and router for connection.
    3. Link your gadgets, such as cell phones and PCs, to the wireless network.
    4. If you can’t find out what’s wrong, try detaching and reconnecting the power cords to the modem and router.

    #Solution 2 – Resolve Comcast’s Receiving and Sending Problems

    If the Xfinity email send/receive function on your Comcast email isn’t responding, check your settings page by following the steps below:

    1. Issues were sometimes created by storage issues, therefore double-check your storage capacity.
    2. Check to see if you’ve reached your daily Comcast email sending and receiving limitation.
    3. Examine your trash and spam folders to see whether any of your emails are still sitting there.
    4. Verify the recipient’s email address before sending the email.
    5. Check to see if the sender has stopped you from receiving emails.

    #Solution 3 – Web Browser

    Comcast not functioning issues can be caused by a number of different things, including your web browser.

    Ensure that the browser you’re using is Comcast-compatible, routinely clean your browser’s cookies and cache, and change to another browser if you’re still having trouble using Comcast.

    There are numerous options available on the Google Play and Apple App Stores for this.

    1. Restart your browser and check your Comcast email again.
    2. Make sure your browser is up to current.
    3. If nothing else works, try switching to a different browser.

    #Solution 4 – Check the Settings of your Antivirus or Firewall Software

    Installing an antivirus or the standard Farewell software on your device can cause problems with Comcast email and make it difficult to work. You should determine whether or not antivirus is the source of the problem.

    You can test it by temporarily deactivating the antivirus or firewall options. If you discover that your antivirus product is the source of the problem, consider uninstalling it and installing a suitable app on your device. If feasible, test an antivirus on a separate device before downloading it on your own. 

    Final Words

    The answers to Comcast email not working have fairly straightforward, and users may quickly implement them.

    You won’t need any other assistance if you follow the instructions correctly. Nevertheless, sometimes the actions are insufficient to entirely eliminate the issue. As a result, you can seek the assistance of Comcast email support professionals in this situation.

  • How do I Make Yahoo My Homepage on Chrome and Firefox?

    How do I Make Yahoo My Homepage on Chrome and Firefox?

    Make Yahoo My Homepage

    Do you want to make Yahoo your Homepage on Google Chrome or Firefox?

    Well, this is a very helpful thing to know about if you are a regular Yahoo user and use Yahoo search engine.

    When you launch a browser, the first page you see is the home page.

    There are a variety of browsers available to choose from.

    To make Yahoo homepage on Firefox as default, you’ll need to follow a different approach from Chrome.

    In this article, I will discuss ways you can follow to set Yahoo as your default Homepage on Google Chrome and Firefox.

    How Do I Make Yahoo My Homepage on Google Chrome: 6 Steps to Follow

    If you are using Google Chrome browser and thinking to set Yahoo as default homepage, then follow the below steps –

    1. Go to Google Chrome menu by clicking on the 3 vertical dots showing on the top right side.
    2. Now select Settings options.
    3. Scroll down to the Show Home Button.
    4. Select Enter Custom Web Address option, and add Yahoo Homepage URL www.yahoo.com
    5. Next, scroll down to On start-up section and select Open a Specific Page or Set of Pages option.
    6. Then go to Add a New Page‘ type in the Yahoo Homepage web address again, and hit Add.
    Steps to Make Yahoo Homepage on Google Chrome
    Steps to Make Yahoo Homepage on Google Chrome

    This will automatically establish Yahoo as your Homepage the next time you open Google Chrome browser.

    How to Make Yahoo Your Homepage on Firefox?

    To make yahoo your default search engine on Firefox browser, follow the below steps –

    1. First, open Firefox Application Menu by clicking on the hamburger menu showing on the top right side.
    2. Select Settings from the drop-down menu.
    3. Click on Home in the left column.
    4. In the New Windows and Tabs section, click on Firefox Home (Default) and select Custom URLs.
    5. Add Yahoo homepage URL
    Steps to Make Yahoo Homepage on Firefox
    Steps to Make Yahoo Homepage on Firefox

    Done, it will change the current search engine to Yahoo as default homepage on Firefox. Whenever you open the Firefox homepage or new windows, Yahoo homepage will come up as the home screen.

    Read Also: How to Delete All Emails on Yahoo at Once?

    Frequently Asked Questions (FAQs)

    Is Yahoo Compatible with Google Chrome?

    Yes, Google Chrome is compatible with the latest version of Yahoo.

    Why is Yahoo Search Opening in Google Chrome?

    This is happening because your default search engine has been changed to Yahoo.

    Is Yahoo Still a Browser?

    Yahoo is not a web browser. It is a web-based search engine that you may access through your browser.

    Do People Still Use Yahoo?

    Yes, millions of people still use Yahoo search engine and related services. As per the latest data, around 3% of internet users are using Yahoo.

    Final Words

    So, this was all about how to make yahoo your Homepage on Google Chrome and Firefox. Follow the above guide and change your default page as a Yahoo search engine without any hassle.

  • How Old Do You Have To Be To Work At Walmart?

    How Old Do You Have To Be To Work At Walmart?

    Thinking to work at Walmart? Then, the first thing you need check your age because Walmart has set a specific age limit to hire new employees.

    So, what age to work at Walmart? Let’s find out…

    Walmart is one of the best picks for youngsters wanting to enter the workplace as the country’s largest private employer.

    It has a minimum hiring age for entry-level retail employment since consumers can purchase alcoholic drinks and tobacco items.

    So, lets check out how old do you have to be to work at Walmart –

    What Age Does Walmart Hire?

    You need to be at least 16 years old to get work at Walmart as part-time or full-time employee.

    Walmart is one of the corporations that continue to hire thousands for part-time and full-time positions and seasonal labour around the vacations.

    When people have lost jobs, and the pandemic is wreaking havoc on our financial security, young people seek employment at Walmart.

    Entry-level employees can apply for a range of customer service positions and management opportunities for individuals with prior background and retail experience.

    Read Also: wmlink/2step: WalmartOne 2 Step Verification

    What Are the Different Departments for Which Walmart Employ?

    The different departments for which Walmart employs are listed below –

    • Stocking and Unloading
    • Fuel Station
    • Hourly Supervisor and Training
    • Cashier and Front End
    • Food and Grocery
    • Auto Care Center
    • Hourly Supervisor and Training
    • Health and Wellness
    • General Merchandising
    • Online Order filling and Delivery

    There can be other vacant positions also depending on work locations.

    What is the Hiring and Interview Process at Walmart?

    To apply for a job at Walmart, most entry-level positions require little to no expertise. Because many underage kids seek employment with the firm, an employee’s schooling degree is also meaningless.

    Managerial positions at Walmart usually demand retail experience and a high school certificate or GED as a minimum education. Physical requirements may apply to some positions; however, prerequisites vary by store location and sector.

    How Much Do Jobs at Walmart Pay?

    According to Walmart, workers at distribution facilities start at $17 to $18 per hour at location.

    Workers at fulfilment centres earn between $15 and $19 per hour, representing a new, temporary wage rise of $2 per hour for those workers that will continue through Memorial Day.

    The majority of Walmart retail positions pay between $10 and $14 per hour.

    Do I Need a Resume/CV to Apply to All Jobs at Walmart?

    This depends on which job positions you are applying for. If you just wish to work hourly or part-time, then a resume/CV is not necessarily needed.

    Though job history and application highlights might be needed for some particular positions.

    What is required to apply for a job at Walmart or Sam’s Club?

    The application criteria differ based on the professional field you’re interested in. To work at Walmart, you must be at least 16 years old, and to work at Sam’s Club, you must be at least 18.

    Several jobs, however, demand that you be at least 18 years old. Have your previous job history on hand as you prepare to finish your application.

    Walmart Employee Benefits

    So, now you are aware of the age requirements to work at Walmart, let us now discuss about offers and benefits you will receive as an employee.

    Benefits at Walmart vary depending on where you work and several other variables. Most employees, on the other hand, may anticipate receiving.

    • Health benefits, including coverage for a spouse and access to a health savings account.
    • Nursing healthcare providers and health care consultants are available for free.
    • After one year on the job, there is a 401(k) plan with a corporate match.
    • Paid time off is available.
    • Walmart shops provide a 10% discount on fresh fruits and vegetables and customarily priced general items.

    Walmart also has a unique initiative called Live Better U, allowing workers to earn degrees for $1 a day from Purdue University Global and the University of Florida.

    According to the firm, more than 12,000 part-time and full-time colleagues are enrolled in the programme, working toward degrees in business administration, computer science, healthcare management, and other fields.

    Final Words

    If you are considering to work at Walmart, then this article will be able to provide all the above insights you need before you can apply or start the job.

    When we talk about at what age does Walmart hire? The answer is straightforward; you must be 16 years or older. Other than that, there are several perks of working with one of the largest multinational retail corporations in the US that we have discussed.

  • How to Translate YouTube Comments in Different Languages?

    How to Translate YouTube Comments in Different Languages?

    Uploading content on YouTube refers to a diverse audience who speaks a variety of languages.

    In reality, approximately 70% of them reside outside the U.S, making it critical for you to be able to attract a worldwide audience.

    Most individuals are unsure of a fantastic tool available on YouTube that can convert comments and translate them in different languages.

    Simply look for the Translate Button beneath the comment, and it will be translated for you instantly.

    It’s not a flawless translation, but it’s close enough that you can comprehend what’s being said.

    When you see comments and want to answer to the user, it’s very simple to do so.

    Google is making this entirely possible, and I think YouTube will follow suit in the future.

    Simply type your text into Google Translate, then copy and paste your answers into the YouTube comment window.

    Now, I’m guessing that YouTube will have that capability in the potential as well, where you can convert on the move.

    Let us now show you the step-by-step process on how to translate YouTube comments.

    Read Also: How to Get Community Tab on YouTube to View Community Posts?

    How to Translate YouTube Comments Step By Step

    1. Open YouTube.
    2. Next go to the video under which you wish to translate a comment
    3. Now find the comment you wish to translate (i.e any comment in different language than English)
    4. Now locate the “Translate” button beneath the comment
    5. Click on the “Translate” option and the comment will be translated into English language.

    This way you will be able to get hold on all the comments that you or any other video has received in a different language.

    Over two-thirds of a creator’s spectator view time arrives from outside their home region on average.

    Make your videos fully available in other countries with the translation resources to expand your foreign audience:

    Metadata that has been translated can improve the scope and discoverability of a video.

    For audiences who speak some other languages, translated video titles and descriptions may appear in YouTube search results.

    All of your videos with subtitles can be found and watched by viewers who speak other languages. Extremely difficult or deaf audiences, non-native speakers, and viewers in noisy settings will all benefit from captions and comments in the same language.

  • How to Get Community Tab on YouTube to View Community Posts?

    How to Get Community Tab on YouTube to View Community Posts?

    How to Get Community Tab on YouTube: Community posts are simple engagement mechanisms that enable Users with at least 1,000 subscribers to connect with their fans in ways other than video.

    You can both offer fans a closer insight at your universe and share your imagination by using various content styles.

    They’re available to anybody who visits your Community page, and if Subscribers are opted in, they’ll get them in their Subs feed or updates.

    You’ll learn how to set up and use Community posts to successfully reach communities in this tutorial.

    Read Also: How to Make a YouTube Playlist Private?

    How to get Community Tab on Youtube?

    The Discussion page, which was formerly an optional discussion field for YouTube channels, has been replaced by the Community tab.

    • Visit your channel and check below your channel art to see if you have the latest Community tab.
    • The Community tab will appear in place of the Discussion tab if you have it installed.
    • The ability to post is the only distinction between the current Community page and the existing Discussion tab.

    Based on the channel’s Discussion settings, the Discussion tab permitted developers, viewers, and visitors to post only text-based status notifications and responses.

    The Community tab provides a Facebook-like experience for platforms, allowing creators to share different forms of status updates – text, photos, connections, and more.

    When you click on community tab option it will display an empty message.

    Select YouTube channels (both authenticated and non-verified) with over 10,000 subscribers can get the Community tab first.

    Like other social networking sites, the feature would most likely start with bigger brands, sponsors, and successful YouTube creators before being rolled out to the rest of the world.

    Join the community content of networks you subscribe to by visiting their Community tab or viewing the Subscriptions tab of the YouTube app to get ideas for your own community posts.

    You can use the latest YouTube channel Community tab to target viewers in the following ways until you have access to it.

    The “highlighted” content in the descriptions are group posts that can be reached by selecting the timestamp of the message. They aren’t videos that the YouTuber has chosen to showcase.

    Make a Video to Introduce your Community Tab

    Since YouTube subscribers and visitors demand video from your site, it may be wise to start with a video when introducing the Community tab.

    Open the tab and copy the URL from your browser’s address bar to include a shortcut to your Community tab in the video summary. Upload the info on your Community tab so that new-comers to this tab understand how to interact with your channel.

    Encourage People to Turn on Notifications if they Haven’t Already

    Using a clip or a group post (or both) to let people know how to get updated about your new channel operation, in addition to letting them learn about your Community tab.

    The Purpose of Your Community Tab Should be Specified

    The first post on your Community tab is the ideal spot to greet your YouTube viewers and explain your goals. This tab on YouTube recommends that you create a creed as a way to develop a strong society.

    Promote the Goods

    On the Community page, you can sell items to channel subscribers and travellers. Create a status update with a picture of the brand and a link to the product’s sales page and post it to the tab. To monitor the results, consider having a special landing page on your website for your channel subscribers and offering an exclusive discount only for YouTube visitors.

    Conclusion

    The Community tab on YouTube enables developers to interact with their viewers and guests in ways other than video. Post status messages, ask questions, invite visitors to ask questions, poll your followers, and more on this tab, much as you would on your Facebook page’s wall.

  • How to Make a YouTube Playlist Private?

    How to Make a YouTube Playlist Private?

    Don’t know how to make a YouTube playlist private? No worries, go through this post where I have explained everything step by step.

    So, let’s get into details –

    YouTube is one of the most widely used websites for watching various kinds of video content all over the world.

    If you own a YouTube channel, you have the option of making it private, public or unlisted.

    Even if all YouTube playlists are set to Public by default, there are certain boards that you can set to Private.

    Do you still want to change the privacy settings for your YouTube playlists?

    There must be a variety of reasons for you to change the privacy settings on your YouTube playlist.

    The primary goal of this guide is to demonstrate how to make a private playlist on YouTube.

    However, keep in mind that the privacy settings for playlists you’ve built vs those you’ve saved can vary.

    How to Make a YouTube Playlist Private Step by Step

    Private YouTube Playlist
    private youtube playlist
    1. Go to YouTube and log into your account
    2. Choose Creator Studio Classic from the drop-down menu
    3. Select Video Manager from the left menu, then Playlists
    4. Press Edit next to the playlist you want to refresh. This operation would guide you to the same playlist you want to control.
    5. On the left, select Private, Public, or Unlisted from the drop-down menu, and then select another choice.

    How to Make your Saved YouTube Playlists Private?

    Here’s a step-by-step guide to changing the privacy settings for saved YouTube playlists –

    1. Sign in to your YouTube account
    2. Press your profile picture in the top right corner
    3. Choose Settings from the drop-down menu
    4. Pick Privacy from the left menu
    5. Choose the option to make all of my saved playlists private

    YouTube’s versatility is one of the main causes for its meteoric rise in success over the years.

    YouTube makes it incredibly simple for content producers to reach a vast audience with their work.

    As a consequence, there is a diverse variety of material from which to select. YouTube has it all, whether it’s countless fashion tips, product ratings, gaming platforms, or hours of unboxing footage.

    There are bound to be a few that pique your attention among the millions of YouTube channels available. Let’s just say there’s plenty for everybody on YouTube.

    Final Words

    So, this was all about how to make a YouTube playlist private, if you are thinking about starting you own channel then knowing all the necessary features is a must.