Category: How To

  • How to Reply to a Specific Message on Instagram?

    How to Reply to a Specific Message on Instagram?

    The concept of responding to particular messages is new and growing in popularity, so keep reading if you want to learn how to reply to a specific message on Instagram.

    In most popular messaging apps, users can respond to precise messages from a single sender.

    This is beneficial because it can save you time when replying to an older message. This feature can be quite useful in group discussions too.

    Instagram was a little late in bringing this function to the public, but better late than never.

    Note: Make sure you have the latest version of the app. If not, update it from the Google Play Store or App Store.

    How To Reply to a Specific Message on Instagram (iPhone)?

    To reply to a specific message on Instagram, follow the below steps –

    1. Open Instagram app.

    2. To view messages, hit the messenger icon.

    3. From your messages, choose a person or group chat.

    4. Look through the person’s message list for the particular message. Swipe right on the message until an arrowhead icon appears, which opens the text box, or press and hold the text and select Reply.

    5. The specified text will now appear above the text entry field. Send your reply by typing it in.

    Note: When you select a message to react to, it appears in quotes so you can see which message you’re talking about in the chat. Otherwise, simply tapping the bottom-right respond button delivers your message on its own.

    How To Respond to a Specific Message in Instagram (Android)?

    On an Android, responding to a precise Instagram message is identical to doing so on an iPhone. To respond to a message in the app, follow these steps –

    1. Open Instagram app.

    2. Tap the messages icon.

    3. Look for a chat with the message you want to answer to.

    4. Swipe right on the message until an arrowhead icon appears, which opens the text box, or press and hold the text and select “Reply” at the bottom.

    5. Fill in the blanks with your response. When you send your message, the message you responded to will be joined to it.

    How To Answer to a Specific Message in Insta (PC)?

    To react to a particular message in Instagram on a Computer, follow the instructions below –

    1. Log in to your Instagram account on your computer.

    2. Tap the Messenger symbol, which is located next to the Home icon at the top of the screen.

    3. Select your preferred chat (person or group).

    4. Hover your cursor over the message you wish to respond to. Keep in mind that the message could be yours or someone else’s.

    5. You should now be able to see the Reply icon. You’ve got it.

    6. Write your message and press the Send button.

    Several Instagrammers are unable to respond to messages because the messaging tool has not been updated. You won’t be able to reply to messages if you haven’t upgraded Instagram’s messaging feature. However, you’ll only have three choices: “Copy,” “Report,” and “Save.”

    Read Also: How to Change Instagram Icon on iPhone and Android Devices

    FAQs on Instagram Messages

    Can I Reply to Any Message on Instagram?

    Yes, the tool is available for both individual and group talks. With the latter, direct message replies are advantageous since you can minimize confusion by identifying which message your response pertains to.

    Why am I Unable to Respond to a Specific Instagram Message?

    Before you can respond to a message on Instagram, you must first upgrade the app’s messaging. When Instagram’s new messaging features are introduced, you’ll be requested to update your messages. However, you will not be encouraged to do so right now. As a result, you’ll have to change messaging manually.

    Final Words

    So, that was all about how to respond to a specific Instagram message.

    Make sure your device’s location is set to an area where the latest update is accessible if the app is up to date. In Japan and parts of Europe, for example, the feature is currently inaccessible.

    Furthermore, you can use the Help feature in the Instagram app to get specialised help. You may be unable to upgrade your messaging service right now due to an account-specific issue.

    Now that you know how to react to certain Instagram messages, your interaction with pals should enhance. To keep Instagram up to date, be sure to activate automatic updates.

  • How to Delete Poshmark Account Step-by-Step?

    How to Delete Poshmark Account Step-by-Step?

    In this guide, we will discuss how to delete Poshmark account in a step-by-step process.

    Poshmark is a web platform and marketplace dedicated to clothing, accessories, small electronics, pet products, and household goods.

    Poshmark allows you to purchase, sell, and exchange clothes with other members.

    The company will collect a nominal fee and handle all sales tax and delivery costs.

    They also keep track of your account information and payout regularly.

    How to Delete Poshmark Account on Mobile?

    Poshmark provides detailed instructions on how to delete an account. Those guidelines have been condensed down into a step-by-step guide. The first set of instructions explains how to delete it from the mobile app. The second section describes how to delete it from a computer.

    Note: Before you terminate your Poshmark profile from the device, keep in mind that it cannot have any pending orders or redemption balances. Before trying to delete the account, make sure all of the products you’ve sold have “cleared” and that any income you’ve earned has been cashed out.

    Follow the below steps to delete your Poshmark account –

    1. Go to your phone’s app store and download the Poshmark app (Android or iOS).

    2. Click on The Account tab option, which is found in the bottom right corner.

    3. A menu will display various account options such as saved payment methods, saved addresses, etc. Look for and tap on the Poshmark Support Center.

    4. Select Manage Account Status from the dropdown menu.

    5. Select Delete My Account from the dropdown menu.

    6. A pop-up window will appear, requesting a verification code. Enter it in the box below and click Submit. check the code sent by email or text message.

    7. Select the explanation for deactivating your Poshmark account from the dropdown menu.

    8. Finally, choose Delete My Account.

    9. Click Yes from the pop-up menu.

    After that, your Poshmark account will be deleted.

    Note that if you remove the app from your phone without filing a deletion request, your profile will stay active and will not be formally terminated.

    How to Close Your Poshmark Account on Desktop?

    Follow the below steps to delete your Poshmark account using the web –

    1. Open the Poshmark official website (PoshMark.com) and login to your account.

    2. Go to your Profile and select Account Settings.

    3. From the left side menu, choose Manage Account Status.

    4. Select Delete My Account.

    5. Finally, choose Logout and your account will be deactivated.

    Read Also: How to Delete Watched Videos on Facebook at Once?

    Reasons to Deactivate Poshmark Account

    You might wish to learn how to remove your Poshmark account for a variety of reasons.

    In this society, not everyone is trustworthy, and this lack of trust can be revealed while attempting to execute money transfers with complete strangers. Here are some of the circumstances that have caused Poshmark users to cancel their accounts:

    • Your account has been hacked, and your personal information has been stolen.
    • Your account is hacked, and your credit card information is stolen.
    • Poshmark experienced a security breach.
    • You place an order for something that never arrives.
    • You are duped into disclosing personal information by another member.
    • You order something and when you get it, you realise it’s not what you expected.
    • You receive faulty item and have no way of returning it.
    • You’re dealing with a member that immediately deletes their account after receiving money from you.
    • Fraudulent activity in general

    Things To Know After Poshmark Account Deletion 

    When you close your account, what happens next? All of your private details will be erased, as previously stated.

    With the id and password you used to register, you won’t be able to access the website or app. 

    Lastly, you won’t be able to make money on Poshmark by selling your things.

    After you’ve deleted your account, make sure you remove the app from all of your devices—your smartphone, iPad, smart TV, and any other device you’ve used Poshmark.

    To ensure that the deleting process is effective, you should also delete your browser’s cookies, history, and cache.

    Here’s something else to think about if you’re seeking to get rid of Poshmark. Even if you deactivate the app from your device, your Poshmark profile will stay live and will not be formally removed if you do not submit a deletion request.

    FAQs on Poshmark Account

    What Happens if I Delete My Poshmark Account?

    If you remove your Poshmark account, you will lose all of your data. Your profile image, username, any products you’ve advertised for sale or given away on Poshmark, and any communications you’ve sent are all included.

    Can you have Two Poshmark Accounts?

    Poshmark allows you to have several accounts. Poshmark allows you to have as many accounts as you desire. You can also quickly eliminate your account.

    Why Can’t I Deactivate y Poshmark Account?

    If you’ve recently sold things on Poshmark, make sure to collect any outstanding sale sums before deleting your account. If there are any ongoing purchases or redeemable balances, Poshmark states it won’t be able to complete the deletion.

    How do I Pause my Poshmark Account?

    To pause your Poshmark account, navigate to the “Settings” section of the website. You can then select “Pause Account” from the dropdown menu.

    Can I Make a New Poshmark Account?

    Yes, you certainly can. Poshmark is a clothing and fashion app that lets you buy and sell clothes with other people. You can establish a new account by installing the app on your phone.

    Final Words

    Poshmark can be a fantastic platform for selling and buying items, but if you’ve decided to delete Poshmark account, this article is for you. Follow the above step by step guide and get a hold of your account without any trouble.

  • How to Clear Recents on Snapchat?

    How to Clear Recents on Snapchat?

    Do you want to know how to clear recents on Snapchat?

    If that’s the case, you’re in luck because Snapchat allows you to delete all of your recents, containing search history and chats, in a matter of seconds.

    How? This article contains all of the pertinent information.

    Skip the cue: How to Clear Recents on Snapchat?

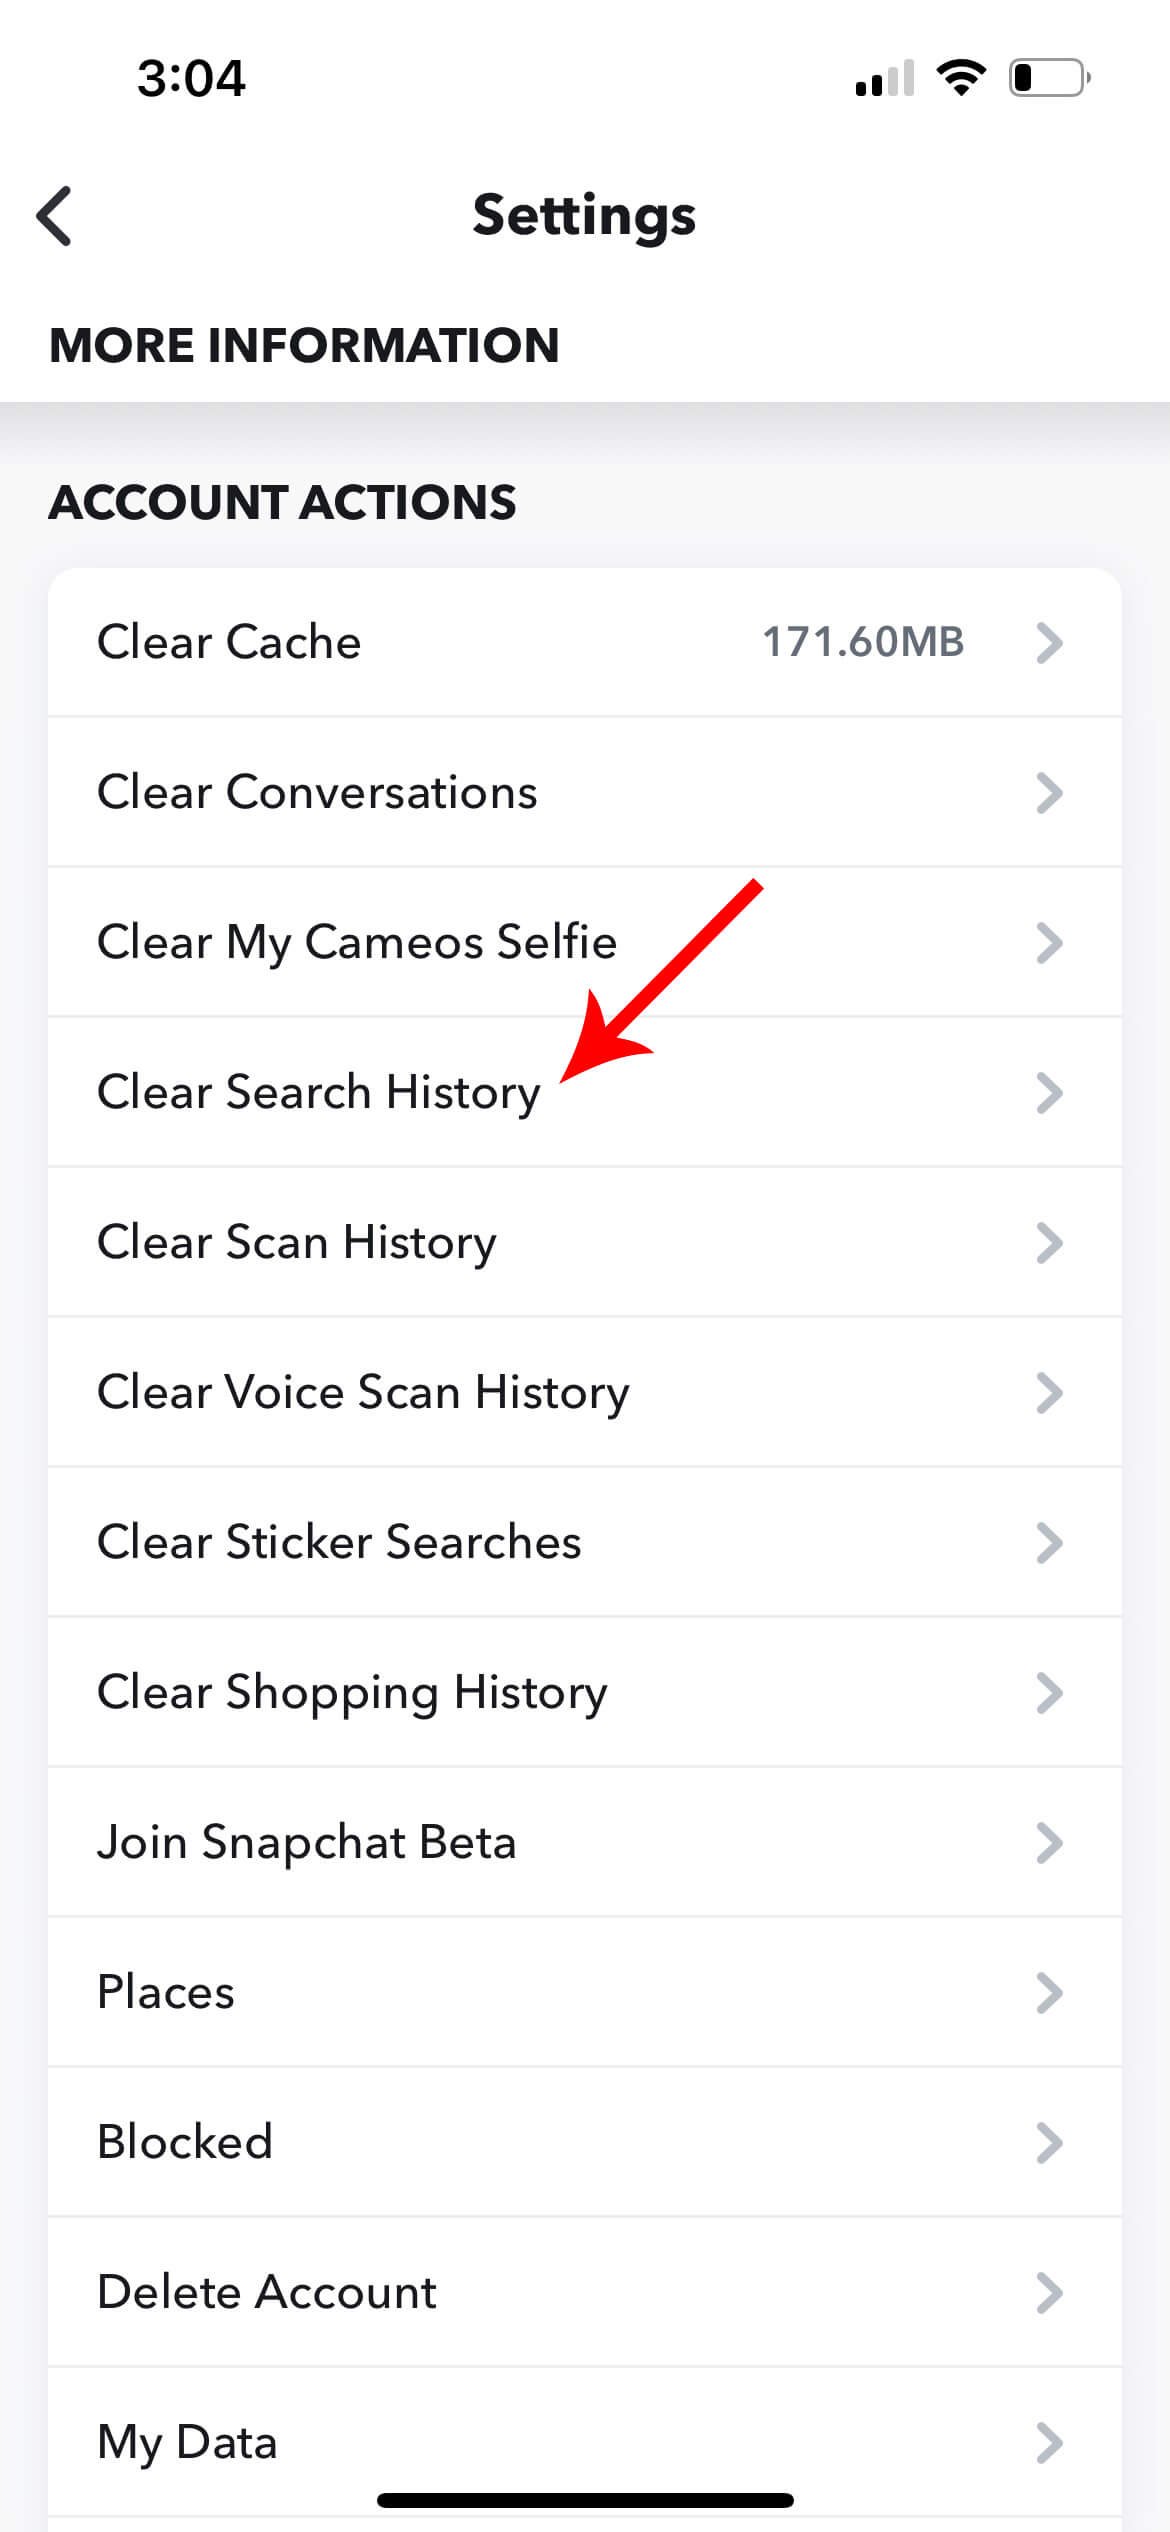
    On your phone, open Snapchat. To access Settings, use the gear symbol. To clear your recents history, go to Account Action and select Clear Search History. To delete your Snapchat recents, press Clear when the popup box displays.

    Snapchat is one of the most used social media services in the world and it keeps track of everyone you snap, talk with, or add in your Recents.

    Keeping track of your discussions, on the other hand, might be annoying at times, particularly if you have a lot of them. Perhaps you have a document that you don’t want your partner to see.

    Snapchat has many options for deleting chats and clearing your search history.

    Steps to Clear Recents on Snapchat?

    If you need to clean your Snapchat history frequently, the whole procedure is pretty simple and can be memorized.

    The following are step-by-step instructions that work with iPhones, Android phones, iPads, and other tablets –

    Clear Search History on Snapchat
    Clear Search History on Snapchat

    1. Launch the Snapchat app on your phone.

    2. From the right corner, tap Settings.

    3. For iOS, go to Account Actions, and for Android, go to Privacy.

    4. Choose the Clear Search History option from the drop-down menu.

    5. Finally, select the Clean option to wipe your recent search history.

    How to Remove Recent Conversations from Snapchat?

    What about the most current discussions? Here’s what you can do if you want to clear it –

    Clear Conversations on Snapchat
    Clear Conversations on Snapchat

    1. Go to Settings on Snapchat.

    2. For iOS, go to Account Actions, and for Android, go to Privacy.

    3. Select Clear Conversations from the drop-down menu.

    4. Select the chats you want to delete by tapping the cross button next to them.

    How to Get Rid of Your Selfies and Cache Data?

    Yes, you read that correctly. You may also clear your cache and selfie data from Cameo. How? This is how it works –

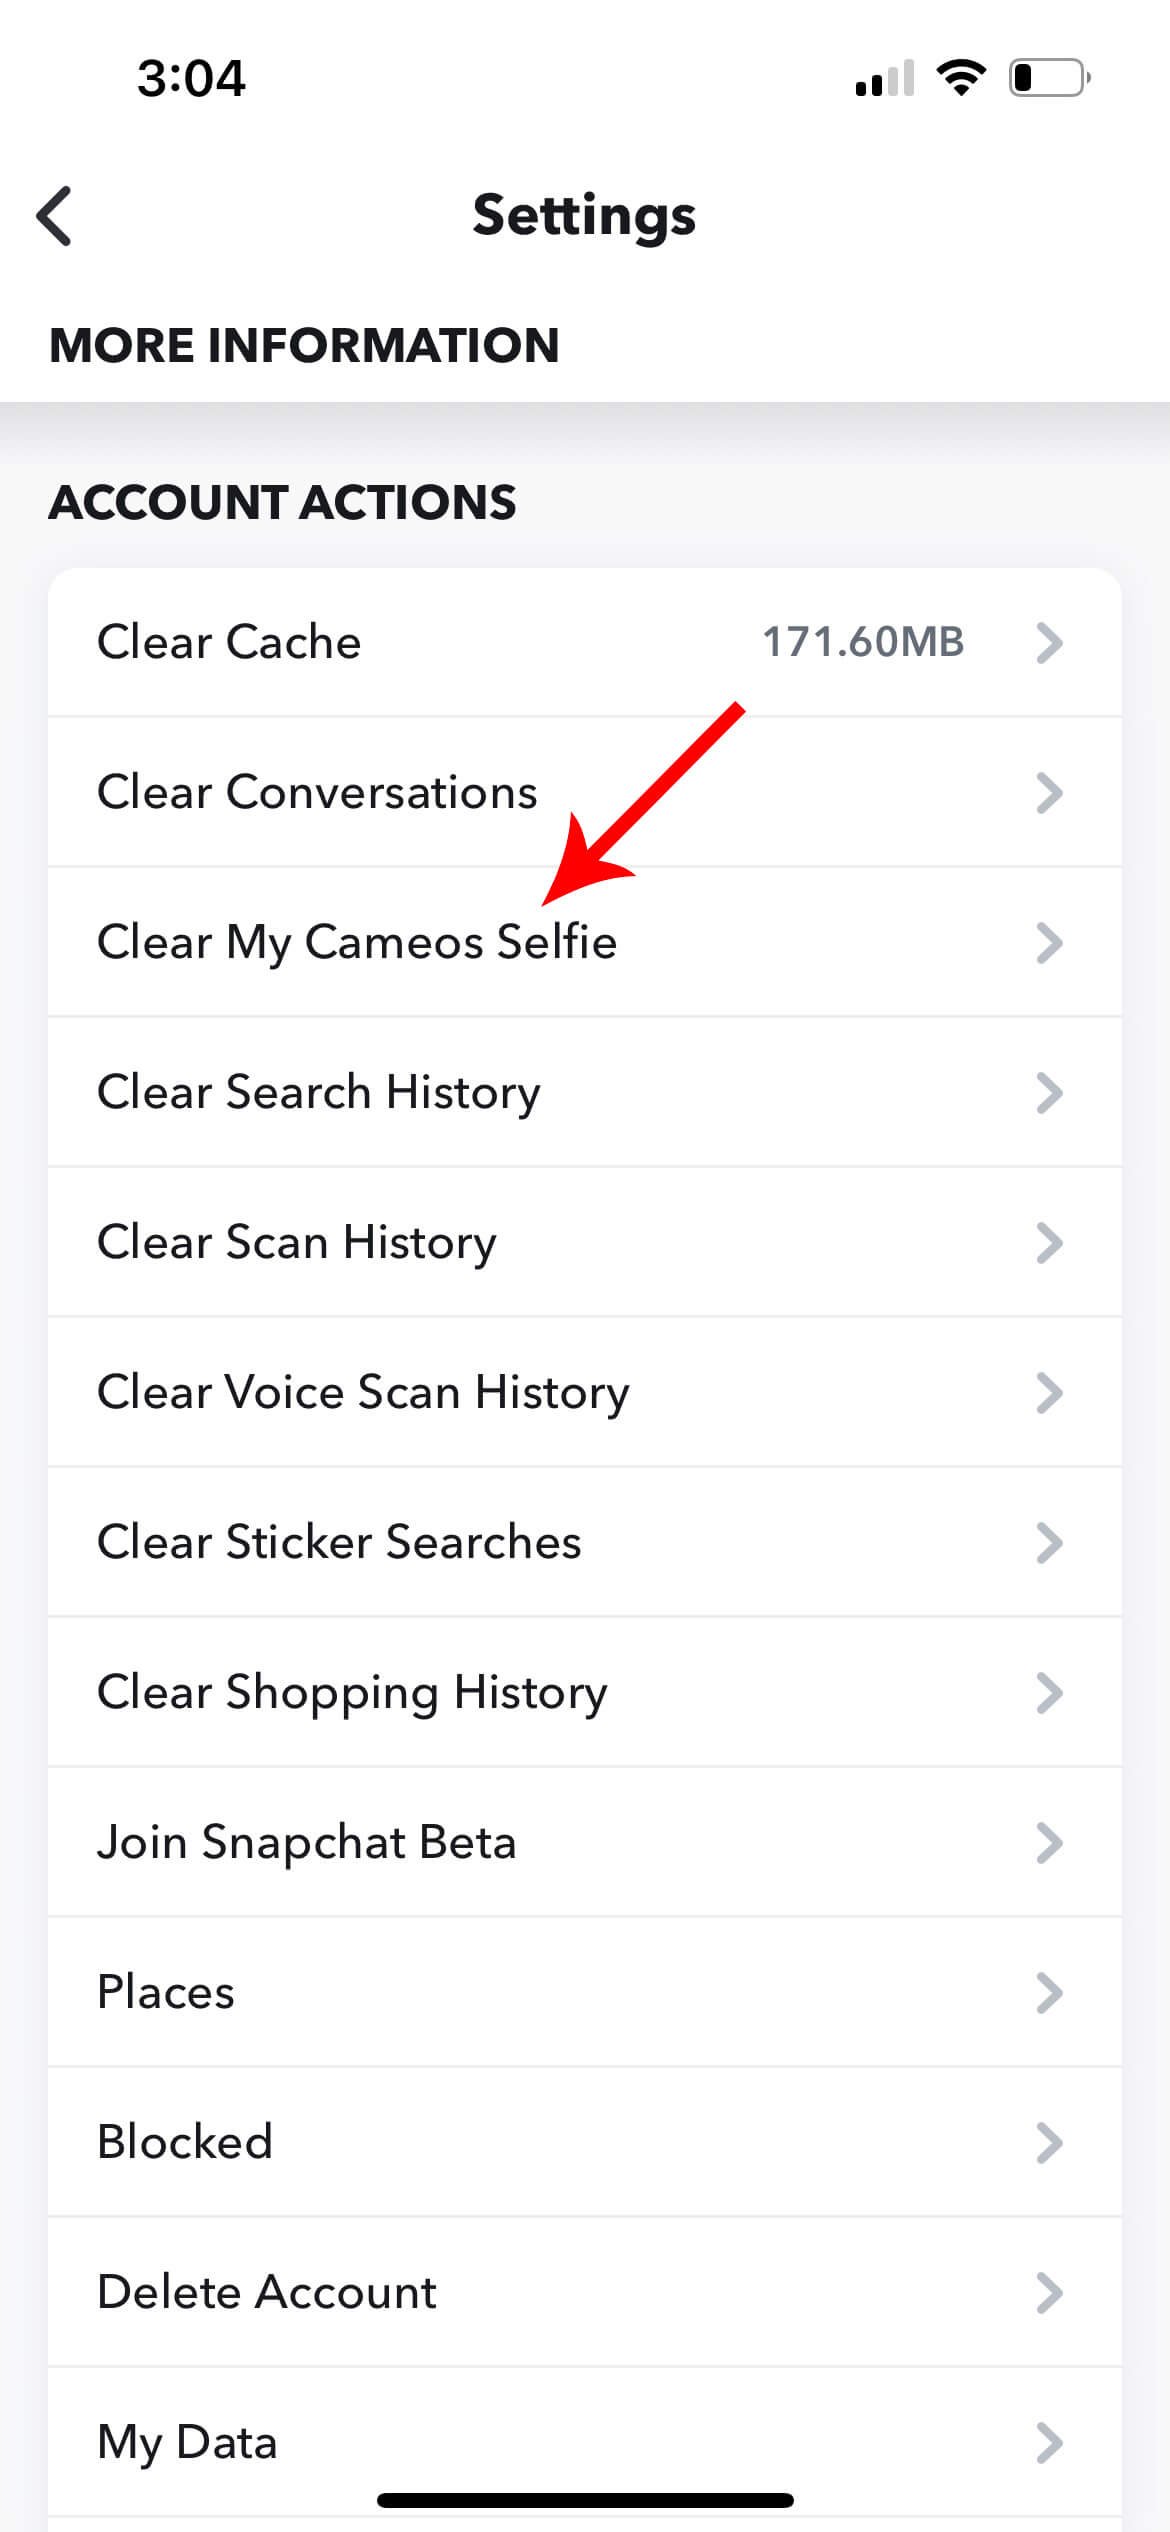
    Clear My Cameos Selfies on Snapchat

    1. Go to Settings on your computer.

    2. Select Account Actions from the drop-down menu.

    3. Select Clear to Finalize from the Clear Cache menu.

    4. Finally, pick Clear My Cameos Selfie and press the Clear button one again.

    How to Delete Snapchat’s Most Popular Locations?

    Snapchat retains your location data and keeps track of your favourite spots. These, on the other hand, can be simply removed. Here’s how to go about it.

    Clear Places on Snapchat

    1. Open Snapchat and select Settings from the menu.

    2. Select Account Actions from the drop-down menu.

    3. Select Clear top locations from the Places menu.

    4. Press the Clear button.

    Read Also: How to Make a Private Story on Snapchat?

    FAQs

    What does Snapchat’s Recent List Imply?

    Your Snapchat Recents is a list of all of your app’s actions, including chats and pictures. Although you cannot delete the list directly, you can delete conversations and browsing history. 

    How do you Hide or Reset your Snap Score?

    There is no way of hiding your Score on Snapchat. Blocking someone is the only effective way to keep them from viewing it.

    Individuals can’t see who you’re Snapchatting with when your Snap Score rises; they can only see that you’re exchanging Snapchats with someone.

    Even if you erase them from your recents, if somebody is watching your activity based on your Snap Score, they may notice you are talking to someone.

    How do you Avoid Individuals from Showing Up on your Recents?

    Regrettably, there is no way to prohibit somebody from appearing in your recents completely. They will be immediately promoted to the top of your recents list if they snap you or you snap them.

    Final Words

    It merely takes a few seconds to get rid of someone from your recents list and delete your history on Snapchat with them. While there is no way to hide someone entirely, you can keep them away from your recents list permanently if you remain on top of everything.

  • How to See Favorites on TikTok?

    How to See Favorites on TikTok?

    Are you new to TikTok and want to know how to see favorites on TikTok?

    When browsing TikTok it is quite common to come across some attractive or relatable videos that you would like to save.

    Thankfully, TikTok’s designers considered this. It takes very little effort to save your favourite stuff to the “Favorites” section, where you can quickly find it.

    This is how you can get to your Favorites in the app.

    How To See Favorites On TikTok: Just 4 Steps

    It’s just as easy to get to your Favorites as it is to get to your Likes –

    1. Open TikTok app in your mobile.

    2. Select the Profile tab.

    3. Next to the Edit Profile button, click the bookmark icon.

    4. Select All Favorites from the drop-down menu to go through all of your favorited videos or a specific collection.

    You may also make a new collection here by selecting Create new collection.

    How to Add Videos to Your Favorites?

    Adding videos to your favourites is a method to make your TikTok experience more comfortable if you’re a newbie still discovering how to use TikTok.

    To add videos to your TikTok favorites, follow the below steps –

    1. Go to the bottom right corner of the page and tap on your profile symbol.

    2. On your profile page, click the favourites symbol next to Edit profile.

    3. Go to the video area and look for your favourite videos.

    How to Delete a Favorite on TikTok?

    Here’s how to delete a Favorite if you accidentally saved a video or if you’ve chosen to clean up your collections.

    1. Open your TikTok profile and go to the Favorites area.

    2. Select the collection that contains the TikTok you want to delete from the drop-down menu.

    3. Select the video you want to delete.

    4. Select Remove from Favourites from the share button on the right-hand side to erase it.

    Individuals who want a place to keep all of the random movies they encounter on their For You Page will find the Favorites function extremely useful.

    How to Favorite a Hashtag (#) on TikTok?

    Hashtags are a crucial component of social networking.

    It doesn’t matter if you’re on Twitter, Instagram, or Facebook. You can use hashtags to make yourself stand out from the throng. Some of the more fun hashtags that have made the rounds in the past are #Fashion and #Travelblogger.

    So, you might want to store a hashtag so you can later find videos linked to it. In any case, you’ll need to use that hashtag to find what you’re looking for.

    To begin, log in to TikTok and navigate to the discovery page. You can either put in the hashtag you’re looking for or skim through the results to select one you prefer.

    What’s the Difference Between Heart and Favorite on TikTok?

    To mark a video that you like, simply click the heart icon on the right side of your screen. 

    When you go to your profile page, the videos you selected with the heart icon will appear right away. 

    You can use this feature to look through clips that you enjoy. It’s easy to have a lot of favourite videos and then have problems searching the one you want to watch again later. 

    TikTok’s Extra Features with Favorite Function

    You can save more than simply videos with this feature. It will automatically show you your favorited videos once you are on the favourites screen. In addition, you may keep track of hashtags, sounds, and effects.

    You can navigate through the favourites at the top and select the sort of favourites you wish to see.

    It’s also simple to save a video’s hashtag, sound, or effect.

    The audio, the name of any effect used in the video, and the hashtags in the video description may all be found in the lower-left corner of the screen.

    To save a hashtag, sound, or effect, simply tap it, and you’ll be taken to a new screen.

    At the top of the page, a bookmark symbol says “Add to favourites.” By tapping that symbol, you’ll be able to add whatever you’ve selected to your favourites page.

    Read Also: How to Change your Age on TikTok Step-by-Step Guide?

    FAQs on TikTok Favorites

    Who Can See your Favorites on TikTok?

    Only you have access to your favourites, just as you do not have access to what others have bookmarked under their profile. The Bookmarks or Favorites feature on TikTok should not be confused with the Liked Videos tab on a user’s profile.

    Can you See Who has Saved your Videos on TikTok?

    TikTok does not alert users when one of their videos is saved. Anyone can store or download your movies and take screenshots of your account if you have made it public.

    Final Words

    TikTok has plenty of entertaining and educational videos to keep your attention hooked to the app. Thankfully, you can save a movie to your favourites folder if you like it. You’ll be able to refer to it at any time.

  • How to Tame a Panda in Minecraft?

    How to Tame a Panda in Minecraft?

    If you are a beginner, then how to tame a panda in Minecraft might be crossing your mind.

    Pandas are creatures in Minecraft that live in trees and like jumping from one to the next.

    Players can tame pandas, but first, they must become acquainted with them before deciding to tame them.

    These larger animals can be found wandering across forests. They’re usually found around their preferred food, Bamboo, which is crucial to taming them.

    Usually, while playing Minecraft, you will come across various animals such as horses, foxes, and cats, but the gentle, loving Panda is the rarest.

    How to Tame a Panda in Minecraft?

    It’s a simple operation, but because these lazy Pandas typically breed like other animals in Minecraft, it may take a little longer. You’ll need to keep feeding them Bamboo until the hearts emerge above your head, and you may pull them closer together.

    Follow the below steps to tame a panda in Minecraft

    1. You must first locate Jungle Biome. In a Jungle Biome, they are an occasional spawn. However, they are more abundant in the Bamboo Jungle.

    2. As you’ve discovered the Biomes, you’ll notice Pandas in groups of two or three.

    3. You’ll now require Panda’s favourite food item. Bamboo is Panda’s favourite food item, so you’re in luck.

    4. So, go out and gather some Bamboo from the area.

    5. Now, feed the Panda Bamboo. It’ll take a few tries to get it right. You may just drop the Bamboo in front of them and they’ll pick it up and eat it.

    6. You’ll must keep trying until the Panda you’re feeding starts to produce Hearts.

    7. The Panda gets tamed as the Hearts start to appear.

    8. You can also use additional Food Item to tame a Panda. Surprisingly, you can tame them with a Cake.

    9. You must place the Cake in front of them to pick and eat it.

    Read Also: How to Tame a Llama in Minecraft?

    How to Breed Pandas in Minecraft?

    Panda breeding necessitates the fulfilment of certain requirements. To begin, both Pandas must be within a 5-block radius of at least 8 Bamboo blocks.

    Then all you have to do is serve each Panda some Bamboo to make them fall in love and give birth to a Baby Panda.

    Keeping Pandas in an enclosed area and planting Bamboo is the quickest way to breed them.

    When a baby is born, it will be passive rather than neutral to the player.

    If you feed a Panda without the necessary Bamboo blocks around, it will devour the Bamboo rather than enter love mode. However, feeding Pandas too close to the player will make them hostile.

    Panda Personalities and Appearance in Minecraft

    Pandas come in a variety of personalities, including normal, lethargic, playful, anxious, weak, aggressive, and brown.

    Normal: They don’t have any distinguishing characteristics. They usually have frowning expression on their face.

    Lazy: These pandas are the slowest land mob in the game since they normally lie on their backs and travel slower than any other pandas. Lazy Pandas do not follow players if they are lying on their backs in Java Edition, but they cease lying on their backs and start following the player in Bedrock Edition. They have happy expressions on their face.

    Playful: Adults and children alike enjoy rolling over and jumping around. Because it can accidentally roll off a cliff or another high altitude, the Panda’s proclivity to roll will often inflict damage or death. These pandas have their tongues protruding from their mouths.

    Worried: Usually avoids players and hostile mobs such as skeletons, creepers, spiders, and other similar creatures. When it’s storming, it hides its face and shakes. They also don’t consume cake and Bamboo by themselves. Their eyes are begging (puppy-dog-like).

    Weak: As new-borns, they sneeze more than regular baby pandas, and their health is half that of other pandas. They have furrowed brows and a gloomy expression. Their eyes are teary, and their nose is runny.

    Aggressive: This is the only non-passive Panda. When the player or other mobs are wounded, an angry panda continues to attack them until the prey dies or goes beyond the radar range. It does not fear when it is hurt, unlike other animals. When pandas in the area are attacked, these pandas become restless and fight. While they move slowly, they have a long reach, making them hard to fend off.

    FAQs on Tame Pandas in Minecraft

    How To Transport Pandas in Minecraft?

    One of the most frequently asked topics about pandas in Minecraft is how to relocate them to a different location. Even though many tutorials still deny it, pandas may be transported by boat in Minecraft. Boats in Minecraft can easily transport pandas without exerting much effort.

    How do you Feed a Panda in Minecraft?

    Pandas can also be fed cake, which serves the same purpose as Bamboo. Staying too near to an aggressive panda for an extended period of time may cause it to become hostile. Baby pandas can roll around in the same way that joyful pandas do.

    Can you Ride Pandas in Minecraft?

    Players can tame pandas, but first they must become acquainted with them before deciding to tame them. If you want to tame pandas, consider learning how to raise pigs in Minecraft, as it will teach you about a variety of animals.

    How to Cure a Sick Panda in Minecraft?

    A sick panda cannot be cured. Because of its parents’ DNA, an ill panda will be born with a weak personality.

    Can you Put Pandas in Boats Minecraft?

    Pandas can be placed in boats. Because pandas are scarce and only spawn in jungle biomes, putting them in boats lets you lead them to your base.

    Final Words

    So that was how to tamed a Panda in Minecraft. By holding a Bamboo in your palm, you can return them to your base. As long as you have the Bamboo in your hand, they will follow you. They can be bred in the same way as other Mobs. Just make sure you surround them with a wooden fence.

    This guide should have assisted you in taming Pandas in Minecraft.

  • How to Tame a Llama in Minecraft?

    How to Tame a Llama in Minecraft?

    This tutorial explains how to tame a Llama in Minecraft with step-by-step instructions.

    While horses get all the attention in Minecraft, the Llama is the four-legged animal’s important member.

    In a public poll on Twitter, game creator Jeb showed Minecraft llamas for the first time. They were later added to edition 1.11 of the game, released in 2016.

    Llamas are a harmless mob that can be found roving in groups and make an excellent companion when hauling items over long distances.

    In Minecraft, llamas can be mounted, tamed, and ridden. 

    This article will cover everything you need to know about llamas, including how to ride and tame them and other useful information.

    How to Control or Tame a Llama in Minecraft?

    To tame a llama, approach it and begin pushing the right mouse button, just like you would with horses. The Llama of your preference will generate hearts to indicate their adoration for you in just a few clicks.

    Where to Find a Llama?

    Llamas are most typically seen in the Savanna Biomes, where they wander in four groups. Below is a comprehensive list of all the Biomes where Llamas can spawn.

    • Plateau of the Savanna
    • The Savanna (Bedrock Only)
    • A Forest in the Wind
    • Wind-Blown Hills
    • Gravelly Hills, which are blasted by the wind
    • Savanna with a lot of wind (Bedrock Only)
    • With the travelling trader, you’ll also encounter two Lamas.

    How To Ride a Llama In Minecraft?

    You don’t have to feed a Llama anything, unlike cats, parrots, and wolves. It’s quite simple to tame it; all you have to do is hop on its back.

    But if you give it enough time, the Llama will be domesticated in no time. You might be able to conquer it in one sitting if you’re lucky.

    Follow the below steps to tame a Llama in Minecraft –

    1. Locate a Llama Herd

    Llamas can be found in savanna or a mountain environment.

    The savanna biome is mainly flat, with thick acacia trees and grass growing in it, and it is found near deserts or plains.

    Because of their distinctively coloured bark and trunk shape, the trees are the most visible feature of the savanna.

    Due to the high elevations, mountain biomes are more visible. You’ll find a variety of mountain types, some of which are found in cold or warm areas.

    2. Take a Llama Ride

    Now that you’ve located a Llama to ride, all you have to do is ride it! To take a ride, empty your hands and press the animal’s use command.

    The Llama will push you off, but all you have to do is try repeatedly.

    Your persistence will finally impress the Llama, and it will be tamed! Either you’ll see hearts over their heads or they’ll return your admiration.

    Read Also: How to Get Cobwebs in Minecraft?

    How to Breed Llamas in Minecraft?

    To begin, double-check that you have two tamed Llamas. You may connect them with leads to keep them together.

    What do Llamas Eat?

    To get them to start mating, use a hay bale. If you don’t have a hay bale, you can make one block of hay out of nine pieces of wheat.

    When you show your llamas the hay bale, hearts will appear between them, indicating that the baby llama is on the way.

    You’ll notice a young llama spawning alongside its parents in a few moments.

    How to Put a Carpet on a Tamed Llama in Minecraft?

    Any tamed Llama can be covered in carpets of any colour. If a player has numerous llamas tamed, this is useful for identifying them.

    Before putting a carpet on the Llama, users should assure that it is tamed.

    The Llama can then be mounted and their inventory opened. This will provide a menu where you can apply a carpet of any colour to the bottom-left corner.

    How to Put a Chest on a Tamed Llama in Minecraft?

    A tamed llama can be fitted with chests to boost their storage capacity.

    To do this, simply hold a chest and right-click (or hit the interaction key) while keeping your face towards any tamed llama.

    Players should be aware that it cannot be detached when a chest has been applied to a llama.

    FAQs on Minecraft Llama

    Can you Saddle a Llama?

    A Llama cannot be saddled and ridden like a horse. You can ride on their backs, but you have no control over where they go. Attaching a lead to Llamas and dragging them along for the journey is the only way to get them where you need them to go!

    Do Llamas Spit?

    Yes, when provoked, llamas will spit. They are mostly neutral, but it will spit at you if you hit one by accident. If wolves get too close, it will spit at them, and if it is attacked by one, it will spit at mobs.

    What do Llamas Eat on Minecraft?

    Llamas can consume both hay bales and wheat, and each food has its own set of benefits. Hay bales can be used to restore llamas’ health, accelerate infant growth, and initiate the breeding phase between two llamas.

    Can you Tame Trader Llamas?

    If you come across any trading Llamas, you can tame them. The Llamas would become tameable if you can remove the leashes that bind them together. The Wandering Trader has several attractive Llamas who accompany him around the map.

    Final Words

    So that was all about how to tame a llama in Minecraft.

    They’re useful for moving enormous amounts of stuff across long distances.

    Unlike a donkey, horse, or mule, a Llama can’t be controlled with a saddle. You can still climb on their backs, but it won’t help you. The only way to keep them under control is to use a lead. If you have a llama lead, it will follow you wherever you go as long as you keep it.

  • How to Refresh on Mac?

    How to Refresh on Mac?

    Are you browsing internet on your new Apple Macbook and don’t know how to refresh a page or browser? No worries, here I will explain how to refresh on Mac step by step.

    When Windows users shift to Mac, they may ask what the equivalent refresh button is on the Mac, as pressing F5 has a different function.

    So, if you are confused, hope on to the next section of this article.

    How Do You Refresh on a Mac?

    On Mac, use Command+R (or cmd+r) to do a refresh. Of course, the majority of Mac web browsers are the same.

    Follow the below steps to refresh on Mac

    1. Hover your mouse over the curved arrow to the right of the address bar.

    2. Hold down the Command+R key.

    Keyboard Shortcut to Refresh on Mac
    Keyboard Shortcut to Refresh on Mac

    A simple refresh isn’t always enough to fix a web page that isn’t showing properly or displays outdated information. You should try a hard refresh in this scenario.

    How to Hard Browser Refresh on Mac?

    Press Command+Option+R to execute a hard refresh in Safari.

    A hard browser refresh helps to clear the cache for a specific page, allowing it to load the most up-to-date version. This could be in the form of new scripts, styles, or features.

    Although saving online pages to the browser’s cache speeds up page processing, it may mean that updates to a website aren’t visible until you execute a hard refresh.

    After making updates to their website, many web developers are all too accustomed with a forced browser refresh. 

    Where is the Refresh Button on Mac?

    Most Mac browsers have a refresh button in their toolbar in addition to the cmd+r shortcut.

    On a variety of Mac browsers, the refresh button is located as follows –

    Safari – Right of the Address Bar

    Google Chrome – Left of the Address Bar

    Firefox – Left of the Address Bar

    What does it Mean to “Refresh” on a Mac?

    When we say “refresh” on a Mac, we’re talking about telling the page we’re on to reload. 

    This operation is required in online browsers like Safari and Chrome and in apps that display content from a remote server. Apps like Music, App Store, Podcasts, and TV are some examples.

    The primary reason to refresh is when content becomes stuck while loading the website or when you try to navigate between pages and nothing happens.

    What should you do if Refreshing Fails?

    Low speed or disconnection from a Wi-Fi network or broadband is the most common reason why refreshing fails.

    So, view different pages in a web browser or use another device to load distant content, such as in a social network app, to check those.

    Restart your Mac and try again if other devices on the same network operate.

    Read Also: How to Factory Reset MacBook Pro?

    Final Words

    Mac has different keyboard shortcuts and functions keys than windows and hence it might create problem if you have just replaced your windows PC with Macbook or iMac.

    If you don’t know how to refresh on Mac, then above are the exact steps you need to follow.

  • How to Make a Private Story on Snapchat?

    How to Make a Private Story on Snapchat?

    Did you just see your best friend making a Snapchat private story and want to know how to make a private story on Snapchat?

    No worries, here I will show you how to create a private Snapchat story step by step.

    Snapchat is excellent for sending photographs to a large group of people in one go, but if you want to limit who sees your stories, you could try creating a private story.

    It’s easy to make private Snapchat stories, but the process isn’t the same as sending a Snap.

    So,

    How To Make a Private Story On Snapchat?

    To create a private story on Snapchat, follow the instructions below –

    1. Open Snapchat app and log in to your account if you haven’t already.

    2. Click on the profile icon, you will find this in the top-left edge of the screen.

    3. Next, click on the + New Story option.

    4. Choose the type of story + Private Story or + Custom Story option.

    Create Snapchat Private Story
    Create Snapchat Private Story

    4. Select the names of each friend whom you want to allow to see your stories.

    5. Edit and add stickers or labels to your picture or video as needed.

    6. Press the send button.

    What’s the Difference Between Snapchat My Stories and Private Stories?

    My Stories are stories that all your friends in Snapchat can view. Other than that, if My Stories option is set to “Everyone” then people outside your friends which means practically everyone will be able to see your Snapchat stories. (This includes people who are not added in your Snapchat can see your stories.)

    On the other hand, Private Stories are only visible to a limited handful of your Snapchat buddies. (Only ones you have selected and allowed to see your Private Snapchat Story.)

    You get to decide who can see your Private Stories, and you’re the only one who can add photographs or videos. If your Story is labelled with a lock symbol, you obviously understand it’s a Private Story.

    To those of your buddies who can read your Private Stories, My Stories and Private Stories appear in distinct tabs, irrespective of whether they’re using Android or iOS.

    Nevertheless, when you post a Private Story, they will not be notified. Your Private Stories tab is hidden from the rest of your contacts on Snapchat.

    Your handpicked friends can watch your Private Stories as many instances as they wish, just like My Stories. These stories, however, are only available for 24 hours. Just choose the Save option if you don’t want to lose them.

    Using Snapchat Private Stories in New Ways

    It’s always possible to make changes to your Private Story right from your profile page. The three vertical dots next to its name must be tapped. 

    You can remove it, adjust the story settings, switch on/off auto-save, or directly save the Story to Memories from here (if auto-save is off).

    How Can You Tell If Someone Hide Their Snapchat Story?

    There is a way to see if someone is keeping their Snapchat stories hidden from you.

    You can use a friend’s account to check if their stories are being popped up on their home page.

    You might also send that individual a private snap. If they respond immediately yet, you are unable to view their stories; this indicates that you are a hidden friend on their list.

    You might also check with a common buddy to see if they’ve received any stories and get updates from them.

    If the person’s stories reach others but not you, it’s because they’ve kept their stories hidden.

    Is it possible to hide someone on Snapchat without them realising it?

    Try the new muting tool if you want to hide somebody but don’t want them to know. This enables you to silence specific friends without them being aware of it.

    The function is named ‘Do Not Disturb,’ enabling you to silence one-on-one or group talks.

    This is a new feature that is quite beneficial. In this instance, you don’t need to conceal or ban any contacts; turn off notifications about their updates.

    To use this feature, all you have to do is tap on the group or person you want to quiet.

    ‘Settings’ would be on the popup menu, and you could choose ‘Do Not Disturb’ from there.

    Such chats will not send you alerts. You will, nevertheless, be able to access, review messages from such contacts, and contribute your own stories.

    This is a useful function, and you don’t have to hide or delete a friend to quiet their discussions.

    As a result, unlike when you block a contact, those individuals will not be alerted. It lets you to check for updates from them whenever you choose.

    FAQs on Snapchat Private Story

    Can I Add More People to My Existing Private Story?

    Yes, you may always include more friends or family members in your personal tale. To access your private narrative, go to your profile page and press the three-dot icon next to it. Then, tap “See Viewers” and add more individuals to the private Story from your Snapchat contacts list on the next screen.

    Does Snapchat Notify Anyone when you Leave a Private Story?

    Snapchat will not alert the person you left the Story, they will most likely notice when their name does not appear in the viewer list. Press and hold the user’s Private Story and select “Quit Story” from the popup menu to leave the Story. 

    Will other People know I Made a Private Story on Snapchat?

    No, your contacts list will not be aware that you have made a private story. Only the individuals you add to your Snapchat private story will be aware of its existence.

    Final Words

    So, here I conclude this definitive guide on how to make a private story on Snapchat.

    The private story feature by Snapchat is perfect if you want to post some exclusive content for your limited set of friends. 

    Other than that, Snapchat also allows you to hide stories from your friends, which can be helpful in many instances. 

    Snapchat has remained one of the best social media platforms for sharing photo stories since 2011.

    This article will help you understand some of the best features provided by Snapchat.

  • How to Invert Colors on iPhone?

    How to Invert Colors on iPhone?

    In this guide, we will discuss how to invert colors on iPhone. Apple allows you to reverse the colours on your iPhone.  This can be useful for a number of reasons, but its primary purpose is to help eye strain caused by looking at the screen and increasing brightness while outdoors.

    Note that one approach is for iOS 12 and prior, while the other is for iOS 13 and beyond. Invert Colors is different from Dark Mode and Night Shift, which are both available on newer iPhones and iPads.

    Can you Invert Colors on iPhone Photos?

    Yes, you can invert colors on iPhone. Go to Settings > Accessibility > Display & Text Size to do so. As soon as you get to the display and text-size selection screen, click the toggle between Classic Invert and Smart Invert, so it turns green. You’ll notice the change right away.

    Let’s understand a little more about Smart Invert and Classic Invert.

    What is Smart Invert on iPhone?

    The first choice is Smart Invert, which inverts the display’s colours but exception of photos, media, and some apps that support dark mode.

    Maximum iPhone users will want to use this choice because inverted colours can be a barrier rather than a benefit in some circumstances, mainly with photos.

    What is Classic Invert on iPhone?

    On the other hand, Classic Invert completely reverses the colors on the iPhone’s screen. Classic Invert does not make any exemptions for photographs or apps; thus, will be switched once it is switched on.

    Inverted colours can also be bound to the side button, allowing users to instantly activate and deactivate the feature. 

    • First, go to Accessibility setting sub-menu.
    • Next, go to Accessibility Shortcuts.
    • Turn it on to enable the triple-click toggle feature.

    Inverting colours in iOS is as easy as that. This feature can be beneficial for minimizing eye strain, which can aid with headaches and vision problems.

    How to Invert Colors On iPhone?

    Follow the below steps to invert colors on iPhone –

    Note: This is for iOS 13 or later.

    Invert Colors On iPhone

    1. Go to the settings option of your iPhone.

    2. Scroll down and tap on the Accessibility option.

    3. Next, click on Display & Text Size.

    4. Click Smart Invert or Classic Invert slider on the Display & Text Size screen until it goes green.

    The iPhone or iPad screen will invert and remain inverted until the display inversion setting is updated or disabled.

    iOS 12 and older: Go to Settings > General > Accessibility > Display Accommodations > Invert Color. Tap Smart Invert or Classic Invert.

    How to Choose Smart or Classic Invert as an Accessibility Shortcut?

    You can choose between Smart or Classic Invert as an accessibility shortcut if you want to be able to invert colours on your iPhone at a moment’s notice.

    Go over to Settings > Accessibility > Accessibility Shortcut to do so. Then select either Classic Invert or Smart Invert.

    You may now engage either invert option by triple-pressing the Side button 

    Note: Press the Home button on the iPhone 8 and older versions.

    Is iPhone Invert the Same as Dark Mode?

    Several operating systems and apps have a function called dark mode that adjusts the colours of the ui from vibrant to dark.

    These dark colours are better for nighttime use and reducing eye strain.

    The iPhone user can change the tone automatically or manually depending on the light source or hour of day.

    There was no genuine dark mode capability for iPhone or iPad in previous versions of iOS. With iOS 13, that changed.

    Are Night Shift and Invert the Same Thing?

    While the Night Shift and Invert features both modify the colours of the iOS device, they do so in different ways.

    Night Shift, which is offered on both Macs and iOS, alters the general tone of the colours on the screen by minimizing blue light and turning the display yellow.

    This is recommended to prevent the sleep disruption caused by blue-tinted displays in the dark for certain users.

    Turn on Color Filters on iPhone

    Color Filters can help you distinguish between colours if you have colour blindness or other visual problems. Because colour filters can alter the appearance of objects such as photographs and movies, you should only use them when absolutely necessary.

    How Can I Activate Colour Filters on my iPhone?

    To activate the colour filter, follow the instructions below:

    1. Go to the settings option of your iPhone.

    2. Scroll down and tap on the Accessibility option.

    3. Next, click on Display & Text Size.

    4. Select Color Filters from the drop-down menu. Three colour spaces are shown here to assist you choose the best solution for your needs.

    5. To choose a filter that works best for you, swipe left or right on the samples.

    Select a Filter

    When Color Filters is turned on, you can choose from four preset filters:

    • Grayscale
    • Protanopia (red/green)
    • Deuteranopia (green/red)
    • Tritanopia (blue/yellow)

    Adjust Color Tint

    If you have colour or light intolerance, tap Color Tint to adjust the colour of your iOS device Touch’s full display. Customize the color and brightness of the effect on your display using the sliders.

    Adjust Color Intensity

    All the Color Filters can be adjusted in intensity to suit your needs. The Intensity slider can be used to make a filter more or less intense.

    Final Words

    If you get eye strain while viewing your phone, knowing how to invert colors on iPhone is essential to maintain your health.

  • How to Turn Off Airplay on iPhone, iPad, and Mac?

    How to Turn Off Airplay on iPhone, iPad, and Mac?

    Today I will walk you through how to turn off Airplay on your iPhone, iPad, or Mac step-by-step.

    AirPlay is a useful feature that allows you to broadcast films, music, images, and other media content from your Apple devices to speakers, smart TVs, and the Apple TV.

    But, what if AirPlay not in use? Well, in that you case you need to shut off Airplay and this is what we are going to discuss in this article.

    How to Turn Off AirPlay on iPhone or iPad?

    In order to turn off AirPlay on iPhone and iPad, you need to simply Navigate to the Control Center’s Screen Mirroring icon and tap “Stop Mirroring.”

    Follow the steps below if you’re not sure how to do it –

    1. To begin, open Control Center.

    2. Swipe down from the top-right corner of the screen on an iPhone X or iPad Pro running iOS 12 and above.

    3. Swipe up from the bottom of the screen to access control center in iPhone 8, iOS 11, and previous versions.

    4. Then, tap Screen Mirroring, followed by Stop Mirroring.

    How to Shut Off AirPlay Mirroring on a Mac?

    Follow the below steps to turn off AirPlay on Mac –

    1. Click the Control Center icon in the upper right corner on your Mac computer.

    2. Select the Screen Mirroring option.

    3. Select Display Preferences from the pop-up menu.

    4. Select Off from the AirPlay Display menu at the lowermost of the Built-In Retina Display window.

    Note: If you’re not seeing the Mirroring symbol, go to the menu bar and pick Apple, then System Preferences > Displays. It’s at the bottom left corner. When available, select the Show mirroring options in the menu bar checkbox.

    Read Also: How to Turn Off iPhone 8, X, XR, XS When Frozen?

    AirPlay On and Off – FAQs

    How do I Stop AirPlay from Automatically Connecting?

    On order to stop AirPlay from automatically connecting, you need to disable Automatically AirPlay to TVs option. Go to your iPhone or iPad’s settings>General>AirPlay & Handoff>Automatically AirPlay to TVs and select desired option accordingly.

    Does AirPlay Need to be On?

    Devices don’t need to be on to use AirPlay. A device can find supported devices like Apple TV using Bonjour discovery, Bluetooth IP address advertisement, or peer-to-peer discovery.

    What does it Mean when AirPlay is on?

    When AirPlay is on, it lets you use iTunes library on your PC and allows you to stream videos and music to your TV. Android users can also stream on Apple TV using their AirPlay.

    Final Words

    I hope you now know how to turn off Airplay on iPhone, iPad or Mac. When Steve Jobs originally announced Airplay in 2011, customers were having trouble managing their HDTV Cables and Wires. As a result, Apple provided them with a Wireless Solution, which improved their viewing experience.

  • How to Change your Age on TikTok Step-by-Step Guide?

    How to Change your Age on TikTok Step-by-Step Guide?

    The process of how to change your age on TikTok without deleting your account can be daunting.

    To create an account on any social networking platform these days, you must supply personal information such as your full name, date of birth, and email address.

    TikTok is no exception, and to use the site successfully, a user must submit all necessary information.

    In 2020, TikTok’s popularity skyrocketed, and it became one of the most downloaded apps.

    As a result, TikTok has a social obligation to protect its younger users from inappropriate content, spam, and other users.

    To sign up for TikTok, you must be at least 13 years old, and you must be 18 years old to send presents to your favourite creators, according to TikTok’s policy.

    If you’re younger than this, you won’t be able to make an account, and your account will be deleted soon.

    It will occur because children are not permitted to share videos on TikTok since this would violate the Children’s Online Privacy Protection Act.

    So,

    Can you Change your Age on TikTok?

    To update your age on TikTok, send an email to infocontact@tiktok.com or approach the platform’s customer service team through the app. The TikTok app does not allow you to modify your age directly. TikTok’s goal is to keep minors from viewing sexual content or interacting with adults.

    How To Change Your Age on TikTok?

    To modify your age on TikTok, contact the app’s customer service and ask for a birthday update. This is how you do it.

    1. Go to your phone’s app store and open the TikTok app.

    2. Select Profile (Me) from the home screen’s bottom right corner.

    3. In the top-right corner, tap the three dots.

    4. This will lead you to the Privacy and Settings page. Scroll to the bottom of the page until you see the Support area, then click Report a Problem.

    5. Select Account and Profile.

    6. Select Edit Profile option.

    7. Next, you need to tap on Other because there isn’t a specific spot where you can offer input about your age.

    8. Select Still have a problem.

    9. Now put something along the lines of “I need to update my birthday on my account because the current date is wrong.” in the provided space. I can show you some identification to establish my real birthday,” and then hit Report.

    Note: A TikTok customer service person will email you at the address associated with your account within a few days. In order to make the modification, you will most likely need to produce government-issued identification to authenticate your identity and date of birth in that correspondence.

    Read Also: Can I Change Birthday on Facebook After Limit?

    Why Can’t I Change My Birthday on TikTok?

    In an effort to prevent minors from accessing the services meant for adult users, such as DM, earning TikTok coins, and launching TikTok live-stream broadcasts, TikTok eliminated the capability to change your birthday.

    Because many younger users were using TikTok to change their age to gain access to some of the extra features, the possibility of doing so was disabled.

    One disadvantage of this change was that many grownup users who raced through the signup procedure and supplied a false birthday were barred from using TikTok.

    Is It Best To Just Create A New TikTok Account?

    As we mentioned in the last section, the entire procedure of changing your age in TikTok is complex and time-consuming.

    Furthermore, the entire process necessitates adequate identity and evidence of age via a certified document, and it will only be changed after that.

    Follow the instructions outlined above if your account’s material is performing well and you don’t want to lose all of your followers, views, or videos.

    If not, and you do not believe that investing the time and effort in this process is worthwhile, creating a new Tiktok account with a different birthdate could be a viable choice.

    FAQs on TikTok User Age

    How Old do I have to be to Send and Receive TikTok Gifts?

    To keep young users away from scammers, TikTok created policies. This is mostly due to their ability to transmit money to other users within the app. Apparently, per TikTok’s community guidelines, anyone under the age of 18 is not permitted to send or receive TikTok presents.

    How Do I Get Rid of TikTok’s Age Restriction?

    The age restriction on your TikTok cannot be changed. If you want to use TikTok without any age limitations, you’ll need to sign up for an account. If your age has already been established, changing your birth date is the only method to get around the restriction.

    Why am I Unable to go Live on TikTok?

    Before users can go live on TikTok, they must follow two rules. To begin, you must have a minimum of 1,000 followers. Second, you must be 16 years old or older. So, if you don’t meet any of the standards above, you won’t be able to go live on TikTok.

    Why does TikTok Want my Birthday Information?

    When you register an account on TikTok, you must enter your birthday in order for TikTok to know your age. Because TikTok has an established policy on age restrictions and underage accounts, you will need to provide TikTok with the correct date in order to maintain your privacy and safety on the app.

    Final Words

    So, here we conclude our definitive guide on how to change your age on TikTok. Make sure you don’t make any blunders when registering on a social networking platform like TikTok.

    If you commit a single mistake, your account will be deleted, or you will be unable to utilise it efficiently.

  • How to Get Cobwebs in Minecraft?

    How to Get Cobwebs in Minecraft?

    Check this definitive guide on how to get cobwebs in Minecraft.

    In Minecraft, the cobweb is a valuable trap. This item is easy to locate, collect, and save for later use. These peculiar blocks can only be collected, not built, and have been in the game since Minecraft Java Edition Beta 1.5.

    Mineshafts, fortress libraries, wooded mansions, igloos and abandoned villages are where players can locate cobwebs.

    Minecraft Cobweb also has a unique power to slow down and damage anything that falls or moves through it.

    How To Get Cobwebs in Minecraft?

    Cobwebs can only be collected by using a Sword or Shears, not your hands. Nevertheless, if these tools are used ordinarily, they will just drop String. Breaking cobwebs with Shears with a Silk Touch Enchantment is the only way to get them.

    Follow the below step by step process to get cobweb in Minecraft

    1. Look for a Cobweb in a deserted location, such as mineshafts or libraries.

    2. Choose the shear from the Hotbar and hold it in your hand.

    3. Break and gather the cobweb in these deserted locations with the shear. Large cobwebs will disintegrate into tiny cobwebs and fall to the ground.

    4. Start picking up the cobweb before it vanishes.

    Note: This cobweb will be saved to the Hotbar. You can find it in the inventory and use them to slow enemies. Technically you should have some cobwebs collected in your inventory for future use.

    Read Also: How to Grow Bamboo in Minecraft?

    Minecraft Cobweb Uses

    A cobweb is a handy item on hand and should be stored in your inventory for future usage.

    These are the top five things you can do with cobwebs in Minecraft –

    Traps

    Trapping is the most common usage of cobwebs in Minecraft. Some players built lava-filled traps out of cobwebs. Enemies who fall into the trap will tumble into the lava and suffer damage.

    If you become caught in the cobwebs, use a bucket of water, fire resistance potions, or ender pearls to free yourself. In addition, to quickly escape cobweb traps, you’ll need expertise and a fast response time.

    Decorations

    Cobwebs are generally used for decoration. This item can be used to adorn your home and farm in the spirit of Halloween.

    Place cobweb blocks in the halls and dingy areas to keep your castles or residences from being infested by spiders.

    In this game, you can enjoy Halloween by building a frightful location of your creation.

    Strings

    Strings can be made out of cobwebs by players. Nine strings can be made from a single cobweb.

    Unfortunately, only the Bedrock Edition has this functionality. Strings can be obtained from cobwebs by destroying them with a non-silk-touch blade or shear in the Java Edition.

    Battles Between Players

    You can also utilise cobwebs to impede and trap your opponents in PVP battles. This device is equally effective on offence and defence.

    To snare your opponents and stop them from attacking you, quickly throw a few cobwebs at them.

    Redstone Constructs

    Cobweb slows down all types of Minecraft creatures. Redstone engineers use cobwebs to delay objects thrown via dispenser or dropper. Players can build Redstone in a precise length of time in this manner.

    FAQs on Cobwebs in Minecraft

    Can you Make String from Cobwebs in Minecraft?

    However, the only way to make a String in a crafting menu is to utilise a cobweb. A cobweb may only be obtained by breaking it with shears. This will cause the cobweb to fall apart. 9 strings can be obtained by placing a cobweb in your crafting menu.

    How to Construct a Cobweb Farm in Minecraft?

    In Minecraft, you can collect and cultivate spiders in a castle or subterranean stronghold, then abandon them to create a cobweb farm. When you return, this will eventually be transformed into a cobweb farm.

    Where are Spiders in Minecraft?

    Spiders can be found in most Overworld biomes with light levels of 7 or less in Minecraft. Spiders mate in the dark, which is usually at night. A spider may survive in the sun once it has hatched in the dark.

    Final words 

    So that brings us to the end of this guide on how to get cobwebs in Minecraft. Mineshafts, stronghold libraries, igloo basements and abandoned settlements naturally generate cobwebs.