Do you want to know the steps to Therap login? Then you’ve arrived at the correct place.
Therap is a prominent web application package that offers comprehensive billing, planning, reporting, and communication solutions.
This is tailored to fit the needs of organizations that can effectively help people with intellectual and developmental disabilities.
Therap secure login is a comprehensive solution that includes secure access from anywhere via the internet and the mobile app.
Therap Login Requirements
Check out the list below for some critical prerequisites that you must have before logging into the portal.
To begin, you’ll need a smart device with a good internet connection, such as a PC, laptop, smartphone, or tablet.
Any web browser that is compatible with the portal.
Last but not least, to enter the login screen, you must have a valid Therap Portal login name, password, and provider code.
Therap Portal Page official website address.
Therap Login Steps
1. To begin, go to the Therap service’s official login page, or just go to www.therapservices.net.
2. You will be taken to the Therap loginpage, where you must enter your username in the right-hand input field.
3. You’ll now be prompted to enter your account password.
4.Click the Login button after entering the provider code.
Have you Forgotten your Therap Login Password?
We’ve included some simple procedures for reclaiming your account below –
1. Go to Therap’s official login page and select FORGOT PASSWORD.
2. Now you must enter your username and email address in the Provider Code box.
3. Then press the Submit button.
4.You will receive an email with information on how to change your password.
Nevertheless, keep in mind that you can only restore your account password if your Provider has allowed this feature. If you do not have this capability and are unable to log into your account, simply contact your provider administrator for assistance.
Therap Services Features
By following the procedures above, you will be able to log into Therap and obtain access to the following perks –
When you utilize therap services, you will be notified in real-time to ensure everyone’s safety and health.
For you, this means that people will be more aware of the dangers that people with developmental impairments and low intellect face, which is a positive thing.
People with disabilities or intellectual issues can also use the Therap to assess how well they are doing in terms of their health.
Furthermore, their website is accessible from everywhere in the world, making it the most important industry with a functioning and user-friendly website.
It also monitors the outcomes and performance of the people they are responsible for to ensure that they are making progress.
They also feature a secure manner for users to communicate with one another and good sharing services.
As a result, Therap is the ideal option for you. They also provide a variety of nursing and family courses for behavior and health, such as behavior planning, health tracking, and more.
Contact Information
If you have any questions about the portal, please contact their customer support using the information below.
Phone number- +1 203-596-7553 Official website- www.therapservices.net
Final Thoughts
That concludes the process for logging into Therap.
There are numerous applications in Therap that aid in the management of one’s health.
An electronic health record (EHR), claims administration, medical scheduling, billing and mental health, and long-term care modules are all included.
You may use Therap to create several workflows to gather the data you need to stay compliant, as well as track goals and outcomes at the individual and provider level.
Therap can be tailored to meet the demands of a given practice in addition to supporting health records. With a dedicated module for specific needs like employment monitoring, recidivism and recovery or rehabilitation, and event reporting, it enables practitioners manage a wide range of situations, including criminal cases.
As a Target Red Card credit cardholder, you’ll find everything you need to access your account online, pay bills, and contact customer support for help on this page.
When you visit the Target Red card login portal, you’ll find a variety of benefits, including an extremely fluid and simple user interface that allows you to pay bills instantly, modify account information, view notifications and account history, activate newly received cards, and view month – to – month account statement history.
Note: Before proceeding, we strongly advise you to read the online privacy policy, which describes in detail how your personal information will be handled and safeguarded during the login process.
Benefits of Target Redcard
There are several advantages to using the Redcard target payment site, including –
Every time you use the card, you’ll get a 5% discount, which you may combine with Target coupons and some other offers.
Free shipping at Target.com —get free shipping on every order placed on Target’s website.
Target is offering a 30-day extra cashback promotion.
It has no annual charge, making it one of the finest credit cards to start with.
Target Red Credit Card Login Steps
The Redcard credit card login process is straightforward; simply follow these steps –
Sign in to Manage My Redcard
1. Go to the REDcard homepage at https://rcam.target.com/
2. Enter your Username and Password to sign in to Manage My RedCard account.
3. Now, hit the Sign In button.
How to Make an Online Target REDcard Payment
Go to the Target REDcard login page and enter your username and password to make an online REDcard payment.
Using the “Schedule a Payment” button on the left side of your Manage My REDcard page, you can set up a payment date and time.
Payment can be withdrawn from your savings or checking account by following the on-screen directions.
Payments received before 5 p.m. are eligible for a discount. The time will be posted in Central Standard Time on the same day.
How To Pay Target Redcard Payment in Person?
Get a latte before you go shopping at Target. If you use your REDcard, you can save 5% on anything you buy at Starbucks in-store.
While you’re there, stop by the Guest Services desk with your billing statement or Target REDcard credit card in hand so the attendant may check your account number.
The employee can receive your Target bill payment and put it into your account using the account number.
Target TD Bank Credit Card Bill Pay Phone Number
You can make Target credit card payments by calling 1-800-659-2396 or by calling the Target REDcard customer support team at 1-800-424-6888, where you can follow the procedures and complete your payment.
If you require help, you can request a Target guest services professional, who will guide you through the procedure.
How to Pay with a Target REDcard by Mail
Monthly printed statements are mailed to Target REDcard credit cards. Customers can rip off the bottom stub and mail it in with their Target payment in the envelope supplied.
Send the payment 5-7 days before the due date to make sure that it arrives on time.
If you lose your statement, send payment to the following address:
A credit score of at least 600 is required to be authorised for a charge card or credit card, while some establishments will accept cards with lower scores.
“If you have a credit score of less than 600, you will almost certainly be charged a higher interest rate and have a lesser credit limit if you are approved.”
Aside from the score, you must be at least 18 years old, a US resident, and able to show that you have adequate money to make monthly payments.
How Do I Cancel My Target Red Card?
You are unable to cancel your account via the internet. To cancel your Target card, dial 1-800-659-2396, enter your account information and follow the prompts to speak with a customer service professional who can assist you.
What Happens If I Miss a Target Payment?
Payments for Target REDcard credit cards are due at least 25 days following the end of each billing month.
Missing a payment costs you more than the 5% discount you received on your purchases, so keep track of your payments and make them on time.
Pay your credit card amount as soon as you learn you’ve missed a payment. Online, in person, or over the phone are the fastest ways to pay.
You’ll be charged a late fee of up to $39, plus interest at a rate of up to 24.90 per cent APR, for every day you keep a balance.
Which Bank does Target Use for their Credit Card?
TD Bank USA, N.A. issues the REDCard credit cards, while Target Corporation issues the REDCard debit cards.
Can a Target Credit Card be Used Anywhere?
No, you won’t be able to use your Target Credit Card anywhere. In other words, you can only use the Target Credit Card in Target stores, on target.com, or through the Target mobile app. This is because it is a store credit card.
How Can I Check the Balance on My Target Credit Card?
You may check your card’s balance and get all of your account information with the Target REDcard online management tool. You can do so by going to the REDcard homepage and logging into your online account on the app.
Final Words
So, this was all about target red card login. This article will provide you with all the information regarding the login process, payments and benefits.
Customers may manage their finances quickly and easily by accessing Bank of America EDD Debit Card login page.
You can access your Bank of America EDD account using a computer or the Bank of America mobile app. If you’re unsure how to sign in to your Bank of America EDD account, then follow these steps.
Bank of America EDD Login Steps
To access the Bank of America EDD card login portal, follow these procedures –
1. Type https://prepaid.bankofamerica.com/EddCard/ into your browser.
2. Enter your username or card number in the Sign-In box and click Sign In.
Bank of America EDD Debit Card Sign in Page
3. To enter your online account, enter the needed information to validate your identification.
If your information is accurate, you will be taken to the dashboard of your online banking account.
How to Recover Forgotten Username?
If you don’t remember your username, you can use your card number instead. If you want to change your username, follow these instructions –
Click on the link Forgot your Username?
To restore your forgotten username, dial the number on the back of your card.
Bank of America EDD Debit Card Delivery and Activation
Your EDD Debit Card will be mailed to you the following business day if you have never had one before and your first benefit payment has been approved.
You will not be required to wait for a new debit card if you previously had one that is still active. We’ll keep loading funds onto your existing card, and you’ll have instant access to them.
You should maintain your card until it expires because it is valid for three years from the day it was issued and is used for all EDD benefit programs.
Online: Select Activate My Card on the Bank of America EDD Debit Card webpage. To contact us by phone: dial 1-866-692-9374 or 1-866-656-5913 from within the United States (TTY). If you are calling from outside the United States, dial 1-423-262-1650 for a collect call.
Advantages of the Bank of America EDD Debit Card
Use in any situation. VISA debit cards are accepted anywhere, including in stores, online, and over the phone.
There’s no need to wait for cheques to arrive in the mail.
Pay your bills with your credit card.
At ATMs, point-of-sale* terminals, and Visa banks and credit unions, you can get cash.
Services Available through the Bank of America EDD Debit Card Online Login
Check the balance of your account.
Your account statement should be printed.
View the history of your transactions
Transfer money between Bank of America accounts. Debit Card from EDD
Transfer money between your Bank of America EDD Debit Card account and your non-Bank of America EDD Debit Card account.
Request account statements, account statements by e-mail registration, and so forth.
Make changes to your contact information.
Contact Information for the Bank of America Edd Debit Card
The toll-free number for Bank of America EDD Debit Card Customer Service is 1.866.692.9374, which is printed on the back of your card and in your user guide.
You can also get account information by contacting Bank of America’s online customer service department at www.bankofamerica.com/eddcard.
The concept of responding to particular messages is new and growing in popularity, so keep reading if you want to learn how to reply to a specific message on Instagram.
In most popular messaging apps, users can respond to precise messages from a single sender.
This is beneficial because it can save you time when replying to an older message. This feature can be quite useful in group discussions too.
Instagram was a little late in bringing this function to the public, but better late than never.
Note: Make sure you have the latest version of the app. If not, update it from the Google Play Store or App Store.
How To Reply to a Specific Message on Instagram (iPhone)?
To reply to a specific message on Instagram, follow the below steps –
1. Open Instagram app.
2. To view messages, hit the messenger icon.
3. From your messages, choose a person or group chat.
4. Look through the person’s message list for the particular message. Swipe right on the message until an arrowhead icon appears, which opens the text box, or press and hold the text and select Reply.
5. The specified text will now appear above the text entry field. Send your reply by typing it in.
Note: When you select a message to react to, it appears in quotes so you can see which message you’re talking about in the chat. Otherwise, simply tapping the bottom-right respond button delivers your message on its own.
How To Respond to a Specific Message in Instagram (Android)?
On an Android, responding to a precise Instagram message is identical to doing so on an iPhone. To respond to a message in the app, follow these steps –
1. Open Instagram app.
2. Tap the messages icon.
3.Look for a chat with the message you want to answer to.
4.Swipe right on the message until an arrowhead icon appears, which opens the text box, or press and hold the text and select “Reply” at the bottom.
5.Fill in the blanks with your response. When you send your message, the message you responded to will be joined to it.
How To Answer to a Specific Message in Insta (PC)?
To react to a particular message in Instagram on a Computer, follow the instructions below –
1.Log in to your Instagram account on your computer.
2.Tap the Messenger symbol, which is located next to the Home icon at the top of the screen.
3.Select your preferred chat (person or group).
4. Hover your cursor over the message you wish to respond to. Keep in mind that the message could be yours or someone else’s.
5. You should now be able to see the Reply icon. You’ve got it.
6.Write your message and press the Send button.
Several Instagrammers are unable to respond to messages because the messaging tool has not been updated. You won’t be able to reply to messages if you haven’t upgraded Instagram’s messaging feature. However, you’ll only have three choices: “Copy,” “Report,” and “Save.”
Yes, the tool is available for both individual and group talks. With the latter, direct message replies are advantageous since you can minimize confusion by identifying which message your response pertains to.
Why am I Unable to Respond to a Specific Instagram Message?
Before you can respond to a message on Instagram, you must first upgrade the app’s messaging. When Instagram’s new messaging features are introduced, you’ll be requested to update your messages. However, you will not be encouraged to do so right now. As a result, you’ll have to change messaging manually.
Final Words
So, that was all about how to respond to a specific Instagram message.
Make sure your device’s location is set to an area where the latest update is accessible if the app is up to date. In Japan and parts of Europe, for example, the feature is currently inaccessible.
Furthermore, you can use the Help feature in the Instagram app to get specialised help. You may be unable to upgrade your messaging service right now due to an account-specific issue.
Now that you know how to react to certain Instagram messages, your interaction with pals should enhance. To keep Instagram up to date, be sure to activate automatic updates.
In this guide, we will discuss how to delete Poshmark account in a step-by-step process.
Poshmark is a web platform and marketplace dedicated to clothing, accessories, small electronics, pet products, and household goods.
Poshmark allows you to purchase, sell, and exchange clothes with other members.
The company will collect a nominal fee and handle all sales tax and delivery costs.
They also keep track of your account information and payout regularly.
How to Delete Poshmark Account on Mobile?
Poshmark provides detailed instructions on how to delete an account. Those guidelines have been condensed down into a step-by-step guide. The first set of instructions explains how to delete it from the mobile app. The second section describes how to delete it from a computer.
Note: Before you terminate your Poshmark profile from the device, keep in mind that it cannot have any pending orders or redemption balances. Before trying to delete the account, make sure all of the products you’ve sold have “cleared” and that any income you’ve earned has been cashed out.
Follow the below steps to delete your Poshmark account –
1. Go to your phone’s app store and download the Poshmark app (Android or iOS).
2.Click on The Account tab option, which is found in the bottom right corner.
3. A menu will display various account options such as saved payment methods, saved addresses, etc. Look for and tap on the Poshmark Support Center.
4. Select Manage Account Status from the dropdown menu.
5. Select Delete My Account from the dropdown menu.
6. A pop-up window will appear, requesting a verification code. Enter it in the box below and click Submit. check the code sent by email or text message.
7. Select the explanation for deactivating your Poshmark account from the dropdown menu.
8. Finally, choose Delete My Account.
9. Click Yes from the pop-up menu.
After that, your Poshmark account will be deleted.
Note that if you remove the app from your phone without filing a deletion request, your profile will stay active and will not be formally terminated.
How to Close Your Poshmark Account on Desktop?
Follow the below steps to delete your Poshmark account using the web –
1. Open the Poshmark official website (PoshMark.com) and login to your account.
2. Go to your Profile and select Account Settings.
3. From the left side menu, choose Manage Account Status.
4. Select Delete My Account.
5. Finally, choose Logout and your account will be deactivated.
You might wish to learn how to remove your Poshmark account for a variety of reasons.
In this society, not everyone is trustworthy, and this lack of trust can be revealed while attempting to execute money transfers with complete strangers. Here are some of the circumstances that have caused Poshmark users to cancel their accounts:
Your account has been hacked, and your personal information has been stolen.
Your account is hacked, and your credit card information is stolen.
Poshmark experienced a security breach.
You place an order for something that never arrives.
You are duped into disclosing personal information by another member.
You order something and when you get it, you realise it’s not what you expected.
You receive faulty item and have no way of returning it.
You’re dealing with a member that immediately deletes their account after receiving money from you.
Fraudulent activity in general
Things To Know After Poshmark Account Deletion
When you close your account, what happens next? All of your private details will be erased, as previously stated.
With the id and password you used to register, you won’t be able to access the website or app.
Lastly, you won’t be able to make money on Poshmark by selling your things.
After you’ve deleted your account, make sure you remove the app from all of your devices—your smartphone, iPad, smart TV, and any other device you’ve used Poshmark.
To ensure that the deleting process is effective, you should also delete your browser’s cookies, history, and cache.
Here’s something else to think about if you’re seeking to get rid of Poshmark. Even if you deactivate the app from your device, your Poshmark profile will stay live and will not be formally removed if you do not submit a deletion request.
FAQs on Poshmark Account
What Happens if I Delete My Poshmark Account?
If you remove your Poshmark account, you will lose all of your data. Your profile image, username, any products you’ve advertised for sale or given away on Poshmark, and any communications you’ve sent are all included.
Can you have Two Poshmark Accounts?
Poshmark allows you to have several accounts. Poshmark allows you to have as many accounts as you desire. You can also quickly eliminate your account.
Why Can’t I Deactivate y Poshmark Account?
If you’ve recently sold things on Poshmark, make sure to collect any outstanding sale sums before deleting your account. If there are any ongoing purchases or redeemable balances, Poshmark states it won’t be able to complete the deletion.
How do I Pause my Poshmark Account?
To pause your Poshmark account, navigate to the “Settings” section of the website. You can then select “Pause Account” from the dropdown menu.
Can I Make a New Poshmark Account?
Yes, you certainly can. Poshmark is a clothing and fashion app that lets you buy and sell clothes with other people. You can establish a new account by installing the app on your phone.
Final Words
Poshmark can be a fantastic platform for selling and buying items, but if you’ve decided to delete Poshmark account, this article is for you. Follow the above step by step guide and get a hold of your account without any trouble.
Do you want to know how to clear recents on Snapchat?
If that’s the case, you’re in luck because Snapchat allows you to delete all of your recents, containing search history and chats, in a matter of seconds.
How? This article contains all of the pertinent information.
Skip the cue: How to Clear Recents on Snapchat?
On your phone, open Snapchat. To access Settings, use the gear symbol. To clear your recents history, go to Account Action and select Clear Search History. To delete your Snapchat recents, press Clear when the popup box displays.
Snapchat is one of the most used social media services in the world and it keeps track of everyone you snap, talk with, or add in your Recents.
Keeping track of your discussions, on the other hand, might be annoying at times, particularly if you have a lot of them. Perhaps you have a document that you don’t want your partner to see.
Snapchat has many options for deleting chats and clearing your search history.
Steps to Clear Recents on Snapchat?
If you need to clean your Snapchat history frequently, the whole procedure is pretty simple and can be memorized.
The following are step-by-step instructions that work with iPhones, Android phones, iPads, and other tablets –
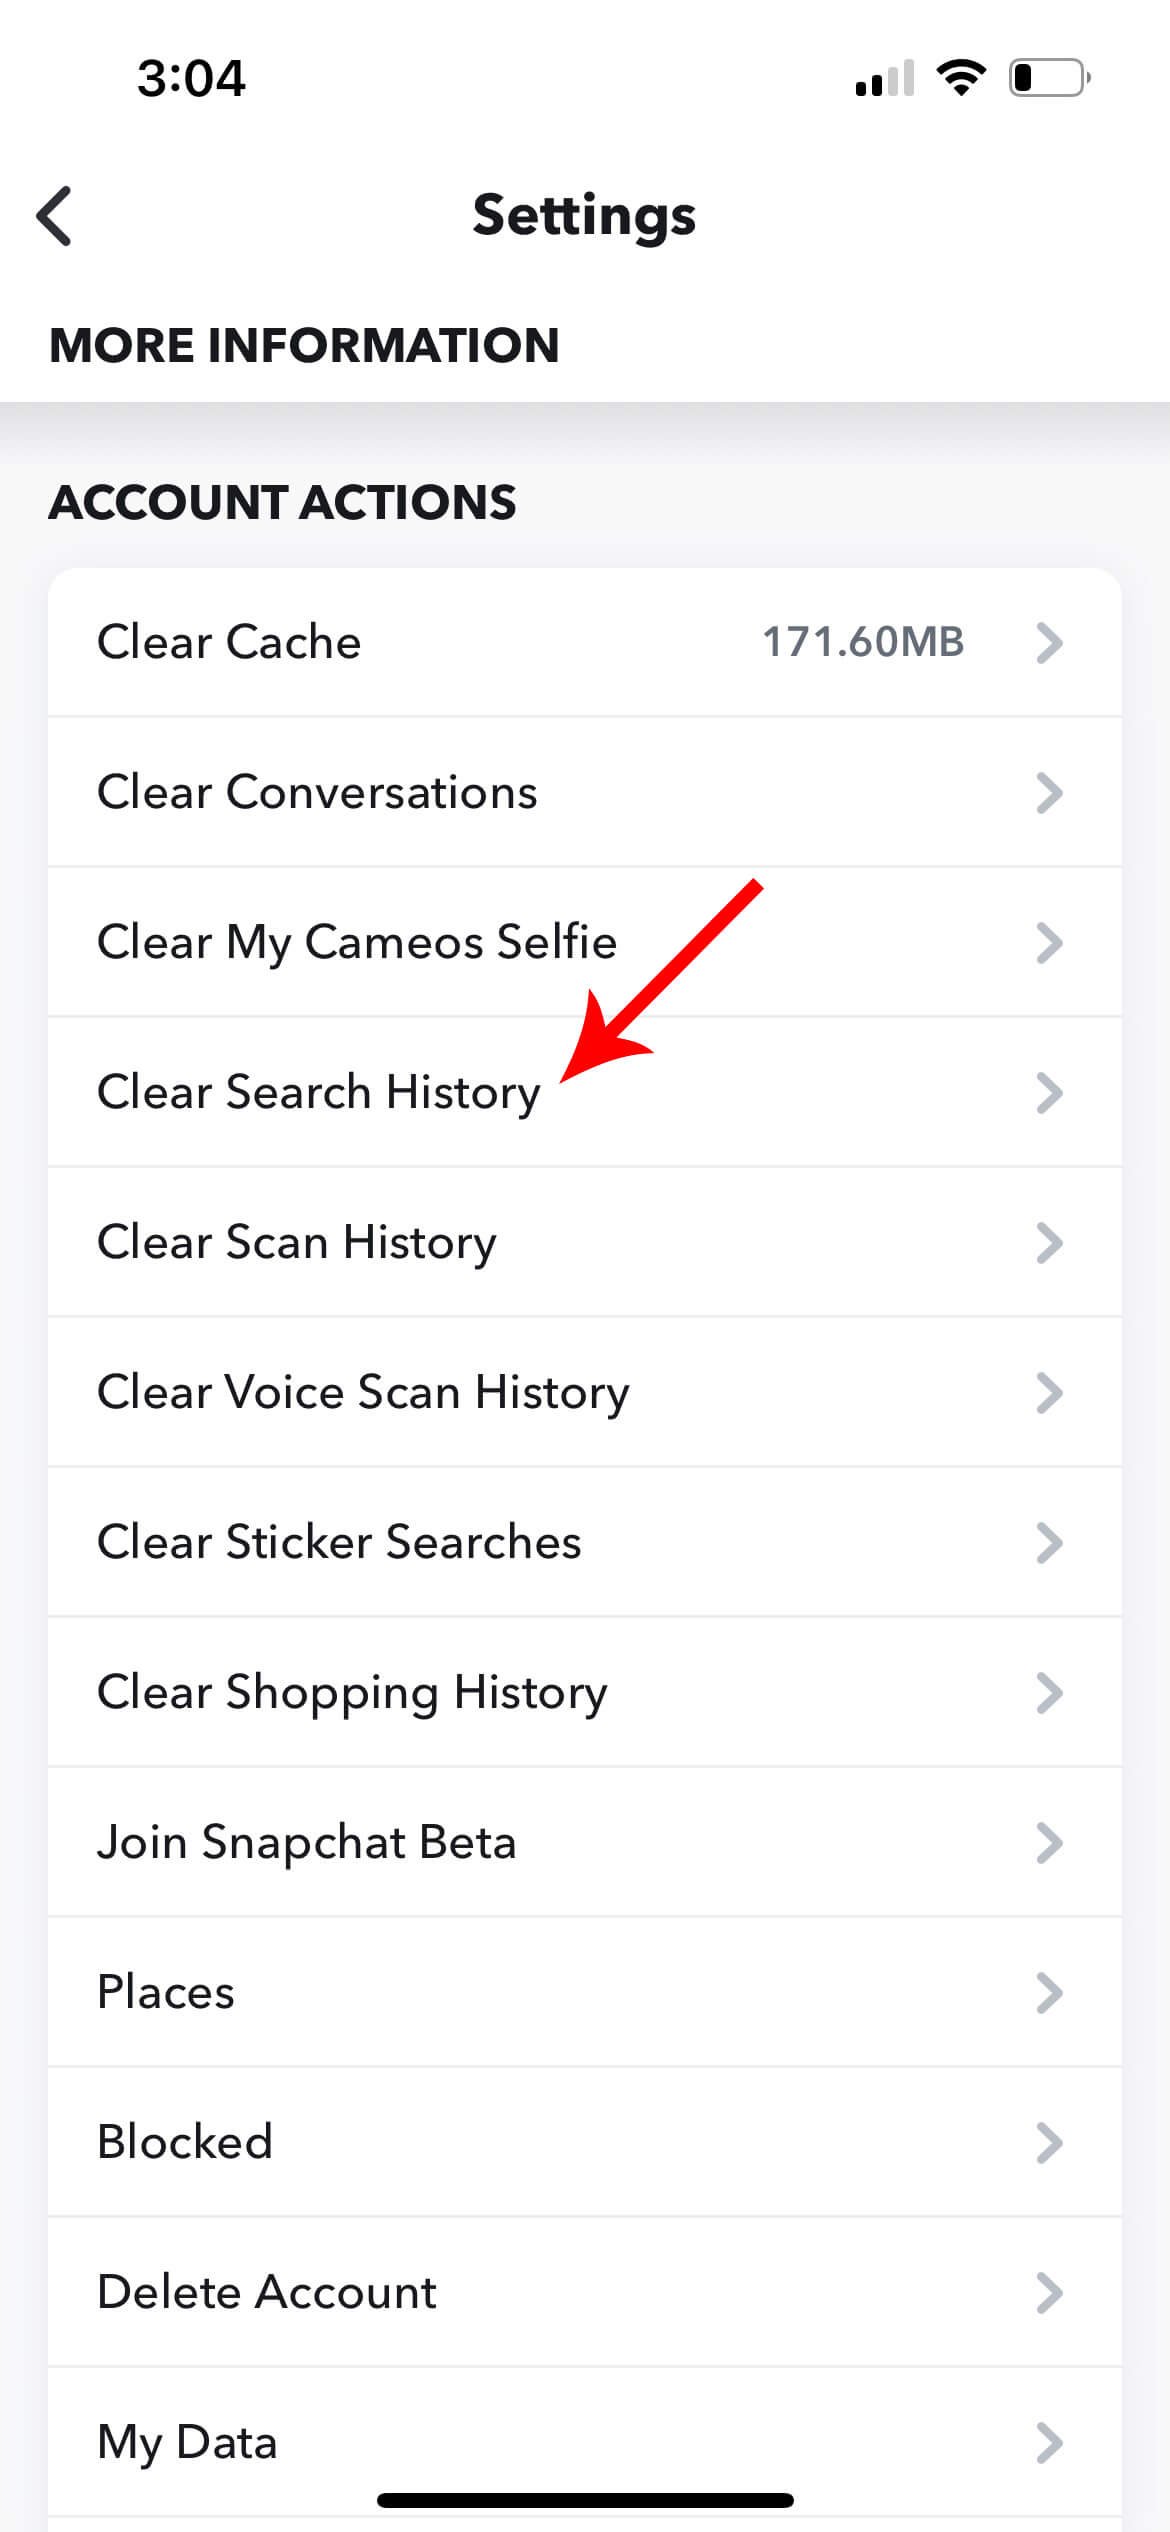
Clear Search History on Snapchat
1. Launch the Snapchat app on your phone.
2. From the right corner, tap Settings.
3. For iOS, go to Account Actions, and for Android, go to Privacy.
4. Choose the Clear Search History option from the drop-down menu.
5. Finally, select the Clean option to wipe your recent search history.
How to Remove Recent Conversations from Snapchat?
What about the most current discussions? Here’s what you can do if you want to clear it –
Clear Conversations on Snapchat
1. Go to Settings on Snapchat.
2. For iOS, go to Account Actions, and for Android, go to Privacy.
3. Select Clear Conversations from the drop-down menu.
4.Select the chats you want to delete by tapping the cross button next to them.
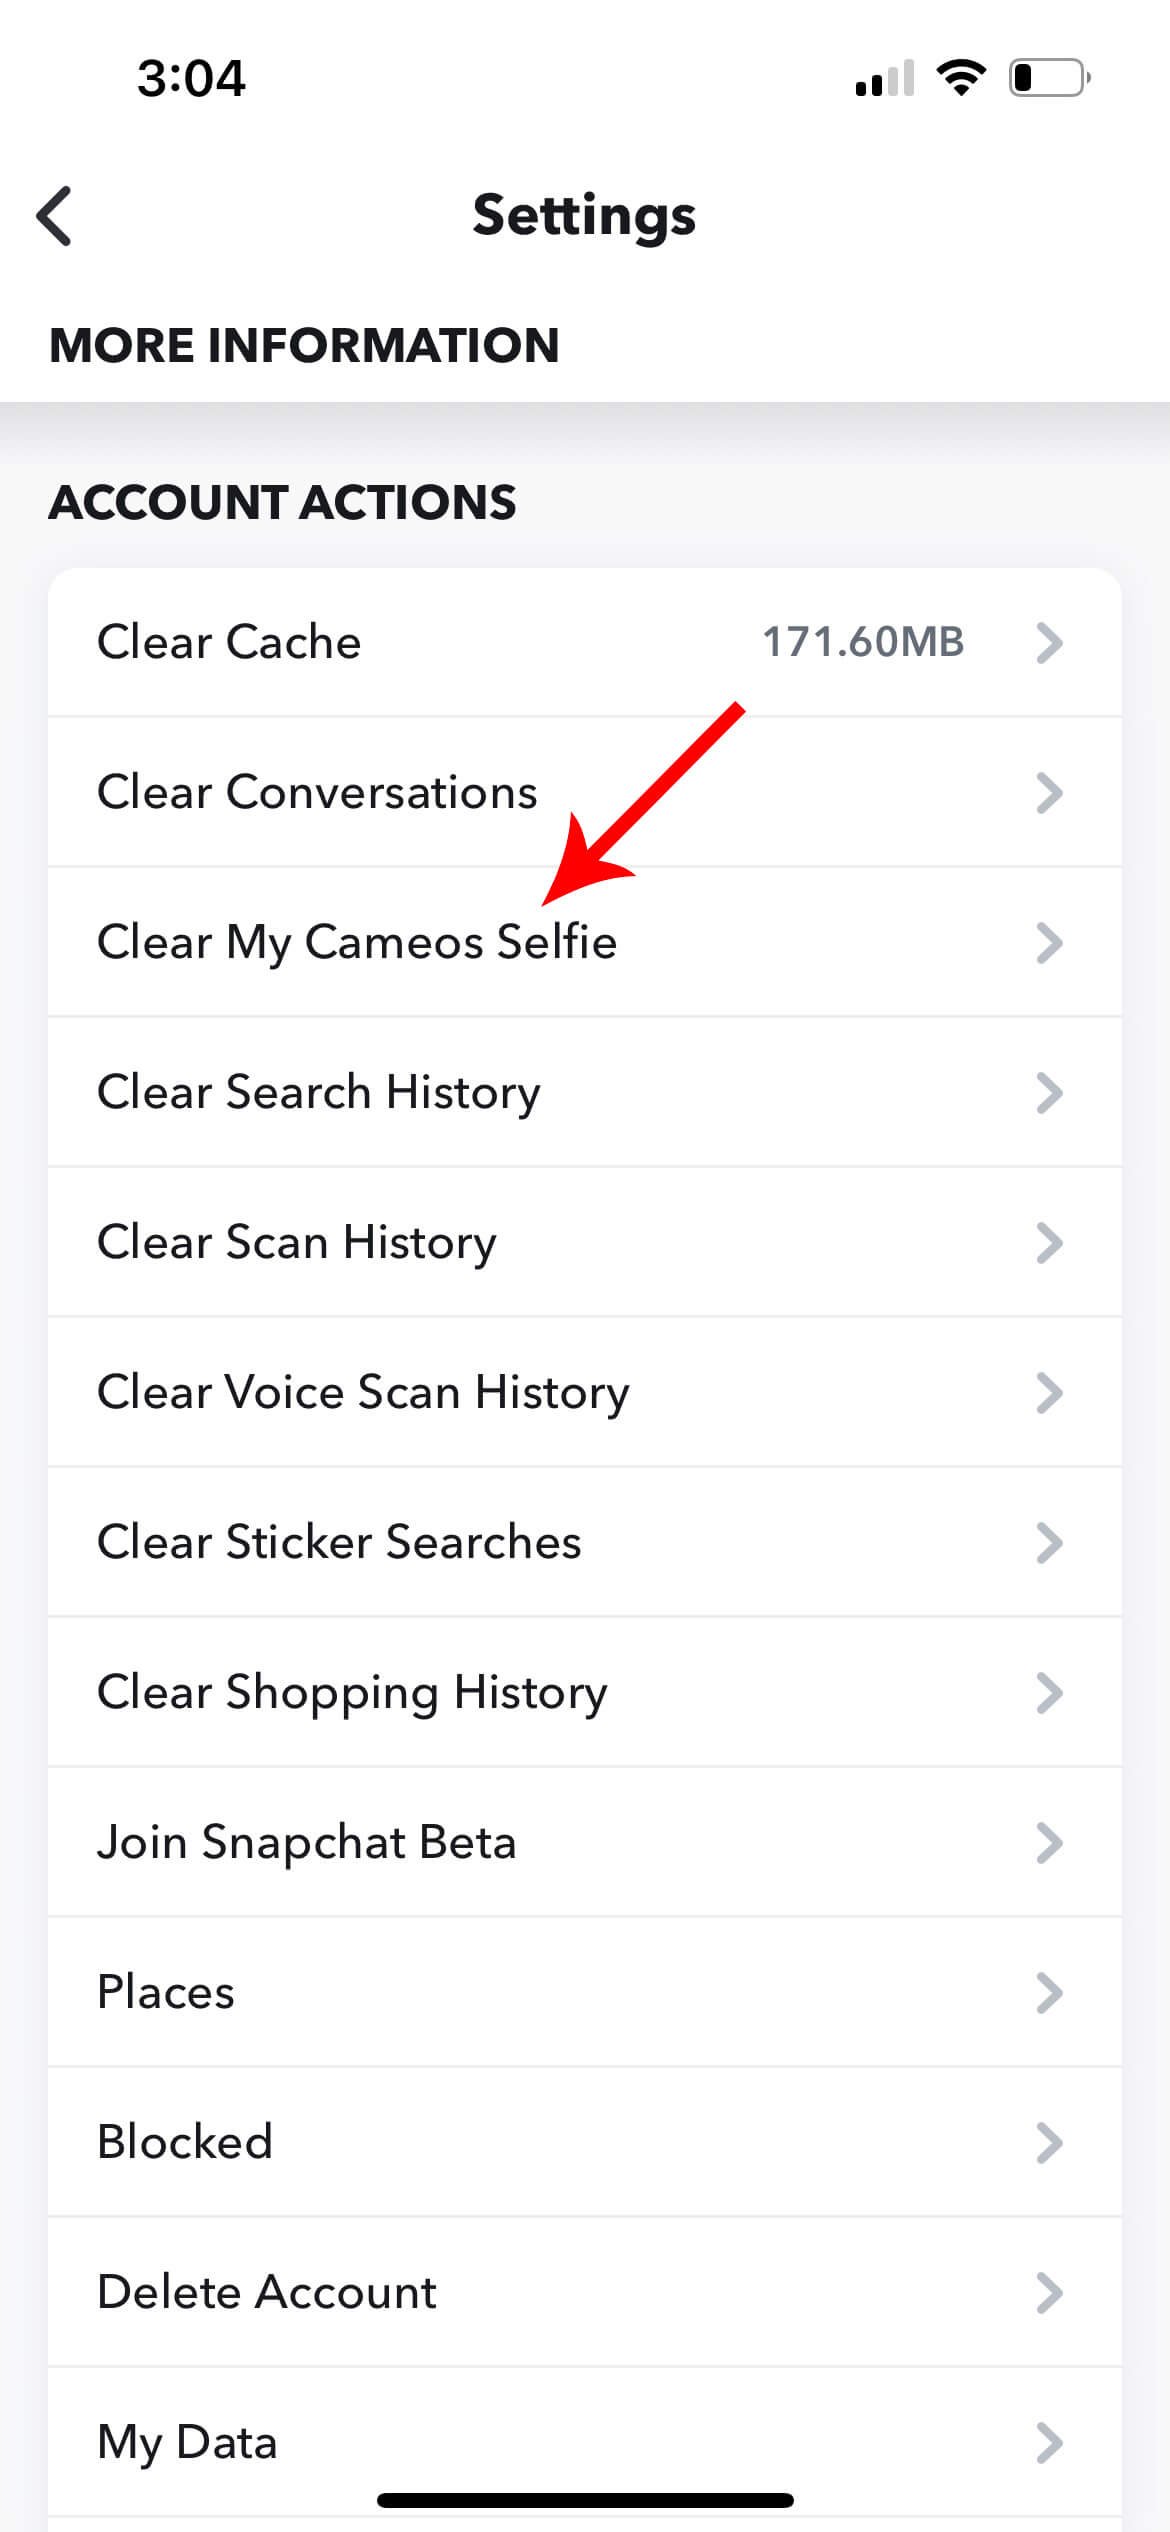
How to Get Rid of Your Selfies and Cache Data?
Yes, you read that correctly. You may also clear your cache and selfie data from Cameo. How? This is how it works –
1. Go to Settings on your computer.
2. Select Account Actions from the drop-down menu.
3. Select Clear to Finalize from the Clear Cache menu.
4. Finally, pick Clear My Cameos Selfie and press the Clear button one again.
How to Delete Snapchat’s Most Popular Locations?
Snapchat retains your location data and keeps track of your favourite spots. These, on the other hand, can be simply removed. Here’s how to go about it.
1. Open Snapchat and select Settings from the menu.
2. Select Account Actions from the drop-down menu.
3. Select Clear top locations from the Places menu.
Your Snapchat Recents is a list of all of your app’s actions, including chats and pictures. Although you cannot delete the list directly, you can delete conversations and browsing history.
How do you Hide or Reset your Snap Score?
There is no way of hiding your Score on Snapchat. Blocking someone is the only effective way to keep them from viewing it.
Individuals can’t see who you’re Snapchatting with when your Snap Score rises; they can only see that you’re exchanging Snapchats with someone.
Even if you erase them from your recents, if somebody is watching your activity based on your Snap Score, they may notice you are talking to someone.
How do you Avoid Individuals from Showing Up on your Recents?
Regrettably, there is no way to prohibit somebody from appearing in your recents completely. They will be immediately promoted to the top of your recents list if they snap you or you snap them.
Final Words
It merely takes a few seconds to get rid of someone from your recents list and delete your history on Snapchat with them. While there is no way to hide someone entirely, you can keep them away from your recents list permanently if you remain on top of everything.
Are you new to TikTok and want to know how to see favorites on TikTok?
When browsing TikTok it is quite common to come across some attractive or relatable videos that you would like to save.
Thankfully, TikTok’s designers considered this. It takes very little effort to save your favourite stuff to the “Favorites” section, where you can quickly find it.
This is how you can get to your Favorites in the app.
How To See Favorites On TikTok: Just 4 Steps
It’s just as easy to get to your Favorites as it is to get to your Likes –
1.Open TikTok app in your mobile.
2.Select the Profile tab.
3. Next to the Edit Profile button, click the bookmark icon.
4.Select All Favorites from the drop-down menu to go through all of your favorited videos or a specific collection.
You may also make a new collection here by selecting Create new collection.
How to Add Videos to Your Favorites?
Adding videos to your favourites is a method to make your TikTok experience more comfortable if you’re a newbie still discovering how to use TikTok.
To add videos to your TikTok favorites, follow the below steps –
1. Go to the bottom right corner of the page and tap on your profile symbol.
2. On your profile page, click the favourites symbol next to Edit profile.
3.Go to the video area and look for your favourite videos.
How to Delete a Favorite on TikTok?
Here’s how to delete a Favorite if you accidentally saved a video or if you’ve chosen to clean up your collections.
1.Open your TikTok profile and go to the Favorites area.
2.Select the collection that contains the TikTok you want to delete from the drop-down menu.
3.Select the video you want to delete.
4. Select Remove from Favourites from the share button on the right-hand side to erase it.
Individuals who want a place to keep all of the random movies they encounter on their For You Page will find the Favorites function extremely useful.
How to Favorite a Hashtag (#) on TikTok?
Hashtags are a crucial component of social networking.
It doesn’t matter if you’re on Twitter, Instagram, or Facebook. You can use hashtags to make yourself stand out from the throng. Some of the more fun hashtags that have made the rounds in the past are #Fashion and #Travelblogger.
So, you might want to store a hashtag so you can later find videos linked to it. In any case, you’ll need to use that hashtag to find what you’re looking for.
To begin, log in to TikTok and navigate to the discovery page. You can either put in the hashtag you’re looking for or skim through the results to select one you prefer.
What’s the Difference Between Heart and Favorite on TikTok?
To mark a video that you like, simply click the heart icon on the right side of your screen.
When you go to your profile page, the videos you selected with the heart icon will appear right away.
You can use this feature to look through clips that you enjoy. It’s easy to have a lot of favourite videos and then have problems searching the one you want to watch again later.
TikTok’s Extra Features with Favorite Function
You can save more than simply videos with this feature. It will automatically show you your favorited videos once you are on the favourites screen. In addition, you may keep track of hashtags, sounds, and effects.
You can navigate through the favourites at the top and select the sort of favourites you wish to see.
It’s also simple to save a video’s hashtag, sound, or effect.
The audio, the name of any effect used in the video, and the hashtags in the video description may all be found in the lower-left corner of the screen.
To save a hashtag, sound, or effect, simply tap it, and you’ll be taken to a new screen.
At the top of the page, a bookmark symbol says “Add to favourites.” By tapping that symbol, you’ll be able to add whatever you’ve selected to your favourites page.
Only you have access to your favourites, just as you do not have access to what others have bookmarked under their profile. The Bookmarks or Favorites feature on TikTok should not be confused with the Liked Videos tab on a user’s profile.
Can you See Who has Saved your Videos on TikTok?
TikTok does not alert users when one of their videos is saved. Anyone can store or download your movies and take screenshots of your account if you have made it public.
Final Words
TikTok has plenty of entertaining and educational videos to keep your attention hooked to the app. Thankfully, you can save a movie to your favourites folder if you like it. You’ll be able to refer to it at any time.
Businesses need data that help them predict consumer behavior, market trends, and decision-making. However, with so much data on the web, a manual collection is labor-intensive and nearly impossible. You can use a scraper API (Application Programming Interface) and web scraping to automate the process.
Unfortunately, there is an ongoing data harvesting war pitting the two. Each method has its proponents, but efficiency depends on the type of business you run and your target outcome. In mention, web scraping uses third-party bot software to extract data, while APIs give you direct access to the data.
As a business competing in the modern, fast-paced market, you need to use a scraper API. This is because it has the benefits that make it the best for data collection and timely implementation. Read this article for the benefits of using this method and more info on it.
Benefits of Scraper API
Easy Integration
Scraper API is user-friendly and easy to integrate. In addition, you can flawlessly plug it into the existing running data extraction process. This feature is possible because APIs don’t require installing browser plugins, tools, databases, or proxy servers.
Quality Data
Unlike web scraping, which provides entire web page content, an API enables you to target the specific data point. This will get you high-quality data without requiring strict parsing to filter relevant information. Therefore, you will save time and resources by harvesting data using scraper API.
Built-In Solutions To Scraping Challenges
Scraping data online has challenges like Javascript rendering, bots, captchas, frequent structural changes, and IP rotations. These challenges distort the data you collect in most instances. Luckily, scrapers APIs have a built-in solution for these problems.
Cost-Effective
A scraper API should be your go-to method for data collection if you work on a shoestring budget. APIs can be paid if you are using them economically or free if it’s already paid for services like analytics. However, note that some free APIs are charged once you have extracted a certain amount of data.
In contrast, web scraping projects that require outsourcing are costly. Other than that, its time consuming to create a bot used in web scraping. For that reason, it will be best if you use APIs.
Fast Data Scraping
Data extraction using an API is faster due to its complex features and because developers can prune slow proxies to get you unlimited bandwidth with high speed. As a result, you will obtain extensive volume data with less effort.
Effective Data Management
Copy-pasting data from online sources can lead to distortion. Using APIs enables you to extract data accurately and then safely store it within a cloud database where you can access it. This feature makes using this tool efficient in data management.
Customization
Web developers change website design occasionally, which calls for monitoring if you use web scraping to extract data. However, using APIs doesn’t require constant monitoring once you’ve fulfilled the initial request. This is because the scraping APIs customize themselves to any changes that may occur, giving it full potential to achieve the scraping goals uninterrupted.
Legal
Data scraping is legal, provided the data is public. But there is a difference between using scraper API and web scraping. You have legal guidelines when using APIs, such as not sharing your API access with third parties. However, the legality only sticks if you don’t use the data to attack the source website.
In comparison, web scraping has no guidelines and can get you in trouble if you scrape personally identifiable information. Note that a disclaimer will appear if you scrape personally identifiable information.
Stable
The website you are harvesting data from can block you when you use web scraping because it affects its infrastructure. This feature makes it unstable and disadvantageous compared to APIs. You won’t be detected as a malicious entity when using an API since the source website authorizes access.
In addition, the source website can help you face any challenges while scraping. This is a stark difference compared to using bots because the source website doesn’t know of your bots’ presence.
Increases Productivity
The competition in business doesn’t allow time to create new bots for data harvesting, and many are looking for a quick and innovative way of prototyping using similar API solutions. With scraper APIs, developers can quickly implement existing tools to collect data for your business.
Enhances Customer Experience
Your business needs real-time data to learn how to improve your service delivery timely. APIs feature makes it the best to deliver accurate data on time. In addition, the sharing ability of the data extracted using this method makes improving customer experience in your business fast.
Conclusion
You can no longer down play the importance of data in your business decision-making, lead generation, and pricing optimization. But with the benefits of extracting data you have read, you can make an informed decision to use a scraper API to extract data; just contact expert developers for this tool and more info.
Music has the potential to increase your productivity. Music can help you relax and put your mind in the appropriate frame of mind, as well as make you feel less anxious and sluggish. This increases the efficiency of your workday.
When employees listen to music, nine out of ten are more productive. According to a study, when music was playing, participants scored higher and finished their most efficient task 81% of the time.
However, it is based on the genre of music you enjoy. If you are interested in music at work, here is a list of music-related apps that are free to help you choose the perfect music for your workplace.
A pro tip is to have a strong internet connection to enjoy uninterrupted music even when you are at home. We recommend to contacting the CenturyLink customer service number and opting for one of their internet packages due to their positive customer reviews and affordable packages.
TuneIn allows you to find and save local stations as well as listen to them. This is a fantastic alternative for folks who need to locate something quickly. You can also type in the name of an artist, song, or music genre to view a list of radio stations linked to that singer, song, or writing style.
2. Spotify
We’ve all experienced the pleasure of listening to newly released songs on Spotify. The application (which has both a free and a premium edition) has over 30 million songs by well-known and emerging artists. You can make your playlist, follow other people, or find a playlist that suits your mood (e.g. concentration, ease of listening, etc.)
Every couple of songs, you’ll see a little advertising about focus, easy listening, and other topics.
3. Pandora
Another one we have had on this list is Pandora. It is similar to Spotify’s radio function, and both are the most powerful competitors in the marketplace. It is a streaming music application that lets you pick stations based on your top artists and explore new artists. They curate music you like (unlike the Spotify playlists).
Pandora also has a paid or premium subscription. The free version is limited to small ads and limits the number of times it can skip tracks.
4. SoundCloud
SoundCloud is a sleekly distinct concept. It’s randomness similar to the social web for music, but it’s an app for music. DJs and users have the option of uploading their tracks, music, and podcasts. You can check out their tracks and follow their followers and favorite tracks or make your own.
5. Musi
Musi is a simple to use app that lets you create your plats based on YouTube videos and SoundCloud tracks. You can browse through genres and music, search for popular songs, and swerve.
Moreover, you can also adjust the tone settings. The number of lists you can make is endless; however, it’s not ad-supported randomness.
6. Amazon Music
Amazon is another Goliath having a music app with an incredible assortment. They, like Google and Apple, have access to a big database, ensuring that you always have the most recent songs, albums, artists, and so on.
You can upload up to 250 songs to the app and then have them synced across several devices. It is easy to use, has a fantastic User Interface, and works on a variety of devices.
7. Google Play
The most appealing feature of Google Play is that it lets you upload your music ads-free (exchangeable with iTunes). It is possible to upload up to 50,000 songs along with their music offering.
Google Play is an excellent alternative if you already have your music and want to listen to it with a streaming music app.
8. The Future FM
This is relatively something new. It is a free streaming platform for music and offers DJ mixes, live sets, and live shows from concerts, nightclubs, festivals, and nightclubs. The initial idea is to release long-form DJ content by the best DJs in the world.
Contrary to the previous applications, it is different by offering a unique music experience. It may not be suitable for every workplace; however, it is certain to keep you entertained.
9. 8tracks
8tracks is a free radio app that allows users to listen to ad-free music in 8-track playlists.You can listen to the most popular and trending mixes, selections of staff members, and more. You can also search for music for songs, artists’ genre, or music style.
10. Slacker Radio
Slacker is a no-cost music application that allows you to choose an artist you love and stream pre-programmed radio stations. It also lets you create new stations and playlists and ensure that you are aware of your top songs, most played songs, and more.
Conclusion
If your team is experiencing an afternoon slump, turn on any of these applications to play around with the music. You will never know how the power of a few Elvis songs can improve your team’s efficiency.
Gaming is one of the most popular pastimes in the world. According to PRNewswire, It has become a $200 billion plus industry, with people playing video games on computers, consoles, tablets, and phones.
Gaming has become a source of entertainment, a source of education, and a source of relaxation for many people. Playing video games has been shown to improve your memory, critical thinking, and visual perception.
Gaming requires a lot of training to perform well. It requires the ability to think quickly, react quickly, and process a lot of information.
To perform well in video games, you need to be able to train your brain. This article will discuss some of the training required for gaming. We will also provide a review of the best game training tool.
Gaming is an activity that requires a range of skills and abilities. To perform well, there are a variety of training required, such as training your aim, your shooting, your reaction time, and more.
Here, we will recommend you the best tool to train yourself for gaming. We have introduced you to Click Counter – the all-in-one tool for gaming practice.
One of the most effective ways to train in any aspect of gaming is to play games that polish certain gaming skills. Click Counter helps you to accomplish this with ease.
Playing games trains your brain in the same way that practicing a sport or a skill does. So, let’s begin.
Why to use Click Counter Tool?
1. Up to the Mark UI
The UI of the tool is simply stunning. The dark mode of the tool provides a next-level gaming touch to it. The various tools like the Scroll Test tool or Drag Test tool are all well-built and presented.
Plus, there are no distractions in the tools and users can take all the tests with zero disturbance to improve their gaming skills. User experience will not be an issue while using this tool.
2. Live Performance Check
Live and Fast Performance check is a required feature in any of the test tools and clickcounter.io has exactly this feature that helps users track their progress in real-time.
For example, if you are taking the Click Speed Test, the number of clicks registered will be displayed just as you keep clicking along with the CPS generated and as per thoughts, this feature is pretty cool.
3. Fast and Ads Free
The tool is so lightweight and easy to load on any browser or device and none of the browsers or devices has witnessed any ads or lagging in any of the tools on the Click counter. Thus, the Click counter is reviewed Fast and Ad-Free.
4. Safe for Online Users
One of the major benefits the tool offers is that no third-party application is needed to use any test. And hence, no chances of any fraud or payment prompts can be seen while using this tool.
Also, the website does not ask for personal details for login purposes. Thus, using this tool is marked safe to use for online users.
5. Quick Support
In case the user encounters a bug or has any query, it can be solved easily by the support team. Users can fill out the contact form about the trouble they are facing and it is sorted much faster compared to other gaming trainer tools.
Benefits
Gamers Can Take Multiple Tests Required for Gaming
1. Click Speed Test
The Click Speed Test is one of the best tools to test and improve your Clicking speed. Using this tool, users can track how many clicks they have made and what their CPS score is.
As mentioned in the features of this tool, the stats can be tracked in real-time so you do not have to wait for the results and can analyze where you are getting weak while taking the test.
Also, there are different time modes of Click Speed Test available- 1, 5, 10, 15, 20, 30, 60, and 100 sec which the users can test their clicks on. There is no lagging in the test and users can train peacefully.
2. Aim Training
Aiming is one of the most needed factors in gaming and so is the training needed for it. The aim trainer at Clickcounter is one of the best aiming practice tools ever.
The customization that comes in the form of easy, medium, and hard levels, Target Size, Shape Color, Cursor Type, and the time for which you wish to take the test, all of them make this trainer worth using.
Though this tool is designed to improve your aiming skills in FPS games, the concept of the tool will help you to enhance your reaction time and Actions per minute too. class=Section2>
Unique and Interesting Concept
Some tools from the Click counter are designed with a unique concept that makes testing fun and interesting. The tools like drag test and scroll test have remarkable idea which you must use once. Their idea of turning basic tests into game is remarkable.
1. Drag Test
The drag Click test is extremely unique in its concept. In this test, a figure is displayed and single or multiple targets are displayed at other parts of the screen connected via arrows.
The user has to move the figure from origin to destination moving through the path portrayed by arrows. Just as you complete one level of the training, it takes you to an advanced next level till you pass the test.
At the end of the test, this tool tells you if the mouse that you are using is working properly, or not.
2. Mouse Scroll
In the entire tool bundle, the mouse scroll test has the most unique concept of all. In this tool, a delivery boy can be seen on his bike while delivering packages.
The faster you scroll using the mouse, the faster his speed is shown above the playing area in terms of KMPH or Kilometers Per Hour.
The concept is interesting and worth giving a shot at. This test can prepare you for scrolling activities in gaming. Also, we like the idea of measuring the pixels in the KMPH unit. The tool is strongly reflecting its unique idea.
While others are being copycats, the clickcounter team brings innovation to their product and stands out from the competitor.
Benefits for Typist
1. Keyboard Counter
The keyboard counter tool focuses on every key of the keyboard and not just one. The tool helps count each keystroke registered and tells you which key you have pressed.
This tool is all set to improve hand-eye coordination which is a necessary skill for typists. Also, keyboarding skills can be improved using this keyboard counter and typists can practice different typing methods too.
The keyboard counter tool is intentionally made for testing keyboard function.
2. Equipment Tester
Using tools like mouse tester and keyboard counter, users can test their equipment like a keyboard and mouse in one place.
The equipment testing is ideal for testing the functioning of peripherals as well as checking how efficient you are at using the peripherals you own.
The equipment testers at clickcounter.io are much recommended as they are accurate. It seems like the developers have worked hard in designing these tools.
3. Use Anywhere
In daily life, tools like online counter are used on mobile for counting purposes. But the problem with other tools is most of them aren’t accessible on mobile phones. Why would anyone use the laptop to count stuff?
Click counter brings a solution to this problem by making the tool mobile-friendly. Users can use this tool on any device to count things like exercise reps, candy, scores, etc.
You can use this portable version of the tool in group activities or when you are bored and want to see how many counts you can hit.
4. Guidance for Beginners
In this click counter tool, an assistant is set to guide the new users to use every tool so they can make the most out of it. Usually, these types of guides are seen in paid tools but here, it is a great job done in a free tool.
Drawbacks
Number to Words
One feature of the tool, called Number to Words, is a pretty good one. In this tool, any number you type would be converted into words, up to 9 digits.
However, this tool might not be helpful for any gaming purpose as nowhere in gaming you would require a number to be converted into words. This might be a drawback but as such extreme, as this feature is unrequired in any kind of gaming.
Opinion
Aim trainer can be Better
The clickcounter.io is a pretty great one in all aspects- the tools, UI, reliability, and concept are all top-notch. But still, it can be better in some concepts like Drag Test, and scroll test. The concepts of aim trainer can be better like the Drag Test and Mouse Scroll test.
A unique concept such as this might attract more users and make them stay and look forward to other levels and tools.
The Purpose
The developers of the tool claim – “Gaming is the fastest growing industry. We see a great future in this field. The rapid growth also leads to more competition.
We want to use our strength to help gamers and keep them prepared in this competitive niche. Hence, we come with a purpose to provide handy solutions to gamers by developing advanced user-friendly tools”
We can see that the clickcounter team is really focused on gamers. We can see their words in their work. The concept of the tool proves it very well.
Conclusion
Click counter is a pretty decent and helpful tool that may prove beneficial for gamers, typists, and also to test equipment or get used to the devices.
It is for sure that users will not be distracted by any annoying pop-ups or emails asking them to buy a premium subscription and they can train in peace. Here are all types of tools included for gamers to typists to polish their skills. Overall, clickcounter.io is worth it and we recommend trying it to train to get the best results in gaming.
Here, I will explain the complete process of Home Depot Health Check login at healthcheck.homedepot.com portal and will also discuss all the features and benefits of THD Health Check for US based associates, employees, and SSC Non-Associates.
So, let’s get started –
The portal healthcheck.homedepot.com is for US associates and SSC Non- associates. You get access to this portal in your scheduled shift. You need to fill out the form after you clock in to join the service. While working, you need to follow all required health and safety standards.
Home depot health checkup time is an opportunity to receive health checkups free of cost for your whole family.
What is Home Depot Health Check?
Home depot wellness check app (healthcheck.homedepot.com) is designed to keep the customers and associates completely safe.
The sole purpose of the THD health check app is to determine whether or not the employee must be allowed to work or not in existing circumstances. The health check status of US and SSC associates is contrasted with the help of a short questionnaire filled up by employees when they report for their work.
The employees of Home Depot are evaluated for gathering data for analysis and when the government makes a request.
In simple words, a Home Depot employee health check is to make sure that the employees are free from any health issues. This was useful mainly during the Coronavirus pandemic.
Requirements to Login at HealthCheck.HomeDepot.com
A stable internet connection.
Laptop or PC with the latest version browsers.
User ID, which is either AIS ID or LAN ID.
Authentic store no.
Home Depot Health Check Login Steps
1. First, open the official Home Depot Health Check login page at https://healthcheck.homedepot.com/.
2. Next, select the type of your role (Associate or SSC Non-Associate).
Welcome to The Home Depot Health Check Portal
3. On the next page, Click on Ok to proceed further.
4. Now, THD Account Sign On page comes up. Fill in your User ID (LDAP), Password, and hit the Sign In button.
THD Account Sign On Page
5. Next, complete the following brief Home Depot Health Check questionnaire.
Done, it helps the company either you are eligible to work or not at the moment.
Things to Consider
While reporting for work at Home Depot, all employees are asked to give respond to the brief survey.
Aggregate and de-identified data from the questionnaire can be used and then shared for analysis and reporting purposes until it is prevented by any health authority or any government agency.
The information and privacy protection policy of THD offers information on how Home depot makes use of personal data.
As per Home Depot’s performance needs, offering false information on the questionaries’ or completing it on days when you are not working is considered fraudulent behavior.
Benefits of Home Depot Associate Health Check App
The employees get a chance to check their blood pressure and other such parameters at any point in time. This is one of the best ways to consistently monitor employees’ well-being, especially those who work for long hours standing or doing some strenuous activities. It assists the company in recognizing any issues before it starts.
This is one of the best ways for those employees who are needed to sit in front of the computers all day and work. They do not get enough exercise or any movement all through the day.
The home depot health check assists them in staying healthy and offers them the required strength for performing their tasks in a better way.
Frequent health checkups assist employees in controlling or stopping diseases that are very common among people who work for long hours.
The app is perfect for employees who are handling dangerous equipment. It helps them keep track of their health conditions and offers immediate feedback when they have problems avoiding accidents at work.
The home depot health checkup app helps workaholics relax and calm their nerves after long hours of labor. It decreases the possibility of common diseases such as heart attack or stroke.
Thus, the home depot health checkup program benefits both employees and employers as the company will have a satisfied workforce who knows that they are healthy for working efficiently day in and day out.
In 1978, Bernard Marcus and Arthur Blank, Kenneth Langone, and Ron Brill Pat Farrah founded Home Depot. At that time, it was called Handy Dan Improvement center. It is now one of the best home improvement retailers with more than five lakhs employees and associates. It offers various tools and services for the following department.’
Building materials
Flooring
Hardware
Paint
Electrical / lightning
Paint
Plumbing or Bath
Home Depot Health Check Support
In case you face any issues with Home Depot, then you can contact customer care at 18004663337 or visit their Official website: Homedepot.com.
FAQs on THD Health Check
Is There a Mobile App for Home Depot Health Check?
Home Depot Health Check is a web based app that can be accessed via this URL healthcheck.homedepot.com. It doesn’t have any mobile app to download on your android or iPhone.
Can I Login to the Home Depot Health Check Portal from Home?
According to Home Depot’s privacy policy, accessing the THD health check account from home is subject to disciplinary action against the responsible associate or employee. It should be used only when you clock in at work.
Who Can Use the Home Depot Health Check Form?
The Home Depot health check form is designed specifically for THD associates, SSC Non-Associates, Vendors, Contractors, Employees, and Visitors entering the Atlanta SSC.
Wrapping Up
So, this was all about The Home Depot Health Check portal and how associates, vendors, visitors, and employees can use it to get wellness benefits the company has to offer.
If you are a beginner, then how to tame a panda in Minecraft might be crossing your mind.
Pandas are creatures in Minecraft that live in trees and like jumping from one to the next.
Players can tame pandas, but first, they must become acquainted with them before deciding to tame them.
These larger animals can be found wandering across forests. They’re usually found around their preferred food, Bamboo, which is crucial to taming them.
Usually, while playing Minecraft, you will come across various animals such as horses, foxes, and cats, but the gentle, loving Panda is the rarest.
How to Tame a Panda in Minecraft?
It’s a simple operation, but because these lazy Pandas typically breed like other animals in Minecraft, it may take a little longer. You’ll need to keep feeding them Bamboo until the hearts emerge above your head, and you may pull them closer together.
Follow the below steps to tame a panda in Minecraft –
1. You must first locate Jungle Biome. In a Jungle Biome, they are an occasional spawn. However, they are more abundant in the Bamboo Jungle.
2. As you’ve discovered the Biomes, you’ll notice Pandas in groups of two or three.
3. You’ll now require Panda’s favourite food item. Bamboo is Panda’s favourite food item, so you’re in luck.
4. So, go out and gather some Bamboo from the area.
5. Now, feed the Panda Bamboo. It’ll take a few tries to get it right. You may just drop the Bamboo in front of them and they’ll pick it up and eat it.
6. You’ll must keep trying until the Panda you’re feeding starts to produce Hearts.
7. The Panda gets tamed as the Hearts start to appear.
8. You can also use additional Food Item to tame a Panda. Surprisingly, you can tame them with a Cake.
9. You must place the Cake in front of them to pick and eat it.
Panda breeding necessitates the fulfilment of certain requirements. To begin, both Pandas must be within a 5-block radius of at least 8 Bamboo blocks.
Then all you have to do is serve each Panda some Bamboo to make them fall in love and give birth to a Baby Panda.
Keeping Pandas in an enclosed area and planting Bamboo is the quickest way to breed them.
When a baby is born, it will be passive rather than neutral to the player.
If you feed a Panda without the necessary Bamboo blocks around, it will devour the Bamboo rather than enter love mode. However, feeding Pandas too close to the player will make them hostile.
Panda Personalities and Appearance in Minecraft
Pandas come in a variety of personalities, including normal, lethargic, playful, anxious, weak, aggressive, and brown.
Normal: They don’t have any distinguishing characteristics. They usually have frowning expression on their face.
Lazy: These pandas are the slowest land mob in the game since they normally lie on their backs and travel slower than any other pandas. Lazy Pandas do not follow players if they are lying on their backs in Java Edition, but they cease lying on their backs and start following the player in Bedrock Edition. They have happy expressions on their face.
Playful: Adults and children alike enjoy rolling over and jumping around. Because it can accidentally roll off a cliff or another high altitude, the Panda’s proclivity to roll will often inflict damage or death. These pandas have their tongues protruding from their mouths.
Worried: Usually avoids players and hostile mobs such as skeletons, creepers, spiders, and other similar creatures. When it’s storming, it hides its face and shakes. They also don’t consume cake and Bamboo by themselves. Their eyes are begging (puppy-dog-like).
Weak: As new-borns, they sneeze more than regular baby pandas, and their health is half that of other pandas. They have furrowed brows and a gloomy expression. Their eyes are teary, and their nose is runny.
Aggressive: This is the only non-passive Panda. When the player or other mobs are wounded, an angry panda continues to attack them until the prey dies or goes beyond the radar range. It does not fear when it is hurt, unlike other animals. When pandas in the area are attacked, these pandas become restless and fight. While they move slowly, they have a long reach, making them hard to fend off.
FAQs on Tame Pandas in Minecraft
How To Transport Pandas in Minecraft?
One of the most frequently asked topics about pandas in Minecraft is how to relocate them to a different location. Even though many tutorials still deny it, pandas may be transported by boat in Minecraft. Boats in Minecraft can easily transport pandas without exerting much effort.
How do you Feed a Panda in Minecraft?
Pandas can also be fed cake, which serves the same purpose as Bamboo. Staying too near to an aggressive panda for an extended period of time may cause it to become hostile. Baby pandas can roll around in the same way that joyful pandas do.
Can you Ride Pandas in Minecraft?
Players can tame pandas, but first they must become acquainted with them before deciding to tame them. If you want to tame pandas, consider learning how to raise pigs in Minecraft, as it will teach you about a variety of animals.
How to Cure a Sick Panda in Minecraft?
A sick panda cannot be cured. Because of its parents’ DNA, an ill panda will be born with a weak personality.
Can you Put Pandas in Boats Minecraft?
Pandas can be placed in boats. Because pandas are scarce and only spawn in jungle biomes, putting them in boats lets you lead them to your base.
Final Words
So that was how to tamed a Panda in Minecraft. By holding a Bamboo in your palm, you can return them to your base. As long as you have the Bamboo in your hand, they will follow you. They can be bred in the same way as other Mobs. Just make sure you surround them with a wooden fence.
This guide should have assisted you in taming Pandas in Minecraft.